SPRUJ64 September 2022
- Abstract
- Trademarks
- 1Key Features
- 2AM64x SKEVM Overview
- 3Functional Block Diagram
-
4System Description
- 4.1 Clocking
- 4.2 Reset
- 4.3 Power Requirements
- 4.4 Configuration
- 4.5 JTAG
- 4.6 Test Automation
- 4.7 UART Interface
- 4.8 Memory Interfaces
- 4.9 Ethernet Interface
- 4.10 USB 3.0 Interface
- 4.11 PRU Connector
- 4.12 User Expansion Connector
- 4.13 MCU Connector
- 4.14 Interrupt
- 4.15 I2C Interface
- 4.16 IO Expander (GPIOs)
- 5Known Issues and Modifications
- 6Revision History
4.3.2 USB Type-C Interface for Power Input
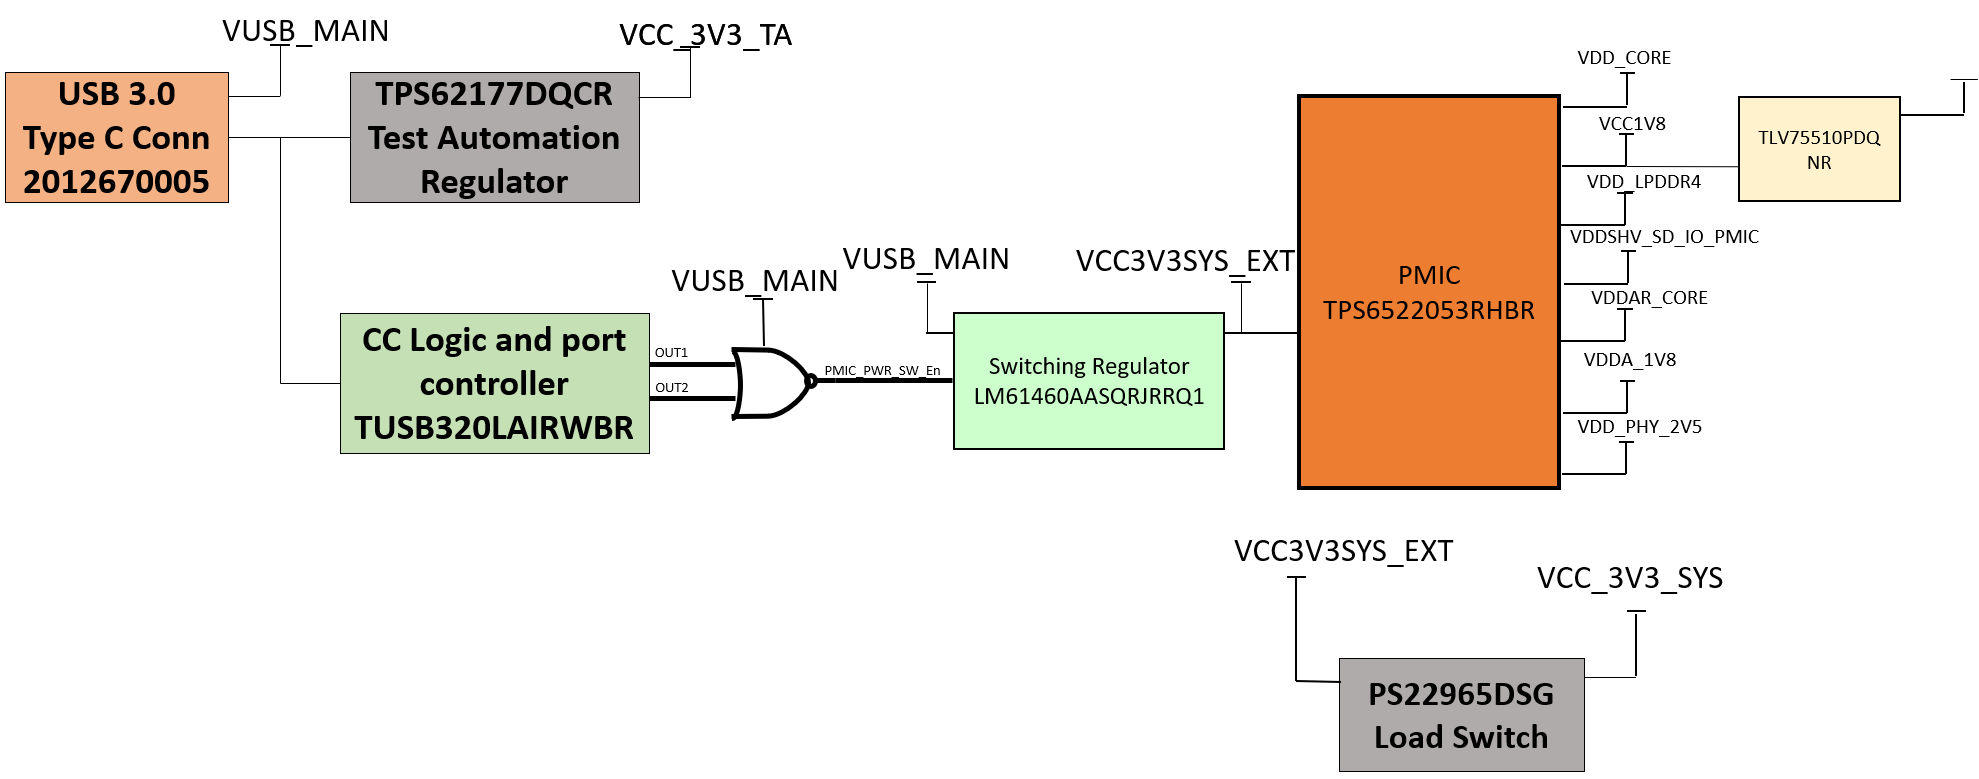
The AM64x SKEVM is powered through USB type-C Connector. The USB Type-C source should be capable of providing 3A at 5 V and should advertise the current sourcing capability through CC1 and CC2 signals. On SKEVM, CC1 and CC2 from USB type-C connector are interfaced to the port controller TUSB320LAIRWBR IC. This device uses the CC pins to determine port attach and detach, cable orientation, role detection, and port control for Type-C current mode. This IC allows for the pin swapping when the Type-C cable is flipped and inserted. The CC logic block monitors the CC1 and CC2 pins for pull-up or pull-down resistances to determine when a USB port has been attached, the orientation of the cable, and the role detected. The CC logic detects the Type-C current mode as default, medium, or high depending on the role detected. Pin PORT is pulled down to ground through resistor to configure it as UFP (Upward Facing Port) mode. VBUS detection is implemented to determine a successful attach in UFP mode. Pin ADDR is left open to configure it as GPIO mode. OUT1 and OUT2 pin is connected to NOR gate. Active low on both OUT1 and OUT2 pin advertises high current (3A) in the attached state which enables the switching regulator with part No. LM61460AASQRJRRQ1, which generates VCC3V3SYS_EXT supply, the input supply to the PMIC section. In UFP mode, the TUSB320 device constantly presents pull-down resistors (Rd) on both CC pins. The TUSB320 device monitors the CC pins for the voltage level corresponding to the Type-C mode current advertisement by the connected DFP. The TUSB320 device de-bounces the CC pins and waits for VBUS detection before successfully attaching. As a UFP, the TUSB320 device detects and communicates the advertised current level of the DFP to the system through the OUT1 and OUT2 GPIOs.
SKEVM power requirement is 5 V at 3A. If the source is not capable of providing 5 V at 3A, output at the NOR gate becomes low, which disables (LM61460AASQRJRRQ1) VCC3V3SYS_EXT Regulator. Thus, all power supplies except VCC3V3_TA does not come up.. Board gets powered ON completely only when the source is capable of providing 5 V at 3A.
 Figure 4-3 USB Type-C Interface for Power
Input
Figure 4-3 USB Type-C Interface for Power
Input| OUT1 | OUT2 | Advertisement |
|---|---|---|
| H | H | Default current in unattached state |
| H | L | Default current in attached state |
| L | H | Medium current (1.5 A) in attached state |
| L | L | High current (3.0 A) in attached state |