SWRU473A February 2017 – August 2018 CC3120MOD , CC3220MOD , CC3220MODA , CC3220R , CC3220S , CC3220SF
-
SimpleLinkrep%#8482; Wi-Fi® CC3220 Out-of-Box Application
- Trademarks
- 1 Introduction
- 2 Download and Installation
- 3 Installation for Basic Users
- 4 Building the Setup
- 5 Flashing the Out-of-Box Project
- 6 Getting Started With the OOB Demonstration
- 7 Troubleshooting
- 8 Limitations and Known Issues
- 9 Out-of-Box for Advance Users
- Revision History
9.3.2 Program a User Modified OOB Binary
When working in debug mode, the application binary is not programmed to the serial flash and is volatile. The compiled binary can be added to the project and create an image that is programmable to the device; this way, the application binary is programmed to the serial flash and becomes non-volatile.
For secured devices, users must add their own certificate chain (the TI private key which pairs the certificate cannot be shared). Nevertheless, to simplify the procedure TI also provides the option to use a self-signed certificate store (playground).
To have all out-of-box content such as the service pack, web pages, and other system and configuration files, a UniFlash project is required so the image can be programmed into the device. The UniFlash projects are available under the following locations according to the connected CC3220 flavor.
- For CC3220S secured device:
- For CC3220SF secured device:
<SDK install dir>\examples\rtos\CC3220S_LAUNCHXL\demos\out_of_box\uniflash\OOB_RS_tirtos.zip
<SDK install dir>\examples\rtos\CC3220S_LAUNCHXL\demos\out_of_box\uniflash\OOB_RS_freertos.zip
<SDK install dir>\examples\rtos\CC3220SF_LAUNCHXL\demos\out_of_box\uniflash\OOB_SF_tirtos.zip
<SDK install dir>\examples\rtos\CC3220SF_LAUNCHXL\demos\out_of_box\uniflash\OOB_SF_freertos.zip
Follow these instructions to program the image into the device (the first four steps are identical to Section 9.3.1, but are listed again here for completeness).
- Open the UniFlash utility to create and program the OOB image.
- Choose the CC3120/CC3220 device and then click the Start Image Creator button (see ).
- Click the Manage Projects button and then click Import project from ZIP file button. Locate the OOB project according to the connected CC3220 device. Projects already imported should appear on the list of available projects.
- For CC3220S secured device:
- For CC3220SF secured device:
<SDK install dir>\examples\rtos\CC3220S_LAUNCHXL\demos\out_of_box\uniflash\OOB_RS_tirtos.zip
<SDK install dir>\examples\rtos\CC3220S_LAUNCHXL\demos\out_of_box\uniflash\OOB_RS_freertos.zip
<SDK install dir>\examples\rtos\CC3220SF_LAUNCHXL\demos\out_of_box\uniflash\OOB_SF_tirtos.zip
<SDK install dir>\examples\rtos\CC3220SF_LAUNCHXL\demos\out_of_box\uniflash\OOB_SF_freertos.zip
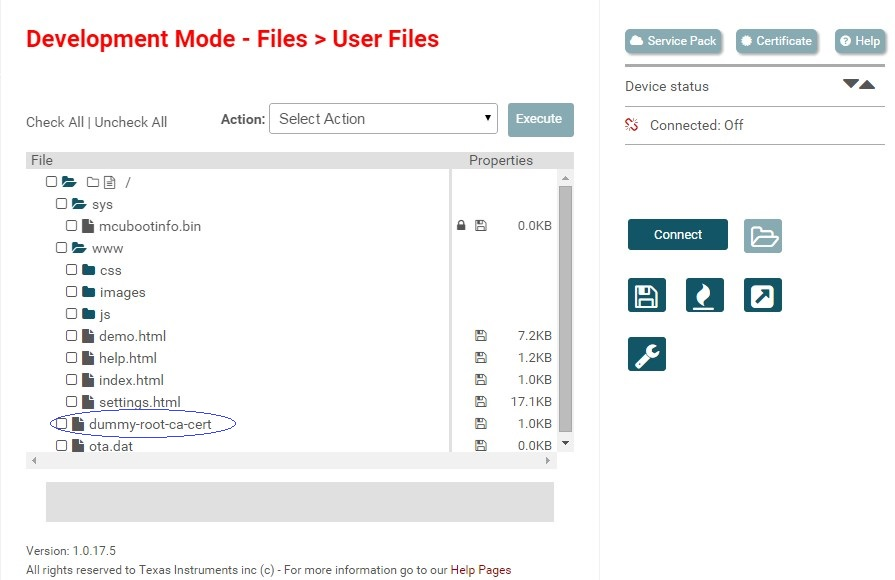
- Browse to see all files under Files → User Files on the left side tree. As shown in Figure 42, a dummy-root-ca-cert certificate is used in case an MCU image is added to the project.
- Create the MCU image for the project by making code modifications and recompiling.
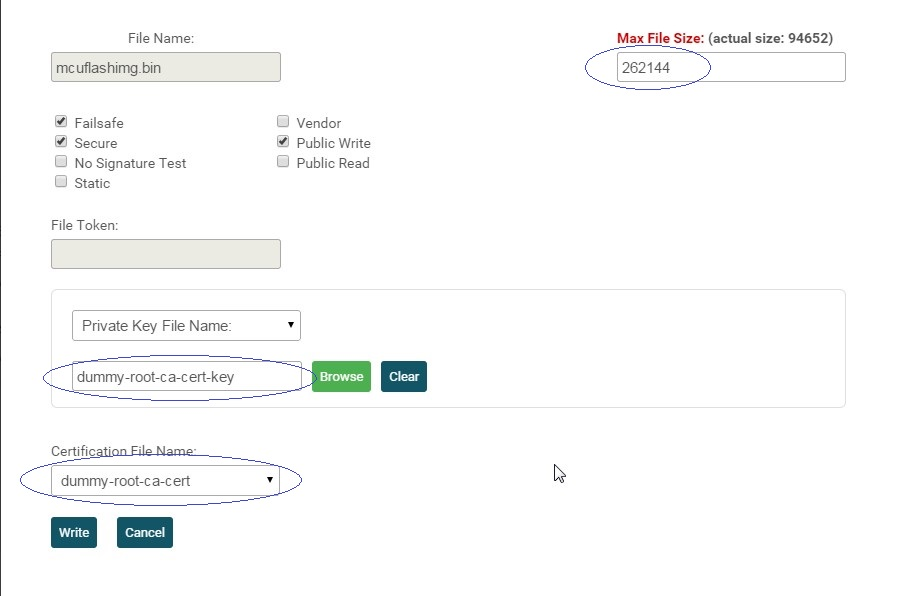
- Add the created application binary to the Image Creator project (see Figure 43):
- Browse to Files → User Files on the left side tree. The dummy-root-ca-cert certificate must be used if an MCU image is added to the project.
- Choose Select MCU Image from the Action drop-down menu and click the Browse button.
- Locate the compiled binary from Step 5 and select it.
- Because the MCU image is secured, the certificate and signature must be configured.
- To choose the certificate, choose dummy-root-ca-cert under the Certification File Name drop-down menu.
- To create a signature, leave the default Private Key File Name from the drop-down, click the browse button, and choose the dummy-root-ca-cert-key key which matches dummy-root-ca-cert-key and click the Write button. UniFlash automatically creates the signature. The key file is located on the SDK under <SDK install dir>\tools\certificate-playground
- Browse to General → Settings on the left side tree and configure the image mode to either Production or Development, either works (choosing Development enables debugging).
- Ensure the CC3220 LaunchPad is connected and click the Connect button. Users can see the device information of the connected device with their device MAC address.
- Save the project and click on the Generate Image icon on the right.
- Finally, click on the Program Image (Create & Program) button. The image is now programmed to the device.
 Figure 42. Root Certificate in UniFlash Project
 NOTE
For secured flash devices (CC3220SF), the default MCU image size is automatically set to 524288 bytes. This size is too large for the image (there are many other files as well). Set it to 262144 bytes.
 Figure 43. UniFlash Add Secured MCU Image
 Upon successful programming, the application starts running.