SWRU473A February 2017 – August 2018 CC3120MOD , CC3220MOD , CC3220MODA , CC3220R , CC3220S , CC3220SF
-
SimpleLinkrep%#8482; Wi-Fi® CC3220 Out-of-Box Application
- Trademarks
- 1 Introduction
- 2 Download and Installation
- 3 Installation for Basic Users
- 4 Building the Setup
- 5 Flashing the Out-of-Box Project
- 6 Getting Started With the OOB Demonstration
- 7 Troubleshooting
- 8 Limitations and Known Issues
- 9 Out-of-Box for Advance Users
- Revision History
9.3.1 Executing in Debug Mode
To execute in debug mode, the device must first be opened in development mode.
To have all OOB content, such as the service pack, web pages, and other system and configuration files, an UniFlash project is required so they can be programmed into the device. The UniFlash projects are available under the following locations, according to the connected CC3220 flavor.
- For CC3220S secured device:
- For CC3220SF secured device:
<SDK install dir>\examples\rtos\CC3220S_LAUNCHXL\demos\out_of_box\uniflash\OOB_RS_tirtos.zip
<SDK install dir>\examples\rtos\CC3220S_LAUNCHXL\demos\out_of_box\uniflash\OOB_RS_freertos.zip
<SDK install dir>\examples\rtos\CC3220SF_LAUNCHXL\demos\out_of_box\uniflash\OOB_SF_tirtos.zip
<SDK install dir>\examples\rtos\CC3220SF_LAUNCHXL\demos\out_of_box\uniflash\OOB_SF_freertos.zip
Follow these instructions to program the image into the device:
- Open the UniFlash utility to create and program the OOB image.
- Choose CC3120/CC3220 device, and then click the Start Image Creator button (see Figure 38).
- Click the Manage Projects button, and then click the Import project from ZIP file button. Locate the OOB project according to the connected CC3220 device. Projects already imported appear on the list of available projects (see ).
- For CC3220S secured device:
- For CC3220SF secured device:
<SDK install dir>\examples\rtos\CC3220S_LAUNCHXL\demos\out_of_box\uniflash\OOB_RS_tirtos.zip
<SDK install dir>\examples\rtos\CC3220S_LAUNCHXL\demos\out_of_box\uniflash\OOB_RS_freertos.zip
<SDK install dir>\examples\rtos\CC3220SF_LAUNCHXL\demos\out_of_box\uniflash\OOB_SF_tirtos.zip
<SDK install dir>\examples\rtos\CC3220SF_LAUNCHXL\demos\out_of_box\uniflash\OOB_SF_freertos.zip
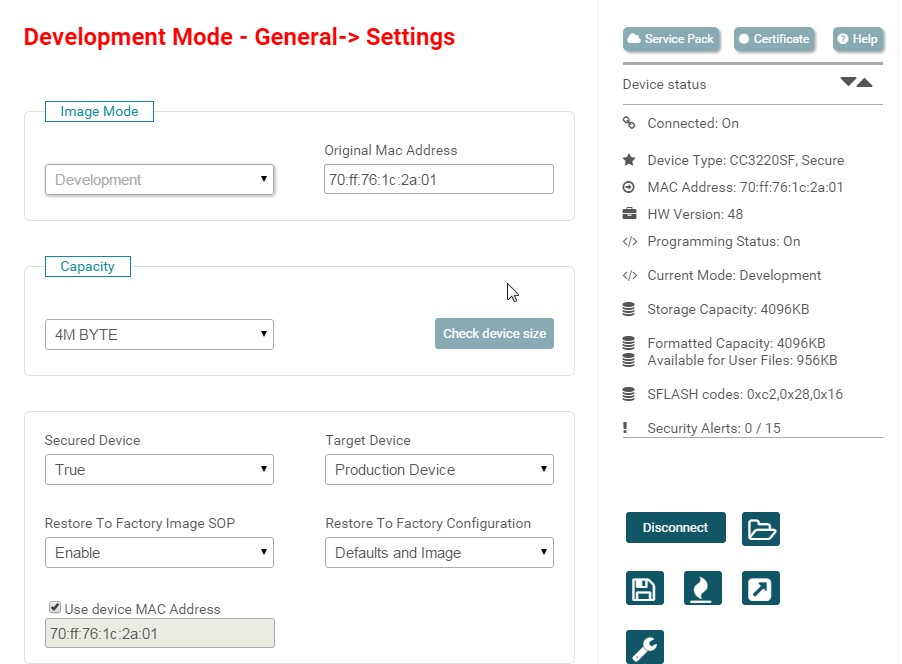
- Navigate to General → Settings on the left side tree and change the image mode to Development.
- Ensure the CC3220 LaunchPad is connected and click the Connect button. Users can see the device information of the connected device with their device MAC address (see Figure 39). This is important because the development mode is matched to the device MAC address.
- Ensure the Use device MAC Address box is checked and that your device MAC address appears on the top.
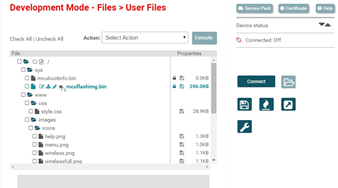
- Browse and see all files under Files → User Files on the left-side navigation tree.
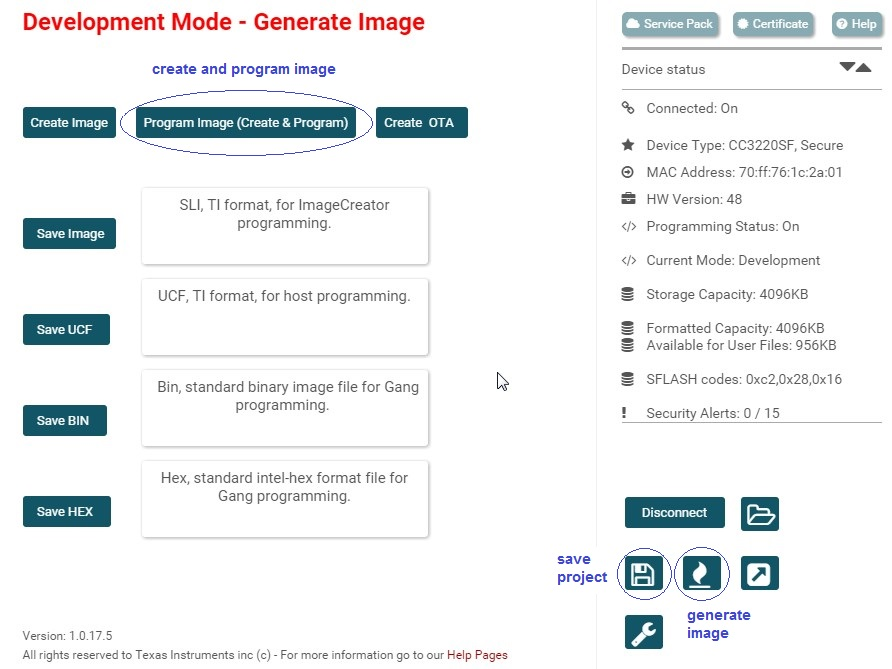
- Save the project and click on the Generate Image icon on the right side.
- Finally, click on the Program Image (Create and Program) button (see Figure 41). The image is now programmed to the device.
- Upon successful programming, open CCS, make your modifications and recompile.
- Click the debug icon and start debugging.
 Figure 38. UniFlash – Choose CC3120 / CC3220 Device
  Figure 39. UniFlash General Settings
 It is good practice if mcuimg.bin for the CC3220S device or mcuflashimg.bin for the CC3220SF device is deleted from the project (a backup resides in the original zipped project). This step ensures that the programmed application binary is not executed and that the code downloaded through CCS is executed (see Figure 40).
 Figure 40. Deleting Application Binary
  Figure 41. UniFlash Generate and Program Image