SWRU473A February 2017 – August 2018 CC3120MOD , CC3220MOD , CC3220MODA , CC3220R , CC3220S , CC3220SF
-
SimpleLinkrep%#8482; Wi-Fi® CC3220 Out-of-Box Application
- Trademarks
- 1 Introduction
- 2 Download and Installation
- 3 Installation for Basic Users
- 4 Building the Setup
- 5 Flashing the Out-of-Box Project
- 6 Getting Started With the OOB Demonstration
- 7 Troubleshooting
- 8 Limitations and Known Issues
- 9 Out-of-Box for Advance Users
- Revision History
5 Flashing the Out-of-Box Project
The CC3220 LaunchPad comes with all the required content flashed to run the application. If the device has never been used and just came out of the box, the following steps are not necessary. If users have already flashed other SDK applications and need to reprogram the OOB content.
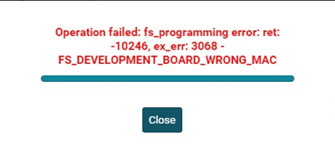
Because the OOB project is set in development mode (not production mode), the project matches a specific device MAC address. The image can be set to a new device MAC address through the GUI or through the command line (CLI). If users try to flash the image as is, the error shown in Figure 11 will appear.
 Figure 11. UniFlash MAC Address Error
 Using the GUI, perform the following steps.
- Ensure the setup is built according to Section 4. Jumpers setting must be positioned as in Figure 9.
- Ensure no other utility uses the XDS110 COM port(1). (1)
- Open the UniFlash utility to program the OOB image.
- Choose the CC3120/CC3220 device and then click the Start Image Creator button (see Figure 12).
- Click the Manage Projects button and then click the Import project from ZIP file button. Locate the OOB image according to the connected CC3220 and the desired OS (freertos or tirtos). Already imported projects shall appear on the list of available projects.
- <SDK install dir> \examples\rtos\CC3220S_LAUNCHXL\demos\out_of_box\uniflash\OOB_RS_tirtos.zip
- <SDK install dir> \examples\rtos\CC3220S_LAUNCHXL\demos\out_of_box\uniflash\OOB_RS_freertos.zip
- <SDK install dir> \examples\rtos\CC3220SF_LAUNCHXL\demos\out_of_box\uniflash\OOB_SF_tirtos.zip
- <SDK install dir> \examples\rtos\CC3220SF_LAUNCHXL\demos\out_of_box\uniflash\OOB_SF_freertos.zip
- Navigate to General → Settings (see Figure 13) by using the left-side navigation panel and ensure that the image mode is set to Development.
- Ensure the CC3220 LaunchPad is connected and click the Connect button. Users can see the device information of the connected device by using the MAC address; this is important because the development mode is matched to the MAC address of the device.
- Ensure the Use device MAC address option is selected (see Figure 13) and that the MAC address appear on the top.
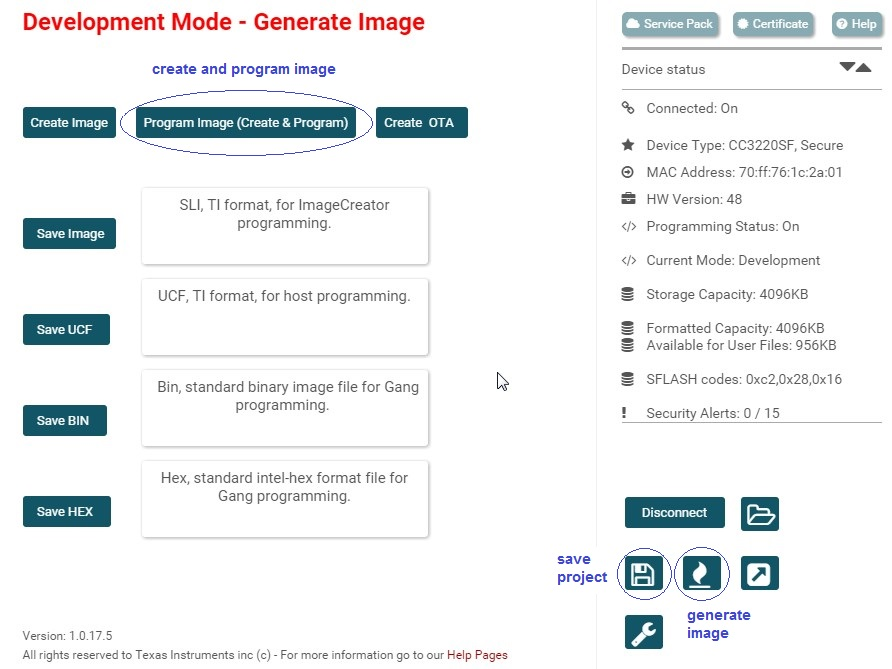
- Save the project and click on the Generate Image icon (see Figure 14).
- Click the Program Image button (see Figure 14). The image is now programmed to the device.
 Figure 12. UniFlash – Choose CC3120 / CC3220 Device
 For CC3220S secured device:
For CC3220SF secured device:
 Figure 13. UniFlash General → Settings
  Figure 14. Program Image and Generate Image
 If using the CLI, perform the following steps.
- Import the OOB project (detailed in the previous steps 1 through 5). This step is required at least once so the project is imported into the UniFlash workspace.
- Open a Windows command prompt and navigate to the UniFlash command line directory (UniFlash install directory where dslite.bat is located).
- Invoke the following command.
- dslite.bat --mode cc3220 project program --name OOB_SF --port com5 –dev
- dslite.bat --mode cc3220 project program --name OOB_RS --port com5 –dev
For the CC3220SF device:
For the CC3220R and CC3220S devices:
NOTE
com5 is an example. Users must modify the COM port according to the assigned COM port.
Programming is considered successful is all progress bars indicate 100% and the command returns without errors. Users must reset the board at the end so the programmed image is executed.