SWRA446 February 2015 CC1310 , CC1310 , CC2620 , CC2620 , CC2630 , CC2630 , CC2640 , CC2640 , CC2640R2F , CC2640R2F , CC2640R2F-Q1 , CC2640R2F-Q1 , CC2650 , CC2650 , CC2650MODA , CC2650MODA
4.2 Eclipse IDE (Windows)
Follow these instructions to install Eclipse and CDT on a Windows platform.
- Download Eclipse from http://eclipse.org/downloads/index.php.
- Unzip the downloaded package.
- The Eclipse IDE can now be started by running the eclipse.exe file. If you are using Windows 7, make sure that Eclipse is run as administrator to allow for the new installations. Eclipse will ask for a folder to use for workspace location when it is started. If Eclipse reports that it cannot find the Java Runtime Environment, make sure that the installation path is added to your environment variables. This is done by going to Control Panel → System and Security → System → Advanced system settings. Append the path of the bin folder in the JRE installation to the PATH variable.
- Verify the installed versions of the package under Help → About Eclipse SDK.
- Verify that you use the correct version of the Java Runtime Environment. The version can be found under Window → Preferences → Java → Installed JREs.
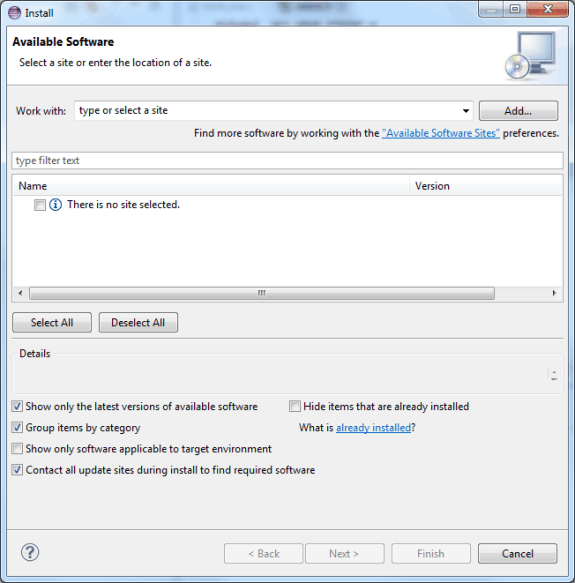
- Navigate to Help → Install New Software (see Figure 1).
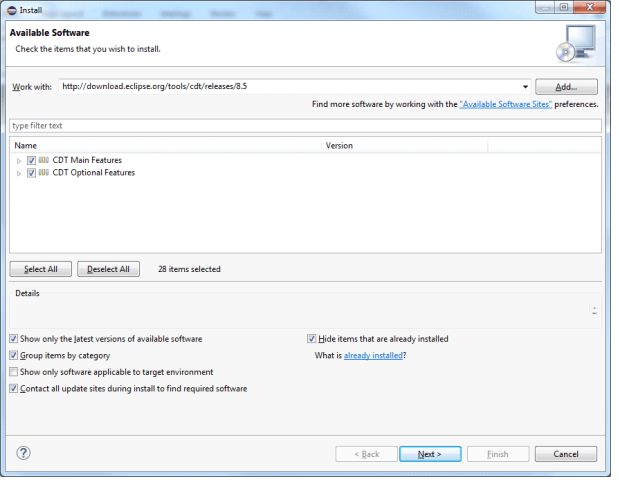
- Type http://download.eclipse.org/tools/cdt/releases/8.5/ (or the address of the software repository for another version of CDT) in the field called 'Work with:'.
- Select both ‘CDT Main Features’ and ‘CDT Optional Features’ to install (see Figure 2).
- Click ‘Next’ twice and accept the licence agreements. Click ‘Finish’ to install the CDT package.
- When finished, click Yes to restart Eclipse.
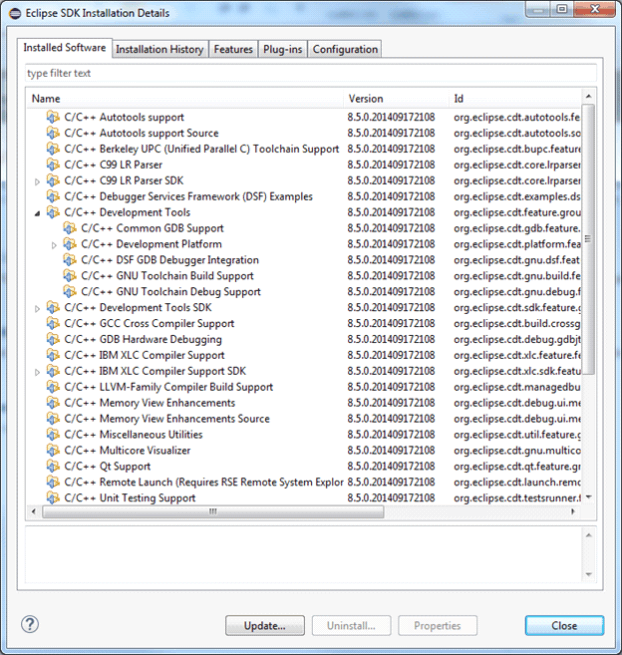
- Verify that the CDT components are correctly installed. Navigate to Help → About Eclipse SDK and click ‘Installation Details’. Make sure that the C/C++ Development Platform and the C/C++ GDB Hardware Debugging are both installed (see Figure 3).
The following instructions describe how to install the CDT plugins:
 Figure 1. Eclipse - Install New Software (Windows)
  Figure 2. Installing CDT
  Figure 3. Installation Details