SWRU580 April 2021 CC2564C , CC2564MODA , CC2564MODN
- Trademarks
- 1 Introduction
- 2 A2DP (AUD) Demo Guide
- 3 A3DP Sink Demo Guide
- 4 A3DP Source Demo Guide
- 5 HFP Demo Guide
- 6 HFP Audio Gateway Demo Guide
- 7 HID Demo Guide
- 8 HSP Demo Guide
- 9 Map Demo Guide
- 10PBAP Demo Guide
- 11SPP Demo Guide
- 12SPPLE Demo Guide
- 13SPPDMMulti Demo Guide
- 14ANP Demo Guide
- 15HFP Demo Guide
- 16HTP Demo Guide
- 17PASP Demo Guide
- 18HOGP Demo Guide
- 19PXP Demo Guide
- 20FMP Demo Guide
- 21CSCP Demo Guide
- 22Revision History
7.2 Demo Application
The demo application provides a description on how to use the demo application to connect two configured boards and communicate over bluetoothLE. The included application registers a custom service on a board when the stack is initialized.
Device 1 (Host/ HID Host) setup on the demo application
- We will setup the first board as a Host. Perform the steps mentioned earlier in Running the Bluetooth Code section to initialize the application. Once initialized, note the Bluetooth address of the server. We will later use this to initiate a connection from the Device or Client.
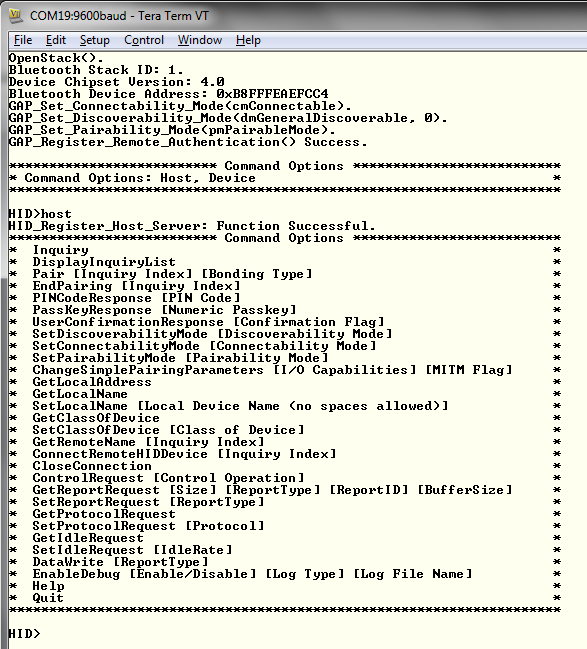
- On the Choose mode> prompt, enter Host.
- You will see a list of all
possible commands at this time for a Host. You can see this list at any time by
entering Help at the Host> prompt.
 Figure 7-2 HID Demo Register
Server Terminal
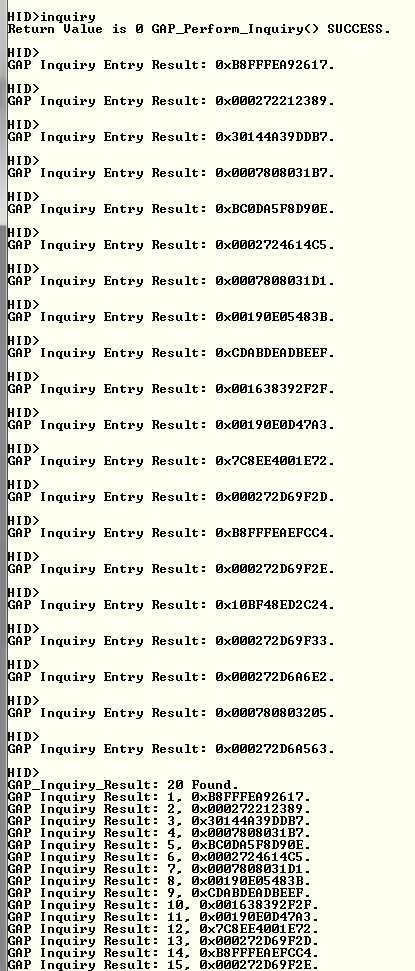
 - At the Host> prompt, enter
Inquiry This will initiate the Inquiry process. Once it is complete, you will
get a list of all discovered devices.
 Figure 7-3 HID Demo Inquiry
Result Terminal
 - You can access this list any time by choosing DisplayInquiryList at the Host> prompt.
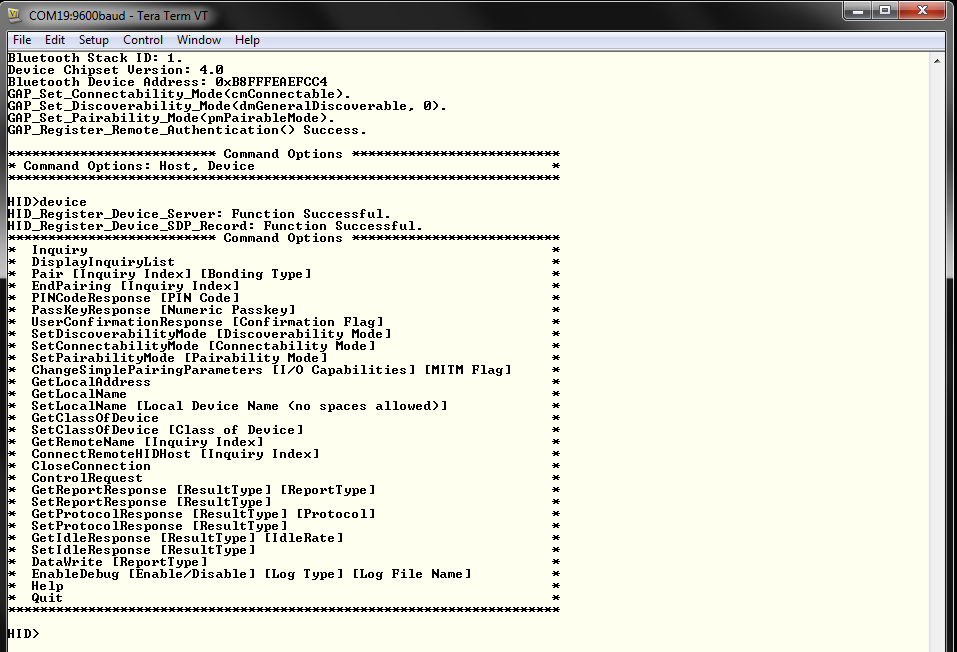
- We will setup the second board as a Device. Perform the steps mentioned earlier in Running the Bluetooth Code section to initialize the application. On the Choose mode> prompt, enter Device.
- You will see a list of all
possible commands at this time for a Device. You can see this list at any time
by entering Help at the Device> prompt.
 Figure 7-4 HID Demo SDP Record
Terminal
- Note the index number of the second board that was configured as a HID Device. [If the list is not on the screen, issue the DisplayInquiryList command on the client to display the list of discovered devices.]
- Issue a ConnectRemoteHIDDevice <Inquiry Index> command from the Device.
- Wait for HID Open
confirmation.
 Figure 7-5 HID Demo Connect
Device TerminalNote: A status of 0x0000 means the connection was successful. Any other status implies that the connection did not succeed.
 - When a client successfully
connects to a server, the server will see the open indication.
 Figure 7-6 HID Demo Open
Indication Terminal
Initiating a connection from the HID Device is the same as the procedure as the Host except that we run the inquiry(mentioned in Step 4) on the HID Device instead and issue a ConnectRemoteHIDHost <Inquiry Index> where the Inquiry Index is the number that corresponds to the BD-ADDR of the Host when we run the inquiry.
 Figure 7-7 HID Demo Connect Device
Terminal 2
Figure 7-7 HID Demo Connect Device
Terminal 2- Now that we have a connection established, the Host and Device can communicate with each other.
- We can send a control operation from either the Host or the Device using the
ControlRequest command. For the Host we issue the Controlrequest
<parameter-number> command. The options for control request are 0= hcNop, 1=
hcHardReset, 2= hcSoftReset, 3= hcSuspend, 4=hcExitSuspend,
5=hcVirtualCableUnplug. When we type Control Request 5 on the Host we get the
following message.
 Figure 7-8 HID Demo Connect
Device Terminal
Figure 7-8 HID Demo Connect
Device TerminalOn the Deviced side, we get a hcVirtualCableUnplug indication.
 Figure 7-9 HID Demo Control Indication Terminal
The Device controlRequest has no parameters. It does hcVirtualCableUnplug by defalt.
 Figure 7-10 HID Demo Control Indication Terminal 2
 - We can make Report Requests issuing the GetReportRequest command. It needs
either 3 or 4 parameters. The first one is Size which is 0 for using the size of
the Report or 1 for using a custom buffer size. The second is ReportType which
is 0 for rtOther, 1 for rtInput, 2 for rtOutput, and 3 for rtFeature. The third
is ReportID. IF we used a custom buffer for size in the first parameter we
specify it here. For example, we send a Report Request with size of Report,
rtInput and ReportID of 2. We get a Report Request Success indication.
 Figure 7-11 HID Demo GetReportRequest
On the Device, we receive a get Report Indication with the Report Type, Id and size and Buffer size.
 Figure 7-12 HID Demo Get Report Indication Terminal
The Device can respond to GetReportRequest using GetReportResponse. It needs the Result type (0 for rtSuccessful, 1 for rtNotReady, 2 for rtErrInvalidReportID, 3 for rtErrUnsupportedRequest, 4 for rtErrInvalidParameter, 5 for rtErrUnknown, 6 for rtErrFatal, 7 for rtData) and ReportType (0 for rtOther, 1 for rtInput, 2 for rtOutput, 3 for rtFeature) as parameters. For example we respond to the above rtInput request from the Host with rtData as Result type and rtInput as Report Type.
 Figure 7-13 HID Demo Get Report Response Terminal
The Host gets a report Confirmation back.
 Figure 7-14 HID Demo Get Report Confirmation Terminal
 - We can run SetReportRequest from the Host. The only parameter it needs is the
report type which is 0 for rtOther, 1 for rtInput, 2 for rtOutput, and 3 for
rtFeature.
 Figure 7-15 HID Demo SetReportRequest Terminal
The Device gets a Set Report Indication with the Report type.
 Figure 7-16 HID Demo SetReport Indication Terminal
The Device can respond to SetReportRequest by issuing the SetReportResponse command. The only parameter it needs is Result type (0 for rtSuccessful, 1 for rtNotReady, 2 for rtErrInvalidReportID, 3 for rtErrUnsupportedRequest, 4 for rtErrInvalidParameter, 5 for rtErrUnknown, 6 for rtErrFatal, 7 for rtData). For example we respond to the above rtInput Report request using rtSuccesful.
 Figure 7-17 HID Demo Set Report Response Terminal
The Host receives a Set Report confirmation indication with the Result type.
 Figure 7-18 HID Demo Set Report Confirmation Terminal
 - We can send a Protocol Request using GetProtocolRequest. It requires no
parameters.
 Figure 7-19 HID Demo GetProtocolRequest Terminal
The Device gets a Protocol Indication.
 Figure 7-20 HID Demo Get Protocol Indication Terminal
The Device can respond to the Protocol Request by issuing the GetProtocolResponse command. It requires two parameters, Result type (0 for rtSuccessful, 1 for rtNotReady, 2 for rtErrInvalidReportID, 3 for rtErrUnsupportedRequest, 4 for rtErrInvalidParameter, 5 for rtErrUnknown, 6 for rtErrFatal, and 7 for rtData) and Protocol (0 for ptBoot and 1 for ptReport). For example, we respond to the previous Request with rtData and ptBoot.
 Figure 7-21 HID Demo Get Protocol Response Terminal 2
The Host gets a protocol confirmation with the Result type and Protocol.
 Figure 7-22 HID Demo Get Protocol Confirmation Terminal 2
 - We can issue SetProtocolRequest from the Host. The only parameter we need is the
protocol(0 for ptBoot and 1 for ptReport). For example we send a request with
ptReport.
 Figure 7-23 HID Demo SetProtocolResponse Terminal 2
The Host gets a Set Protocol Indication along with the protocol. It can respond to it by issuing the SetProtocolResponse command which requires Result type as the parameter (0 for rtSuccessful, 1 for rtNotReady, 2 for rtErrInvalidReportID, 3 for rtErrUnsupportedRequest, 4 for rtErrInvalidParameter, 5 for rtErrUnknown, 6 for rtErrFatal, and 7 for rtData).
 Figure 7-24 HID Demo SetProtocolIndication Terminal 2
We get a Protocol Confirmation with the Result type in the Host.
 Figure 7-25 HID Demo Set Protocol Confirmation Terminal 2
 - We can set the Idle request issuing the GetIdleRequest command. It requires no
parameters.
 Figure 7-26 HID Demo GetIdleRequest Terminal
The Device gets a GetIdleIndication.
 Figure 7-27 HID Demo Get Idle Indication Terminal
It can respond to it with a GetIdleResponse which requires Result type (0 for rtSuccessful, 1 for rtNotReady, 2 for rtErrInvalidReportID, 3 for rtErrUnsupportedRequest, 4 for rtErrInvalidParameter, 5 for rtErrUnknown, 6 for rtErrFatal, and 7 for rtData) and Idle Rate as parameters. For example we respond with a Result type of rtData and Idle Rate of 50.
 Figure 7-28 HID Demo Get Idle Response Terminal
On the Host we get a Idle Confirmation.
 Figure 7-29 HID Demo Get Idle Confirmation Terminal 2
 - We can Set the Idle Rate using SetIdleRequest from the Host which requires Idle
rate as the only parameter. For example we set the Idle rate to 50 from
here.
 Figure 7-30 HID Demo Set Idle Request Terminal 2
The Device receives a Set Idle Indication. It can respond to it using Set Idle Response which requires Result type (0 for rtSuccessful, 1 for rtNotReady, 2 for rtErrInvalidReportID, 3 for rtErrUnsupportedRequest, 4 for rtErrInvalidParameter, 5 for rtErrUnknown, 6 for rtErrFatal, and 7 for rtData) as its one parameter.
 Figure 7-31 HID Demo Set Idle Indication 2
We get a SetIdleConfirmation with the Result type on the Host
 Figure 7-32 HID Demo Set Idle Confirmation Terminal 2
 - We can write data between devices using DataWrite. The one parameter it needs is
ReportType (0 for rtOther, 1 for rtInput, 2 for rtOutput, and 3 for rtFeature).
We write data from the Device in this example.
 Figure 7-33 HID Demo DataWrite Terminal
The Host gets a Data indication.
 Figure 7-34 HID Demo Data Indication Terminal