SPRACO3 October 2019 F28377D-SEP , INA240 , LMG5200 , TMS320F280021 , TMS320F280021-Q1 , TMS320F280023 , TMS320F280023-Q1 , TMS320F280023C , TMS320F280025 , TMS320F280025-Q1 , TMS320F280025C , TMS320F280025C-Q1 , TMS320F280040-Q1 , TMS320F280040C-Q1 , TMS320F280041 , TMS320F280041-Q1 , TMS320F280041C , TMS320F280041C-Q1 , TMS320F280045 , TMS320F280048-Q1 , TMS320F280048C-Q1 , TMS320F280049 , TMS320F280049-Q1 , TMS320F280049C , TMS320F280049C-Q1 , TMS320F28374D , TMS320F28374S , TMS320F28375D , TMS320F28375S , TMS320F28375S-Q1 , TMS320F28376D , TMS320F28376S , TMS320F28377D , TMS320F28377D-EP , TMS320F28377D-Q1 , TMS320F28377S , TMS320F28377S-Q1 , TMS320F28378D , TMS320F28378S , TMS320F28379D , TMS320F28379D-Q1 , TMS320F28379S
-
Dual-Axis Motor Control Using FCL and SFRA On a Single C2000 MCU
- Trademarks
- 1 Introduction
- 2 Benefits of the C2000 for High-Bandwidth Current Loop
- 3 Current Loops in Servo Drives
- 4 PWM Update Latency for Dual Motor
- 5 Outline of the Fast Current Loop Library
- 6 Evaluation Platform Setup
- 7 System Software Integration and Testing
- 8 Summary
- 9 References
7.2.5 Position Encoder Feedback
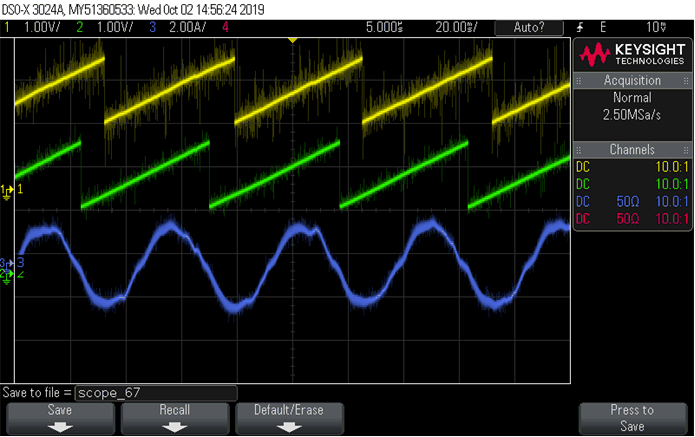
During all the above tests, the QEP interface was continuously estimating position information. When the motor is commanded to run, it is taken through an initial alignment stage where the electrical angle and the QEP angle count are set to zero, before the rotor spins continuously. Reference position (motorVars[0].ptrFCL → rg.Out) and encoder feedback angle (motorVars[0].ptrFCL->qep.ElecTheta) signals, when plotted using DACs on J3-30 and J7-70 pins, should look as shown in Figure 23
 Figure 23. DAC Outputs on Scope Showing Reference Angle and Rotor Position
 The waveform of channel 1 represents the reference position, while channel 2 represents the feedback position from QEP encoder. The ripple in feedback position estimate is indicative of the fact that the motor runs with some minor speed oscillation. Because of open loop control, the rotor position and reference position may not align. However, it is important to make sure that the sense of change of estimated angle should be same as that of the reference; otherwise, it indicates that the motor has a reverse sense of rotation. This can be fixed by swapping any two wires connecting the motor.
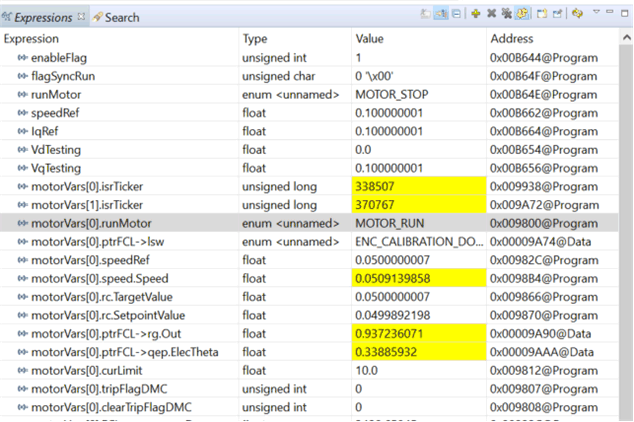
To ensure that the function runSpeedFR() works, change the 'motorVars[0].speedRef' variable in the Expressions window as shown in Figure 24, and check whether the estimated speed variable, 'motorVars[0].speed.Speed', follows the commanded speed. Because the motor is a PM motor, where there is no slip, the running speed follows the commanded speed regardless of the control being open loop.
 Figure 24. Reference and Feedback Speed Expressions Window
 When the tests are complete, set ‘motorVars[0].runMotor’ to MOTOR_STOP to stop the motor, bring the system to a safe stop by reducing the bus voltage, taking the controller out of real-time mode, and resetting it. Now, the motor stops.
The same set of tests can be done on motor 2 by working with structure variable 'motorVars[1]'. Once done, take the controller out of real time mode and reset.