TIDUEM7A April 2019 – February 2021
- Description
- Resources
- Features
- Applications
- 5
- 1System Description
-
2System Overview
- 2.1 Block Diagram
- 2.2 Highlighted Products
- 2.3 Design Considerations
- 2.4
Hardware, Software, Testing Requirements, and Test Results
- 2.4.1 Required Hardware and Software
- 2.4.2
Testing and Results
- 2.4.2.1 Test Setup
- 2.4.2.2 Test Results
- 3Design Files
- 4Related Documentation
- 5About the Author
- 6Revision History
2.3.2.3.2 Foreground Process
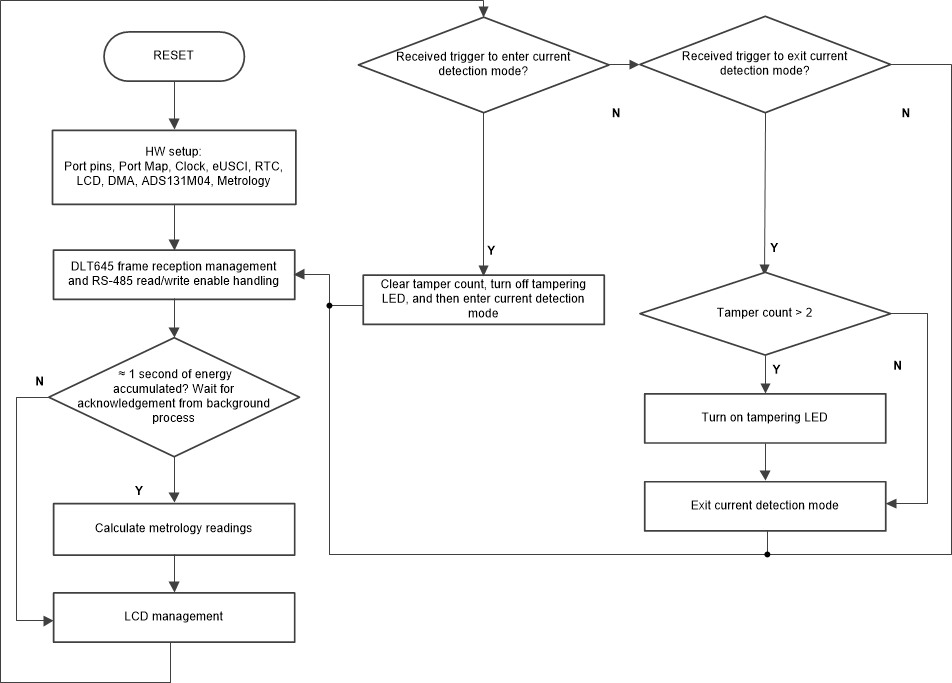
The foreground process includes the initial setup of the MSP432 hardware and software and the ADS131M04 registers immediately after a device RESET. Figure 2-14 shows the flow chart for this process.
 Figure 2-14 Foreground Process
The initialization routines involve the setup of the MSP432 general purpose input/output (GPIO) port pins and associated port map controller; MSP432 clock system; MSP432 USCI_A0 for UART functionality; MSP432 RTC module for clock functionality; MSP432 LCD; MSP432 DMA; ADS131M04 registers; and MSP432 metrology variables.
After the hardware is setup, any received frames from the GUI are processed. If RS-485 is selected for communication to the PC GUI, the THVD1500 device must have its RE and DE pins driven to enable the receiver and driver during the proper points in time to receive packets from the PC GUI and send responses back to the GUI. After any packet is sent from the MSP432 MCU to the PC GUI, the foreground process is responsible for asserting the RE and DE pins after the packet has been completely sent out from the MSP432 MCU but before the GUI sends out its next packet.
Subsequently, the foreground process checks whether the background process has notified the foreground process to calculate new metering parameters. This notification is accomplished through the assertion of the "PHASE_STATUS_NEW_LOG" status flag whenever a frame of data is available for processing. The data frame consists of the processed dot products that were accumulated for approximately one second in the background process. This is equivalent to an accumulation of 50 or 60 cycles of data synchronized to the incoming voltage signal. In addition, a sample counter keeps track of how many samples accumulate over this frame period. This count can vary as the software synchronizes with the incoming Mains frequency.
The processed dot products include the VRMS, IRMS, active power, and reactive power. These dot products are used by the foreground process to calculate the corresponding metrology readings in real-world units. Processed voltage dot products, current dot products, active energy dot products, and reactive energy dot products are accumulated in separate 64-bit registers to further process and obtain the RMS and mean values. Using the calculated values of active and reactive power of the foreground process, the apparent power is calculated. The frequency (in Hz) and power factor are also calculated using parameters calculated by the background process using the formulas in Section 2.3.2.3.2.1.
The foreground process also updates the LCD. The LCD display item is changed every two seconds. See Section 2.4.2.1.4.1 for more information about the different items displayed on the LCD.
The foreground process is also where the MSP432 MCU triggers the ADS131M04 device to enter or exit current-detection mode. In this design, the LED labeled LED1 is turned ON to indicate that tampering was previously detected sometime in the interval from when the TPS7A78 device has provided a power failure indication to the time when it has provided a power good indication. In addition, a variable logs how many times the ADS131M04 device has alerted the MSP432 that a tamper event has been detected by the ADS131M04 device during this same time interval.
If the MSP432 has received a trigger to enter current-detection mode based on the power fail indication from the TPS7A78 device, the tamper count variable is cleared so that this variable only counts the number of times tampering has been detected from the last power failure instance instead of it counting the total number of times tampering has been detected from the last time the MSP432 MCU has been reset. After clearing the tamper count variable, the tampering LED is turned off in case it was already on from the previous time. Current-detection mode is then entered.
If the MSP432 has received a trigger to exit current-detection mode based on the power good indication from the TPS7A78 device, the tamper count variable is checked to see if there has been more than two tamper events that were detected by the ADS131M04 device. If more than two tamper events were detected by the ADS131M04, the tampering LED is turned ON to indicate that tampering was detected. The reason why a tamper event is defined based on having more than two tamper events detected by the ADS131M04 is so that the system does not indicate tampering from the following two scenarios: (1) when power is first lost, current-detection mode is triggered when the current has not fallen below the current-detection mode threshold yet, despite already being indicated of a power failure event, and (2)power is being restored to the meter and the sensed current is now above the current-detection mode threshold but the system still did not have enough time to exit current-detection mode so this is seen as a tamper event.
After checking to see if the tamper count variable is greater than 2 and turning on the tampering LED if it is, current-detection mode is exited. The code then returns to the beginning of the foreground loop by checking for any new messages from the PC GUI again.