SWRU558 June 2020 CC3100 , CC3100MOD , CC3200 , CC3200MOD
-
SimpleLink Wi-Fi CC3100, CC3200 UniFlash
- Trademarks
- 1 Introduction
- 2 Installation
- 3 Prerequisites
- 4 Uniflash Block Diagram
- 5 Session Support
- 6 Secured File System Support
- 7 GUI Interface
- 8 CC3200 Support
- 9 Command Line Support
- 10 Configuration File Support
- 11 Image Creation and Programming
- 12 Troubleshoot/Debugging
- 13 Limitations
- 14 References
- A UART Connection
10.3.8.6 Configuration
Figure 30 shows a screenshot of all the Profiles parameters. Some parameters have default values in case the user decides to skip configuration. However, profiles are mostly user specific and thus require user configuration. There are two screens relevant, the main screen and per profile screen. In the main screen, the following parameters are defined:
- Enable Profile x (where x is an index 1-7). In this example, two profiles are enabled.
- Auto Start Enable is set to default Enable.
- Fast Connect Enable is set to default Disable.
- Auto Smart Config is set to default Enable.
- Auto To Open AP is set to default Disable.
- Connect To Any Peer 2 Peer is set to default Disable.
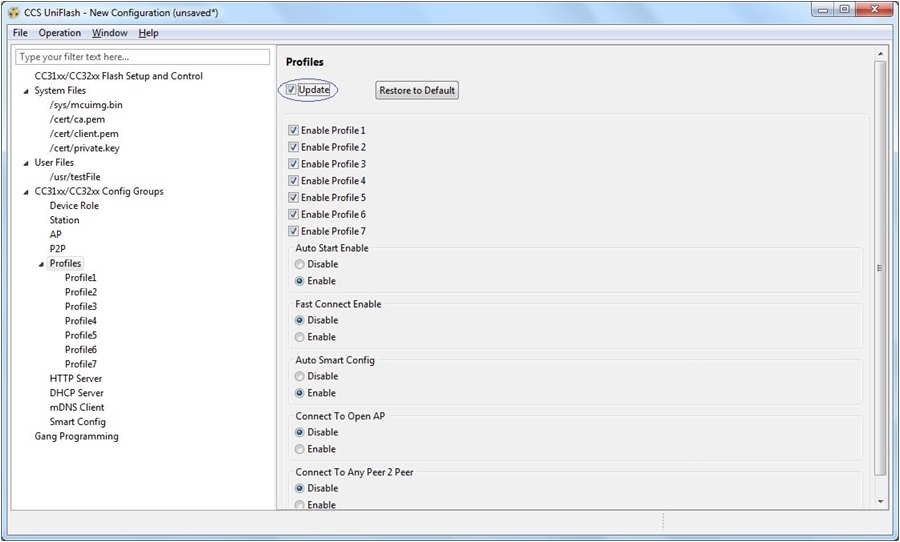 Figure 30. Profiles Main Screen
 In the per profile screen, several example profiles are described. For Open security profile, the following parameters are defined:
- Profile 1 SSID is set to openProfile.
- Profile 1 Priority is set to 10.
- Profile 1 Bssid Set is set to Disable.
- Profile 1 Security Type is set to Open.
- All rest of parameters is not relevant for an Open security profile.
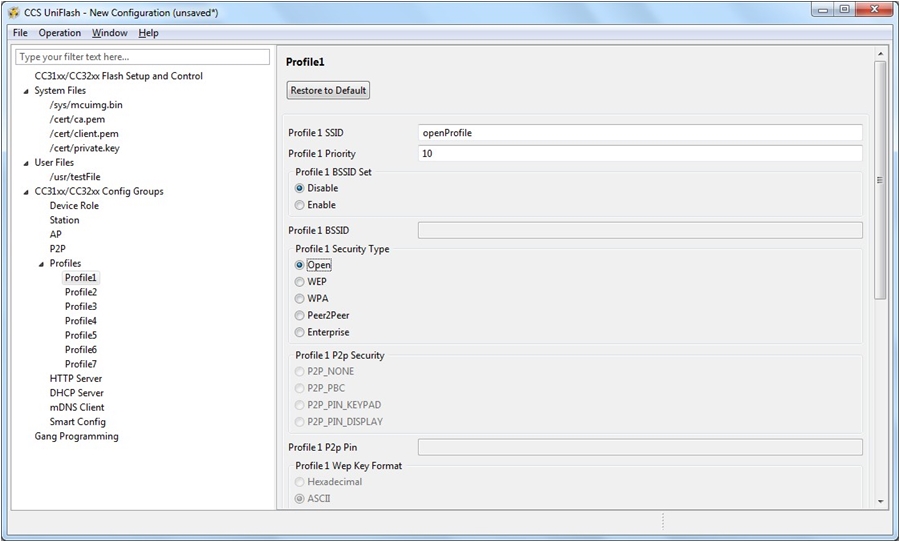 Figure 31. Open Profile Screen
 For WEP security profile, the following parameters are defined:
- Profile 2 SSID is set to wepProfile.
- Profile 2 Priority is set to 1.
- Profile 2 Bssid Set is set to Enable.
- Profile 2 BSSID is set to 12:34:56:78:90:AB.
- Profile 2 Security Type is set to WEP.
- WEP Key Format is set to ASCII.
- Profile 2 Wep Key is set to 12345.
- All rest of parameters is not relevant for a WEP security profile.
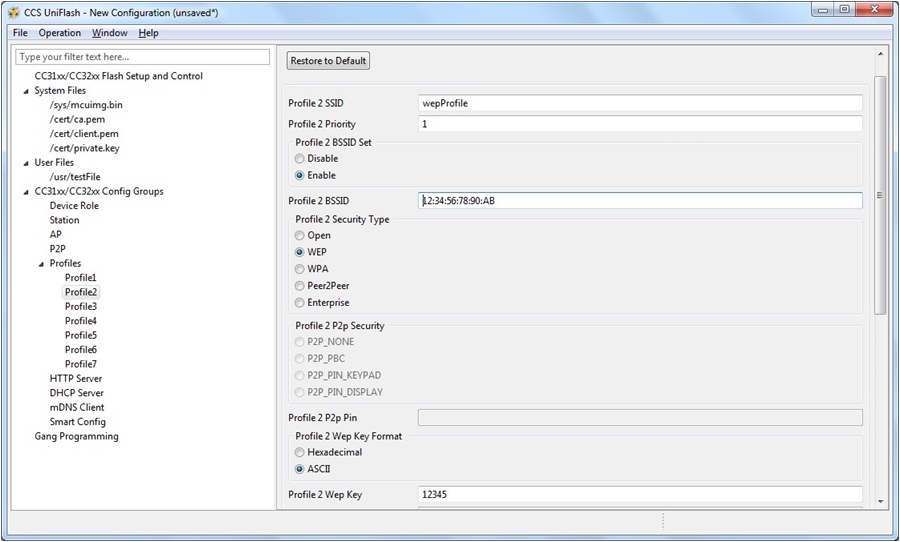 Figure 32. Wep Profile Screen
 For WPA security profile, the following parameters are defined:
- Profile 3 SSID is set to wpaProfile.
- Profile 3 Priority is set to 5.
- Profile 3 Bssid Set is set to Disable.
- Profile 3 Security Type is set to WPA.
- Profile 3 Wpa Key is set to 1234567890.
- All rest of parameters is not relevant for a WPA security profile.
 Figure 33. Wpa Profile Screen
 For Peer 2 Peer security profile, the following parameters are defined:
- Profile 4 SSID is set to p2pProfile.
- Profile 4 Priority is set to 8.
- Profile 4 Bssid Set is set to Disable.
- Profile 4 Security Type is set to Peer2Peer.
- Profile 4 P2p Security is set to P2P_PIN_KEYPAD.
- Profile 4 P2P Pin is set to 12345678.
- All rest of parameters is not relevant for a Peer 2 Peer security profile.
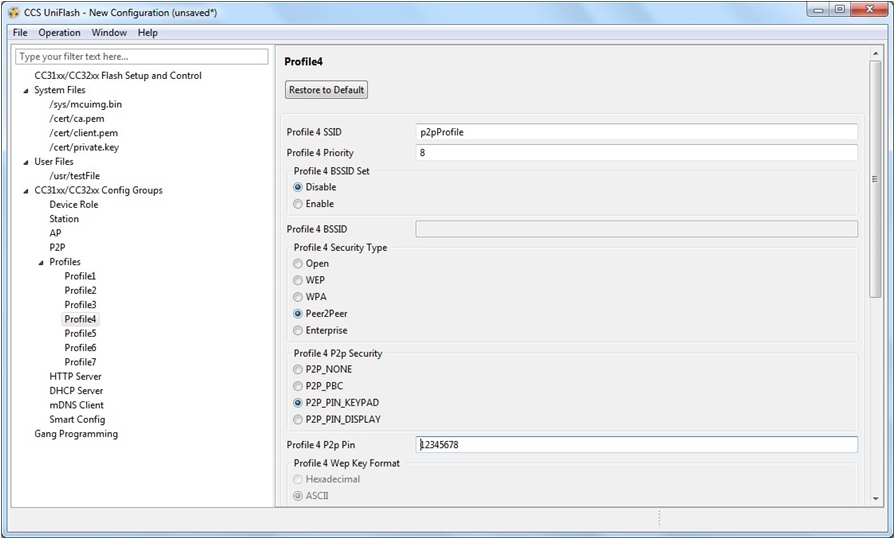 Figure 34. P2p Profile Screen
 For Enterprise security with TLS profile, the following parameters are defined:
- Profile 5 SSID is set to tlsProfile.
- Profile 5 Priority is set to 1.
- Profile 5 Bssid Set is set to Disable.
- Profile 5 Security Type is set to Enterprise.
- Profile 5 EAP Type is set to TLS.
- Profile 5 User Identity is set to tlsUser.
- All rest of parameters is not relevant for a TLS Enterprise security profile.
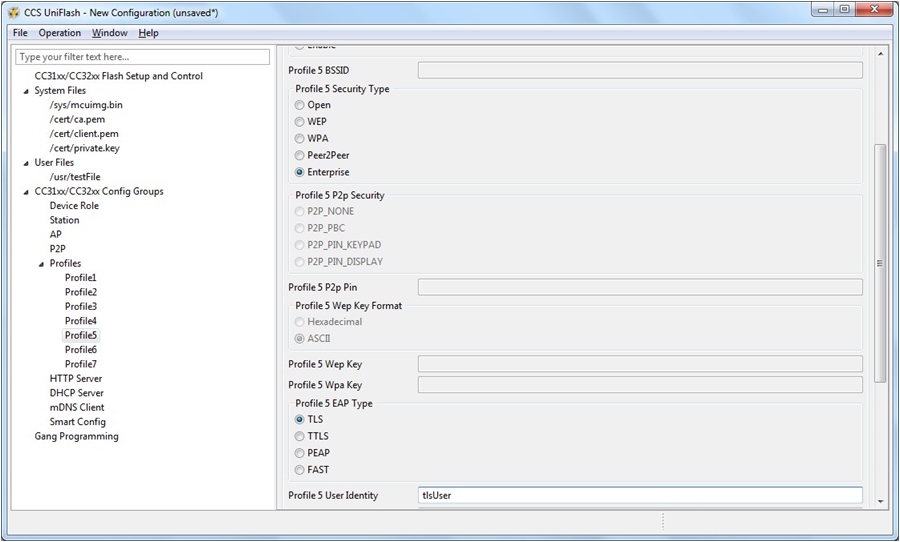 Figure 35. Tls Profile Screen
 For Enterprise security with TTLS/Mschapv2 profile, the following parameters are defined:
- Profile 6 SSID is set to ttlsMschapv2Profile.
- Profile 6 Priority is set to 7.
- Profile 6 Bssid Set is set to Disable.
- Profile 6 Security Type is set to Enterprise.
- Profile 6 EAP Type is set to TTLS.
- Profile 6 User Identity is set to ttlsMschapv2User.
- Profile 6 Anonymous Identity is set to ttlsMschapv2Anonymous.
- Profile 6 User password is set to ttlsMschapv2Password.
- Profile 6 EAP Sub Type is set to MSCHAPv2.
- All of the rest of the parameters are not relevant for a TTLS/Mschapv2 Enterprise security profile.
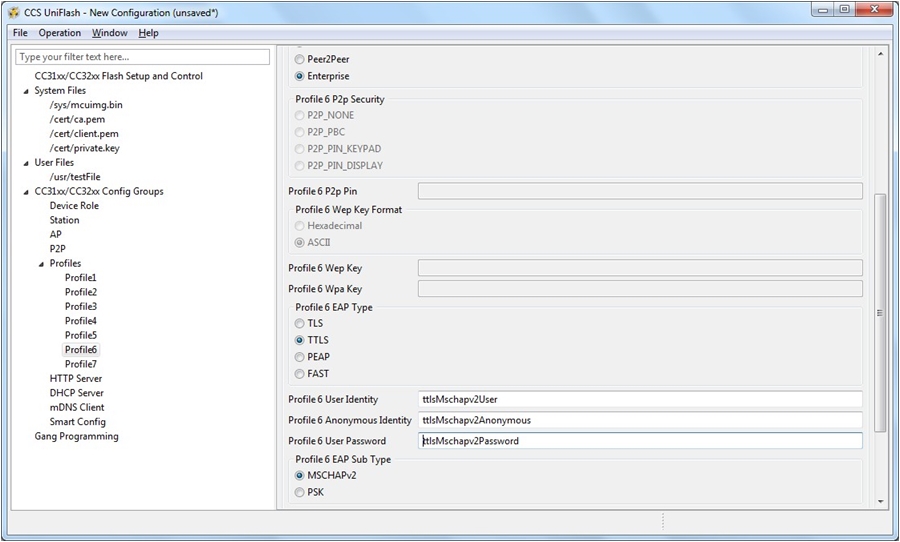 Figure 36. TtlsMschapv2 Profile Screen
 For Enterprise security with PEAP/PSK profile, the following parameters are defined:
- Profile 7 SSID is set to peapPskProfile.
- Profile 7 Priority is set to 2.
- Profile 7 Bssid Set is set to Disable.
- Profile 7 Security Type is set to Enterprise.
- Profile 7 EAP Type is set to PEAP.
- Profile 7 User Identity is set to peapPskUser.
- Profile 7 Anonymous Identity is set to peapPskAnonymous.
- Profile 7 User password is set to peapPskPassword.
- Profile 7 EAP Sub Type is set to PSK.
- Profile 7 PEAP Version is set to Version1.
- All of the rest of the parameters are not relevant for a PEAP/PSK Enterprise security profile.
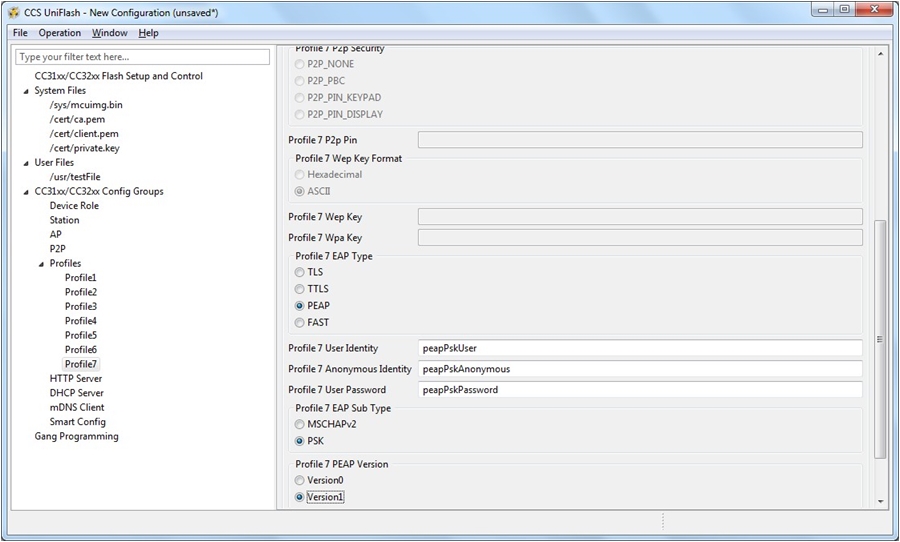 Figure 37. PeapPsk Profile Screen
 For Enterprise security with EAP_FAST profile, the following parameters are defined:
- Profile 7 SSID is set to fastProfile.
- Profile 7 Priority is set to 3.
- Profile 7 Bssid Set is set to Disable.
- Profile 7 Security Type is set to Enterprise.
- Profile 7 EAP Type is set to FAST.
- Profile 7 User Identity is set to fastUser.
- Profile 7 Anonymous Identity is set to fastAnonymous.
- Profile 7 User password is set to fastPassword.
- Profile 7 EAP Fast Provisioning is set to Authenticated.
- All of the rest of the parameters are not relevant for an EAP_FAST Enterprise security profile.
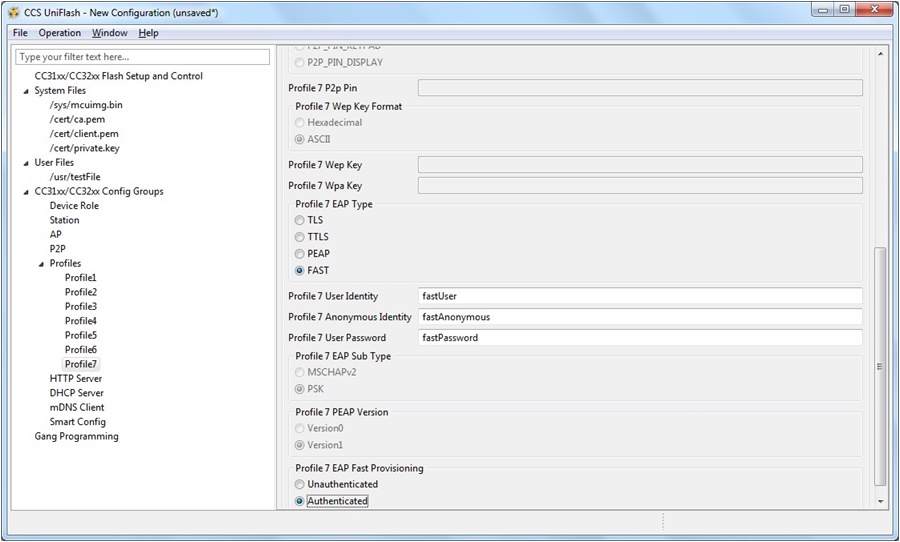 Figure 38. Fast Profile Screen