SPRUIQ5 May 2019 TMS320F280021 , TMS320F280021-Q1 , TMS320F280023 , TMS320F280023-Q1 , TMS320F280023C , TMS320F280025 , TMS320F280025-Q1 , TMS320F280025C , TMS320F280025C-Q1 , TMS320F280040-Q1 , TMS320F280040C-Q1 , TMS320F280041 , TMS320F280041-Q1 , TMS320F280041C , TMS320F280041C-Q1 , TMS320F280045 , TMS320F280048-Q1 , TMS320F280048C-Q1 , TMS320F280049 , TMS320F280049-Q1 , TMS320F280049C , TMS320F280049C-Q1 , TMS320F28374D , TMS320F28374S , TMS320F28375D , TMS320F28375S , TMS320F28375S-Q1 , TMS320F28376D , TMS320F28376S , TMS320F28377D , TMS320F28377D-EP , TMS320F28377D-Q1 , TMS320F28377S , TMS320F28377S-Q1 , TMS320F28378D , TMS320F28378S , TMS320F28379D , TMS320F28379D-Q1 , TMS320F28379S
3.3 Configuring a Project
NOTE
If this is your first time using Code Composer, xds100v2-F2837x must be the default target configuration.
- To verify if TMS320F28379D.ccxml is the default configuration file, view this file in the expanded project structure and check to see if [Active/Debug] status is marked next to it.
- Click Target Configurations to edit existing target configurations or change the default or active configuration.
- Right-click the name of the target configuration to link a target configuration to a project in the workspace.
- Select Link to Project.
- Right-click the project you wish to work with if there are multiple projects in the workspace.
- Click View.
- Select Active Build Configuration.
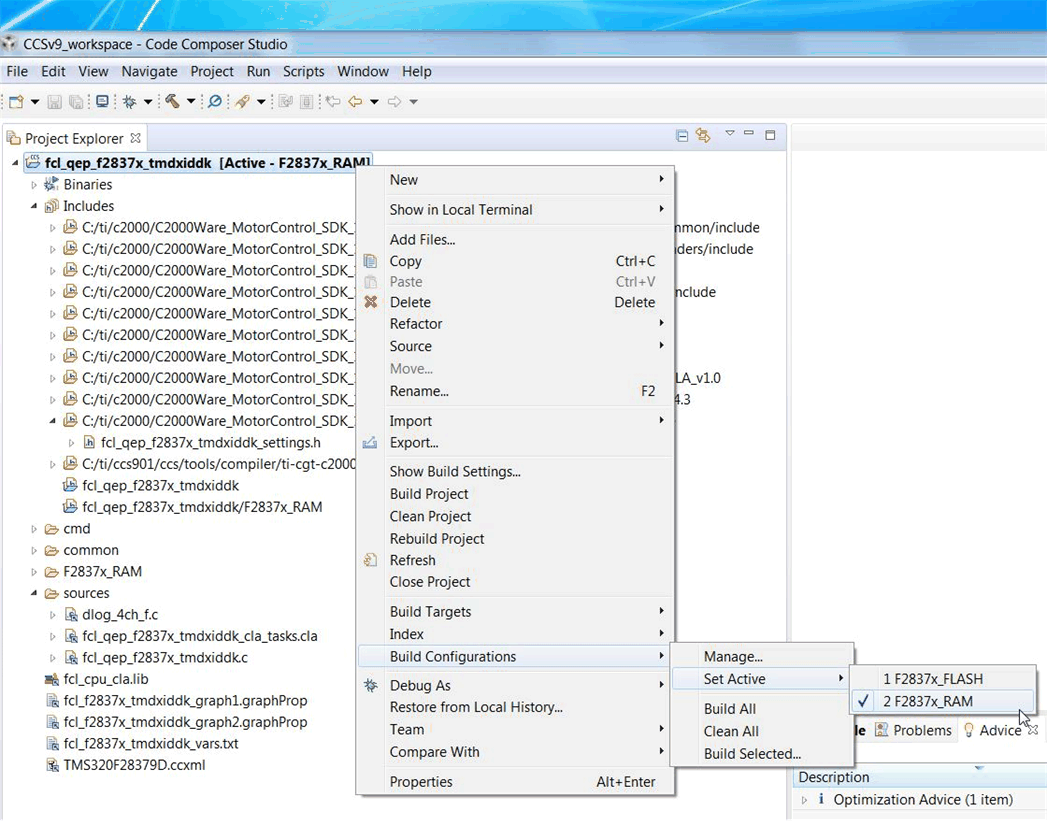
- Click the F2837x_RAM configuration. (See Figure 3-4.)
NOTE
The project can be configured to create code and run in either flash or RAM. For lab experiments, use the RAM configuration most of the time and use the flash configuration for production.
 Figure 3-4 Selecting the F2837x_RAM Configuration