SLUUBW5A July 2018 – September 2021 BQ34Z100-G1
- 1 Read This First
- 1 Introduction
-
2 Data Commands
- 2.1
Standard Data Commands
- 2.1.1
Control(): 0x00/0x01
- 2.1.1.1 CONTROL_STATUS: 0x0000
- 2.1.1.2 DEVICE TYPE: 0x0001
- 2.1.1.3 FW_VERSION: 0x0002
- 2.1.1.4 HW_VERSION: 0x0003
- 2.1.1.5 RESET_DATA: 0x0005
- 2.1.1.6 PREV_MACWRITE: 0x0007
- 2.1.1.7 CHEM ID: 0x0008
- 2.1.1.8 BOARD_OFFSET: 0x0009
- 2.1.1.9 CC_OFFSET: 0x000A
- 2.1.1.10 CC_OFFSET_SAVE: 0x000B
- 2.1.1.11 DF_VERSION: 0x000C
- 2.1.1.12 SET_FULLSLEEP: 0x0010
- 2.1.1.13 STATIC_CHEM_DF_CHKSUM: 0x0017
- 2.1.1.14 SEALED: 0x0020
- 2.1.1.15 IT ENABLE: 0x0021
- 2.1.1.16 CAL_ENABLE: 0x002D
- 2.1.1.17 RESET: 0x0041
- 2.1.1.18 EXIT_CAL: 0x0080
- 2.1.1.19 ENTER_CAL: 0x0081
- 2.1.1.20 OFFSET_CAL: 0x0082
- 2.1.2 StateOfCharge(): 0x02
- 2.1.3 MaxError(): 0x03
- 2.1.4 RemainingCapacity(): 0x04/0x05
- 2.1.5 FullChargeCapacity(): 0x06/07
- 2.1.6 Voltage(): 0x08/0x09
- 2.1.7 AverageCurrent(): 0x0A/0x0B
- 2.1.8 Temperature(): 0x0C/0x0D
- 2.1.9 Flags(): 0x0E/0x0F
- 2.1.10 FlagsB(): 0x12/0x13
- 2.1.11 Current(): 0x10/0x11
- 2.1.1
Control(): 0x00/0x01
- 2.2
Extended Data Commands
- 2.2.1 AverageTimeToEmpty(): 0x18/0x19
- 2.2.2 AverageTimeToFull(): 0x1A/0x1B
- 2.2.3 PassedCharge(): 0x1C/0x1D
- 2.2.4 DOD0Time(): 0x1E/0x1F
- 2.2.5 AvailableEnergy(): 0x24/0x25
- 2.2.6 AveragePower(): 0x26/0x27
- 2.2.7 SerialNumber(): 0x28/0x29
- 2.2.8 InternalTemperature(): 0x2A/0x2B
- 2.2.9 CycleCount(): 0x2C/0x2D
- 2.2.10 StateOfHealth(): 0x2E/0x2F
- 2.2.11 ChargeVoltage(): 0x30/0x31
- 2.2.12 ChargeCurrent(): 0x32/0x33
- 2.2.13 PackConfiguration(): 0x3A/0x3B
- 2.2.14 DesignCapacity(): 0x3C/0x3D
- 2.2.15 DataFlashClass(): 0x3E
- 2.2.16 DataFlashBlock(): 0x3F
- 2.2.17 AuthenticateData/BlockData(): 0x40…0x53
- 2.2.18 AuthenticateChecksum/BlockData(): 0x54
- 2.2.19 BlockData(): 0x55…0x5F
- 2.2.20 BlockDataChecksum(): 0x60
- 2.2.21 BlockDataControl(): 0x61
- 2.2.22 GridNumber(): 0x62
- 2.2.23 LearnedStatus(): 0x63
- 2.2.24 Dod@Eoc(): 0x64/0x65
- 2.2.25 QStart(): 0x66/0x67
- 2.2.26 TrueRC(): 0x68/0x69
- 2.2.27 TrueFCC(): 0x6A/0x6B
- 2.2.28 StateTime(): 0x6C/0x6D
- 2.2.29 QmaxPassedQ(): 0x6E/0x6F
- 2.2.30 DOD0(): 0x70/0x71
- 2.2.31 QmaxDod0(): 0x72/0x73
- 2.2.32 QmaxTime(): 0x74/0x75
- 2.2.33 Data Flash Interface
- 2.1
Standard Data Commands
-
3 Fuel Gauging
- 3.1 Overview
- 3.2
Impedance Track Variables
- 3.2.1 Load Mode
- 3.2.2 Load Select
- 3.2.3 Reserve Cap-mAh
- 3.2.4 Reserve Cap-mWh/cWh
- 3.2.5 Design Energy Scale
- 3.2.6 Dsg Current Threshold
- 3.2.7 Chg Current Threshold
- 3.2.8 Quit Current, Dsg Relax Time, Chg Relax Time, and Quit Relax Time
- 3.2.9 Qmax
- 3.2.10 Update Status
- 3.2.11 Avg I Last Run
- 3.2.12 Avg P Last Run
- 3.2.13 Cell Delta Voltage
- 3.2.14 Ra Tables
- 3.2.15 StateOfCharge() Smoothing
- 3.2.16 Charge Efficiency
- 3.2.17 Lifetime Data Logging
- 3.3 Device Configuration
- 3.4 Voltage Measurement and Calibration
- 3.5 Temperature Measurement
- 3.6 Overtemperature Indication
- 3.7 Charging and Charge Termination Indication
- 3.8 SCALED Mode
- 3.9 LED Display
- 3.10 Alert Signal
- 4 Communications
- 5 Device Functional Modes
- 6 Power Control
- 7 Data Flash Summary
- 8 Gas Gauge Timing Considerations
- 9 HDQ Communication Basics
- 10Procedures to Seal and Unseal the Gauge
- 11Impedance Track Gauge Configuration
- 12Revision History
9.6 Using UART Interface to HDQ
An implementation option for HDQ is to use a UART. An advantage to using the UART is that if the UART is handling the communication and storing the results in a buffer, host processor interrupts during the communication do not affect the timing of the HDQ communication with the HDQ slave. Use of the UART for HDQ communication requires that each word sent to or received from the UART is only a single bit of the HDQ data or address. The procedure is to set the UART baud rate to 57,600 with no parity and two stop bits. This yields a data word with 11 bits total (start bit, eight data bits, and two stop bits). At a baud rate of 57,600 (17.3 μs per bit), this is a total communication time of 190.9 µs and meets the required HDQ bit timing of 190 µs minimum. If data of 0xFE is sent to the UART, the transmitted data is low for 34.6 µs and then high for the remaining bit time and is interpreted by the HDQ slave as a 1. If data of 0xC0 is sent to the UART, the transmitted data is low for 121.5 μs and then high for the remaining bit time and is interpreted by the HDQ slave as a 0. When data is sent to the host from the HDQ slave, the received data could be interpreted as either 0xFE or 0xFC if a logic 1 is sent, or either 0xF0, 0xE0, 0xC0, 0x80, or 0x00 if a logic 0 is sent. A simple test of the received data determines the received data bit. If the received data is greater than 0xF8, the data bit should be interpreted as a logic 1, and if less than or equal to 0xF8, the data bit should be interpreted as a logic 0. This analysis assumes the UART samples the received data approximately half-way through each of the 17.3-μs UART bit times, and that capacitive loading on the HDQ line may delay the rise time of the data a few microseconds.
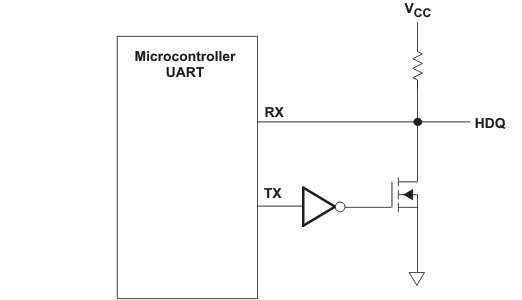
Note that the TX and RX of the UART must be tied together because HDQ is a single-wire interface. In case the TX output is not an open-drain output, it needs to be converted to an open-drain output, as shown in Figure 10-5.
Any data sent out to the HDQ slave is also received by the UART; therefore, if 8 bits of an address are sent and then 8 bits of data from the HDQ slave are received from that address, the UART inputs 16 bytes of data into the UART data buffer. The host needs to skip the first 8 bytes, which contain the command word sent to the HDQ slave and use the second 8 bytes of data.
 Figure 9-5 HDQ Communication Using UART Without Open-Drain Output