ZHCSAO1D January   2013  – August 2016 CSD97374Q4M


  1. 特性
  2. 应用
  3. 说明
    1.     Device Images
  4. 修订历史记录
  5. Pin Configuration and Functions
    1.     Pin Functions
  6. Specifications
    1. 6.1 Absolute Maximum Ratings
    2. 6.2 ESD Ratings
    3. 6.3 Recommended Operating Conditions
    4. 6.4 Thermal Information
    5. 6.5 Electrical Characteristics
    6. 6.6 Typical Characteristics
  7. Detailed Description
    1. 7.1 Functional Block Diagram
    2. 7.2 Powering CSD97374Q4M and Gate Drivers
    3. 7.3 Undervoltage Lockout Protection (UVLO)
    4. 7.4 PWM Pin
    5. 7.5 SKIP# Pin
      1. 7.5.1 Zero Crossing (ZX) Operation
    6. 7.6 Integrated Boost-Switch
  8. Application and Implementation
    1. 8.1 Application Information
    2. 8.2 Power Loss Curves
    3. 8.3 Safe Operating Curves (SOA)
    4. 8.4 Normalized Curves
    5. 8.5 Calculating Power Loss and SOA
      1. 8.5.1 Design Example
      2. 8.5.2 Calculating Power Loss
      3. 8.5.3 Calculating SOA Adjustments
  9. Layout
    1. 9.1 Layout Guidelines
      1. 9.1.1 Recommended PCB Design Overview
      2. 9.1.2 Electrical Performance
      3. 9.1.3 Thermal Performance
    2. 9.2 Layout Example
  10. 10器件和文档支持
    1. 10.1 接收文档更新通知
    2. 10.2 社区资源
    3. 10.3 商标
    4. 10.4 静电放电警告
    5. 10.5 Glossary
  11. 11机械封装和可订购信息
    1. 11.1 机械尺寸
    2. 11.2 推荐 PCB 焊盘图案
    3. 11.3 建议模板开口

封装选项

机械数据 (封装 | 引脚)
  • DPC|8
散热焊盘机械数据 (封装 | 引脚)
订购信息

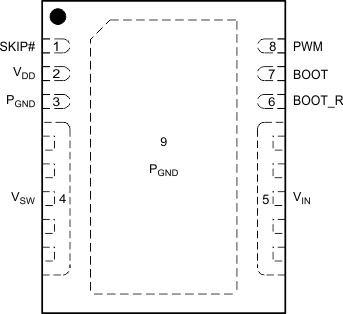
Pin Configuration and Functions

SON 3.5 mm × 4.5 mm
Top View
CSD97374Q4M PinOut_DPC-8_SLPS382_P2.gif

Pin Functions

PIN DESCRIPTION
NO. NAME
1 SKIP# This pin enables the diode emulation function. When this pin is held low, diode emulation mode is enabled for the sync FET. When SKIP# is high, the CSD97374Q4M operates in forced continuous conduction mode. A tri-state voltage on SKIP# puts the driver into a very low power state.
2 VDD Supply voltage to gate drivers and internal circuitry.
3 PGND Power ground. Needs to be connected to Pin 9 and PCB.
4 VSW Voltage switching node. Pin connection to the output inductor.
5 VIN Input voltage pin. Connect input capacitors close to this pin.
6 BOOT_R Bootstrap capacitor connection. Connect a minimum 0.1-µF 16-V X5R ceramic cap from BOOT to BOOT_R pins. The bootstrap capacitor provides the charge to turn on the control FET. The bootstrap diode is integrated. Boot_R is internally connected to VSW.
7 BOOT
8 PWM Pulse width modulated tri-state input from external controller. Logic low sets control FET gate low and sync FET gate high. Logic high sets control FET gate high and sync FET gate low. Open or Hi-Z sets both MOSFET gates low if greater than the tri-state shutdown hold-off time (t3HT).
9 PGND Power ground.