SPRABA5D January 2014 – January 2019 AM1802 , AM1802 , AM1806 , AM1806 , AM1808 , AM1808 , AM1810 , AM1810
-
Using the AM18xx Bootloader
- Trademarks
- 1 Introduction
- 2 Boot Modes
- 3 Non-AIS Boot Modes
- 4
Application Image Script (AIS) Boot
- 4.1 Section Load Command (0x58535901)
- 4.2 Section Fill Command (0x5853590A)
- 4.3 Enable CRC Command (0x58535903)
- 4.4 Disable CRC Command (0x58535904)
- 4.5 Validate CRC Command (0x58535902)
- 4.6 Jump & Close Command (0x58535906)
- 4.7 Jump Command (0x58535905)
- 4.8 Sequential Read Enable Command (0x58535963)
- 4.9 Function Execute Command (0x5853590D)
- 4.10 Boot Table Command (0x58535907)
- 5
AISgen: Tool to Generate Boot Script (AIS Image)
- 5.1 Installation
- 5.2 Getting Started
- 5.3
Generating AIS
- 5.3.1 Boot Mode and Boot Peripheral Setup
- 5.3.2 Phase-Locked Loop (PLL) Setup
- 5.3.3 Synchronous Dynamic Random Access Memory (SDRAM) Setup
- 5.3.4 DDR Setup
- 5.3.5 PSC Setup
- 5.3.6 Pin Multiplexing Setup
- 5.3.7 Application File Selection
- 5.3.8 AIS File Selection
- 5.3.9 Status and Messages
- 5.3.10 Additional AIS Options
- 5.3.11 Command Line Usage
- 6 Master Boot – Booting From a Slave Memory Device
- 7 Slave Boot – Booting From an External Master Host
- 8 UART Boot Host - Using Your PC as a UART Boot Master
- 9 Boot Requirements, Constraints and Default Settings
- 10 References
- A Boot Mode Selection Table
- B Details of Supported NAND Devices
- C CRC Computation Algorithm
-
D Details of Pre-Defined ROM Functions
- D.1 PLL0 Configuration (Index = 0, Argument Count = 2)
- D.2 PLL1 Configuration (Index = 1, Argument Count = 2)
- D.3 Clock Configuration (Index = 2, Argument Count = 1)
- D.4 mDDR/DDR2 Controller Configuration (Index = 3, Argument Count = 8)
- D.5 EMIFA SDRAM Configuration (Index = 4, Argument Count = 5)
- D.6 EMIFA Async Configuration (Index = 5, Argument Count = 5)
- D.7 PLL and Clock Configuration (Index = 6, Argument Count = 3)
- D.8 Power and Sleep Configuration (PSC) (Index = 7, Argument Count = 1)
- D.9 Pinmux Configuration (Index = 8, Argument Count = 3)
- E ROM Revision History
- Revision History
5.2 Getting Started
On successful installation, a link to start AISgen is created in the following folder: Start Menu → Program Files → Texas Instruments → AISgen for D800K008.
Click on this link to start AISgen. It may take some time for the main window to appear.
 Figure 20. AISgen Main Window
 The AISgen window groups controls within tabs to reduce interface clutter. The General tab is always enabled and controls general configuration settings, such as the boot mode selection. Table 4 lists additional tabs that can appear depending on selections made in the General tab.
Table 4. Optional Tabs in the AISgen Window
| Tab Name | Enabled By | Description |
|---|---|---|
| Flash | Boot mode selection (1) | Configures data width (NOR only) and EMIF timing for Flash interface |
| Peripheral | Boot mode selection (2) | Configures peripheral speed and enables sequential read |
| PLL0 | Configure PLL0 checkbox | Configures PLL0 clock multiplication and division |
| SDRAM | Configure SDRAM checkbox | Configures SDRAM interface register settings |
| PLL1 | Configure PLL1 checkbox | Configures PLL1 clock multiplication and division |
| DDR | Configure DDR2 checkbox | Configures DDR interface register settings |
| PSC | Configure PSC checkbox | Allows LPSCs to be turned on, turned off, or placed in sync. reset |
| Pinmux | Configure Pinmux checkbox | Configures Pinmux registers |
You may notice that some controls are disabled. A control may be disabled for multiple reasons:
- You may not have selected an associated option. For example, when the Specify Entrypoint checkbox is not selected, the adjacent numeric entry field is disabled.
- The control displays a calculated result and cannot be set directly. For example, CPU frequency on the PLL0 tab is a calculated result.
The File menu can be used to remember and re-apply previous settings. File → Save Configuration saves the current settings from all tabs to a file for later use, and File → Load Configuration re-applies settings from a file. Select File → Restore Defaults at any time to restore all fields to the default configuration shown in Figure 20.
You may also notice an icon next to one or more controls (such as the AIS File text box near the bottom of the main window) of a red circle and exclamation point. This icon indicates an improper value in the control left of the icon.
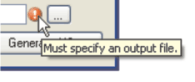
To see error details, hover the mouse over this icon for 2 seconds and an error message tool tip will appear. An icon next to the AIS file specification box indicates that a file name is required to generate AIS.
The area below the AIS file specification box is used to display status messages.
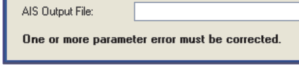
For example, if you click on the Generate AIS button when one or more error indicators are visible, a message appears stating: One or more parameter error must be corrected.
When an AIS file is successfully generated, this area will display the AIS file’s size. It will also report when the AISgen configuration settings are saved to or loaded from a file.