SNLU293A December 2022 – December 2022
- DS560DF810EVM User's Guide
- Trademarks
- 1Hardware Description and Setup
- 2Software Description
- 3Test Case Examples
- 4Supplemental Documents
- 5EVM Cable Assemblies
- 6Revision History
2.4.3 Example: Programming DS560DF810EVM for 26.5625 GBd PAM4 Test Case
In this step, the retimer device on the DS560DF810EVM is programmed. The procedure to program the EVM are as follows:
Ensure CAL_CLK_IN has 25 MHz input clock signal.
Provide a valid input signal to the DUT retimer channel.
Execute “setup.py” (user may select file on side panel and click F5).
Execute “devinit.py” (user may select file on side panel and click F5).
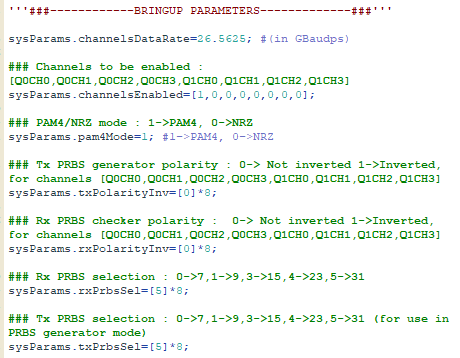
Execute “1_bringupParams.py” after entering the desired 26.5625 GBd retimer settings for the “Bringup Parameters” (see Figure 2-5).
Data rate is entered in unit of GBd.
PAM4 mode is enabled by setting system variable to 1.
For this case, PRBS31Q pattern is selected for Tx and Rx PRBS functions through value of 5.
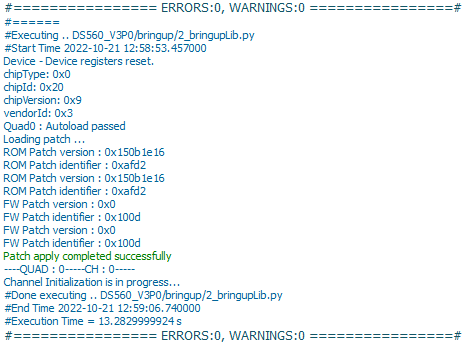
Execute the “bringupLib.py” script. This will load and apply a ROM patch before initializing all enabled retimer channels (see Figure 2-6).
Note:At the end of the bring-up scripts, the variables “quad” and “ch” will be set corresponding to the last retimer channel enabled. The variables can be re-assigned according to the channel of interest by manually entering values in one of the Latte scripts.
 Figure 2-5 Latte GUI Snapshot
Showing the User Configurable Retimer Parameters from the
“1_bringupParams.py” Script
 Figure 2-6 Example Latte GUI
Log Window Snapshot Showing ROM Patch Load and Channel
Initialization
Figure 2-6 Example Latte GUI
Log Window Snapshot Showing ROM Patch Load and Channel
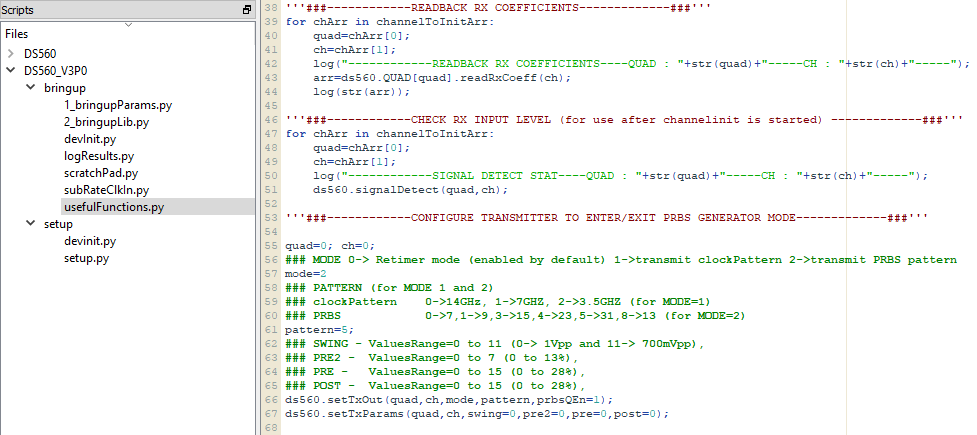
InitializationIf the retimer channel in question is intended to serve as Tx PRBS generator for retimer Tx to retimer Rx link tests, the “usefulFunctions.py” script may be used to configure this channel accordingly (see Figure 2-7).
Go to “Configure transmitter” section of “usefulFunctions.py”.
Set parameter mode=2 for “transmit PRBS pattern”.
Set the numeric value for the “pattern” variable for the desired pattern.
The user may highlight the “configure transmitter” command lines on the Latte window and click on F7 to execute only those commands.
 Figure 2-7 Latte GUI Snapshot
Showing the “usefulFunctions.py” User Parameters
Figure 2-7 Latte GUI Snapshot
Showing the “usefulFunctions.py” User ParametersIn the case that a sub rate clock input is supplied to the retimer channel, an alternate script “subRateClkIn.py” should be run in place of “2_bringupLib.py”. This allows the retimer channel to always observe CDR lock in cases where phase lock is achieved prior to frequency lock.
subRateClkIn.py (for use in Latte scripting window).
### Hardware reset
if(setupInfo==0):
    ds560.hardReset();
delay(0.5);

### Software reset and I2C check
resetStat=ds560.softReset();

### Device bringup Call

[quadToOn,channelToInitArr]=ds560.getChannelArr();

if(resetStat):
    bringupStat=ds560.deviceBringup();

quad=0;ch=0;
ds560.channelInitSubRateInput(quad,ch);