ZHCS566I February 2010 – March 2022 LMZ12010
PRODUCTION DATA
- 1 特性
- 2 应用
- 3 说明
- 4 Revision History
- 5 Pin Configuration and Functions
- 6 Specifications
- 7 Detailed Description
- 8 Application and Implementation
- 9 Power Supply Recommendations
- 10Layout
- 11Device and Documentation Support
- 12Mechanical, Packaging, and Orderable Information
8.2.2.1 Enable Divider, RENT, RENB, and RENH Selection
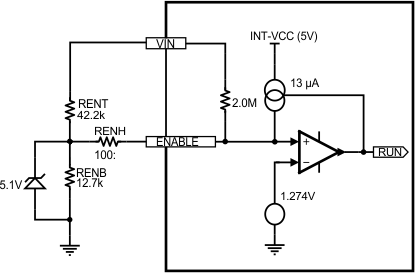
Internal to the module is a 2-MΩ pullup resistor connected from VIN to Enable. For applications not requiring precision undervoltage lockout (UVLO), the Enable input can be left open circuit and the internal resistor will always enable the module. In such case, the internal UVLO occurs typically at 4.3 V (VIN rising).
In applications with separate supervisory circuits, Enable can be directly interfaced to a logic source. In the case of sequencing supplies, the divider is connected to a rail that becomes active earlier in the power-up cycle than the LMZ12010 output rail.
Enable provides a precise 1.274-V threshold to allow direct logic drive or connection to a voltage divider from a higher enable voltage such as VIN. Additionally there is 13 μA (typical) of switched offset current, allowing programmable hysteresis.
The function of the enable divider is to allow the designer to choose an input voltage below which the circuit will be disabled. This implements the feature of a programmable UVLO. The two resistors must be chosen based on the following ratio:
The LMZ12010 typical application shows 12.7 kΩ for RENB and 42.2 kΩ for RENT, resulting in a rising UVLO of 5.51 V. Note that this divider presents 4.62 V to the EN input when VIN is raised to 20 V. This upper voltage must always be checked, making sure that it never exceeds the absolute maximum 5.5-V limit for Enable. A 5.1-V Zener clamp can be applied in cases where the upper voltage would exceed the range of operation for the EN input. The Zener clamp is not required if the target application prohibits the maximum Enable input voltage from being exceeded.
Additional enable voltage hysteresis can be added with the inclusion of RENH. It is possible to select values for RENT and RENB such that RENH is a value of zero allowing it to be omitted from the design.
Rising threshold can be calculated as follows:
Whereas the falling threshold level can be calculated using:
 Figure 8-2 Enable Input Detail