SPMA082 August 2021 TM4C1230C3PM , TM4C1230D5PM , TM4C1230E6PM , TM4C1230H6PM , TM4C1231C3PM , TM4C1231D5PM , TM4C1231D5PZ , TM4C1231E6PM , TM4C1231E6PZ , TM4C1231H6PGE , TM4C1231H6PM , TM4C1231H6PZ , TM4C1232C3PM , TM4C1232D5PM , TM4C1232E6PM , TM4C1232H6PM , TM4C1233C3PM , TM4C1233D5PM , TM4C1233D5PZ , TM4C1233E6PM , TM4C1233E6PZ , TM4C1233H6PGE , TM4C1233H6PM , TM4C1233H6PZ , TM4C1236D5PM , TM4C1236E6PM , TM4C1236H6PM , TM4C1237D5PM , TM4C1237D5PZ , TM4C1237E6PM , TM4C1237E6PZ , TM4C1237H6PGE , TM4C1237H6PM , TM4C1237H6PZ , TM4C123AE6PM , TM4C123AH6PM , TM4C123BE6PM , TM4C123BE6PZ , TM4C123BH6PGE , TM4C123BH6PM , TM4C123BH6PZ , TM4C123BH6ZRB , TM4C123FE6PM , TM4C123FH6PM , TM4C123GE6PM , TM4C123GE6PZ , TM4C123GH6PGE , TM4C123GH6PM , TM4C123GH6PZ , TM4C123GH6ZRB , TM4C1290NCPDT , TM4C1290NCZAD , TM4C1292NCPDT , TM4C1292NCZAD , TM4C1294KCPDT , TM4C1294NCPDT , TM4C1294NCZAD , TM4C1297NCZAD , TM4C1299KCZAD , TM4C1299NCZAD , TM4C129CNCPDT , TM4C129CNCZAD , TM4C129DNCPDT , TM4C129DNCZAD , TM4C129EKCPDT , TM4C129ENCPDT , TM4C129ENCZAD , TM4C129LNCZAD , TM4C129XKCZAD , TM4C129XNCZAD
6.1 Pnmtoc
The pnmtoc utilities converts a NetPBM image file into the format that is recognized by the graphics library. The input image must be in the raw PPM format (in other words, with the P6 tag). The NetPBM image format can be produced using GIMP, NetPBM, ImageMagick, or numerous other open source and proprietary image manipulation packages.
Use an example to demonstrate the usage of this utility:
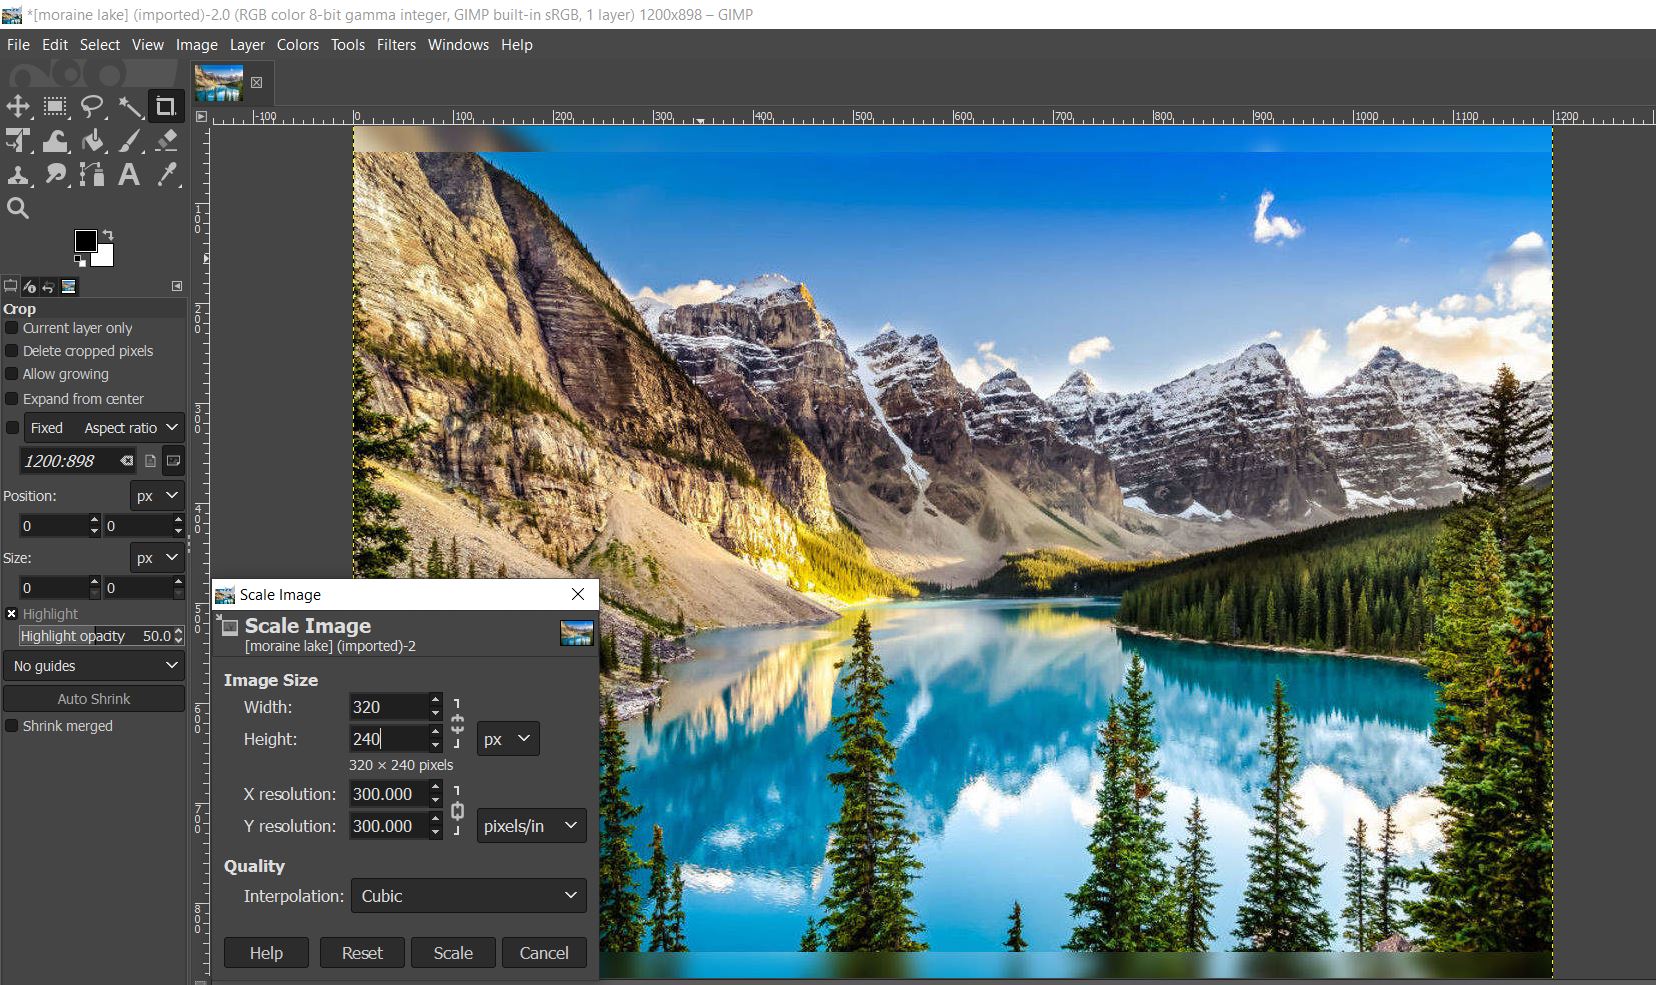
- Load a JPEG image file into GIMP, see Figure 6-1.
- Scale the image to 320x240 resolution.
- Convert the image to indexed mode (Image->Mode->Indexed). Select “Generating optimum palette” and select either 2, 16, or 256 as the maximum number of colors (for a 1 BPP, 4 BPP, or 8 BPP image respectively). If the image is already in indexed mode, it can be converted RGB mode (image->Mode->RGB) and then back to indexed mode.
- Save the file as a PNM image (File->Save As). Select raw format when prompted.
- Use pnmtoc to convert the PNM image
into c array as in:
> pnmtoc -c <input_image.pnm> output_image.c
- To test the new image, replace the g_pucLogo array in the image.c file for the grlib_driver_test example with the new array generated in the output_image.c file.
- Recompile the grlib_driver_test project and run. You should see the new image rendered on the display, see Figure 6-2.
 Figure 6-1 Gimp Scaling the Image to 320x240
Resolution