SLAU646F September 2015 – June 2020
- Read This First
- 1Introduction
- 2Installing MSP430 GCC Toolchain
-
3Using MSP430 GCC Within CCS
- 3.1 Create New Project
- 3.2 Debug Using MSP-FET, MSPFET430UIF, eZ-FET, eZ430
- 3.3
Build Options for MSP430 GCC
- 3.3.1 GNU Compiler
- 3.3.2 GNU Compiler: Runtime
- 3.3.3 GNU Compiler: Symbols
- 3.3.4 GNU Compiler: Directories
- 3.3.5 GNU Compiler: Optimization
- 3.3.6 GNU Compiler: Preprocessor
- 3.3.7 GNU Compiler: Assembler
- 3.3.8 GNU Compiler: Debugging
- 3.3.9 GNU Compiler: Diagnostic Options
- 3.3.10 GNU Compiler: Miscellaneous
- 3.3.11 GNU Linker
- 3.3.12 GNU Linker: Basic
- 3.3.13 GNU Linker: Libraries
- 3.3.14 GNU Linker: Symbols
- 3.3.15 GNU Linker: Miscellaneous
- 3.3.16 GNU Objcopy Utility
- 3.4 CCS Compared to MSP430 GCC
-
4MSP430 GCC Stand-Alone Package
- 4.1 MSP430 GCC Stand-Alone Package Folder Structure
- 4.2 Package Content
- 4.3 MSP430 GCC Options
- 4.4 MSP430 Built-in Functions
- 4.5 Using MSP430 GCC Support Files
- 4.6 Quick Start: Blink the LED
- 4.7 GDB Settings
- 5MSP430 GCC Features
- 6Building MSP430 GCC From Sources
- 7MSP430 GCC and MSPGCC
- 8Appendix
- 9References
- Revision History
3.1 Create New Project
This section describes the step-by-step instructions to create an assembly or C project from scratch and to download and run an application on the MSP430 MCU using the MSP430 GCC toolchain. Also, the CCS Help presents a more detailed information of the process.
- Start CCS (Start → All Programs → Texas Instruments → Code Composer Studio → Code Composer Studio).
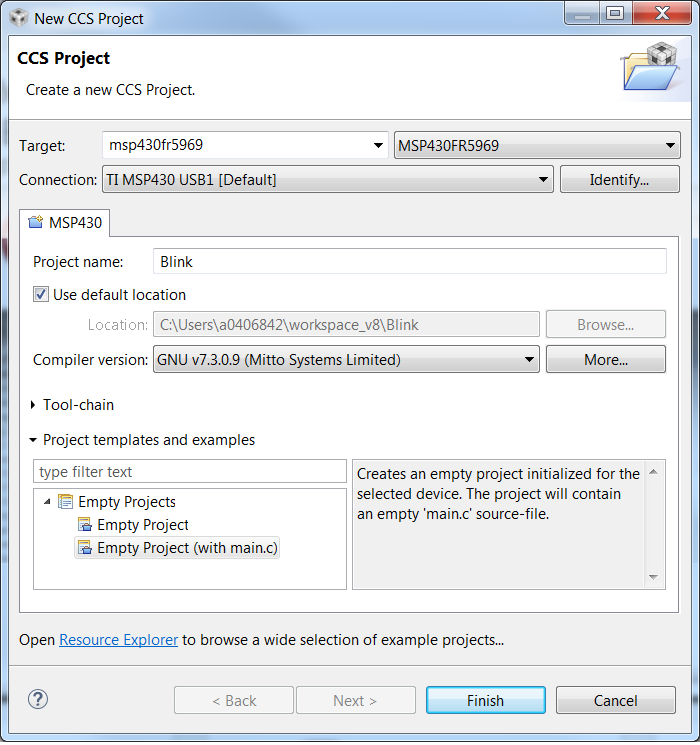
- Create a new project (File → New → CCS Project). Select the appropriate MSP430 device variant in the Target field and enter the name for the project.
- Select GNU v7.3.0.9 (Mitto Systems Limited) for Compiler version (or any newer version).
- In the Project template and examples section, select Empty Project (with main.c). For assembly-only projects, select Empty Project.
 Figure 3-1 Creating New CCS Project Using MSP430 GCC
 - If you are using a USB Flash Emulation Tool such as the MSP-FET, MSP-FET430UIF, eZ-FET, or the eZ430 Development Tool, they should be already configured by default.
- For C projects, the setup is complete now.
- Click Finish to create a new project that is then visible in the Project Explorer view.
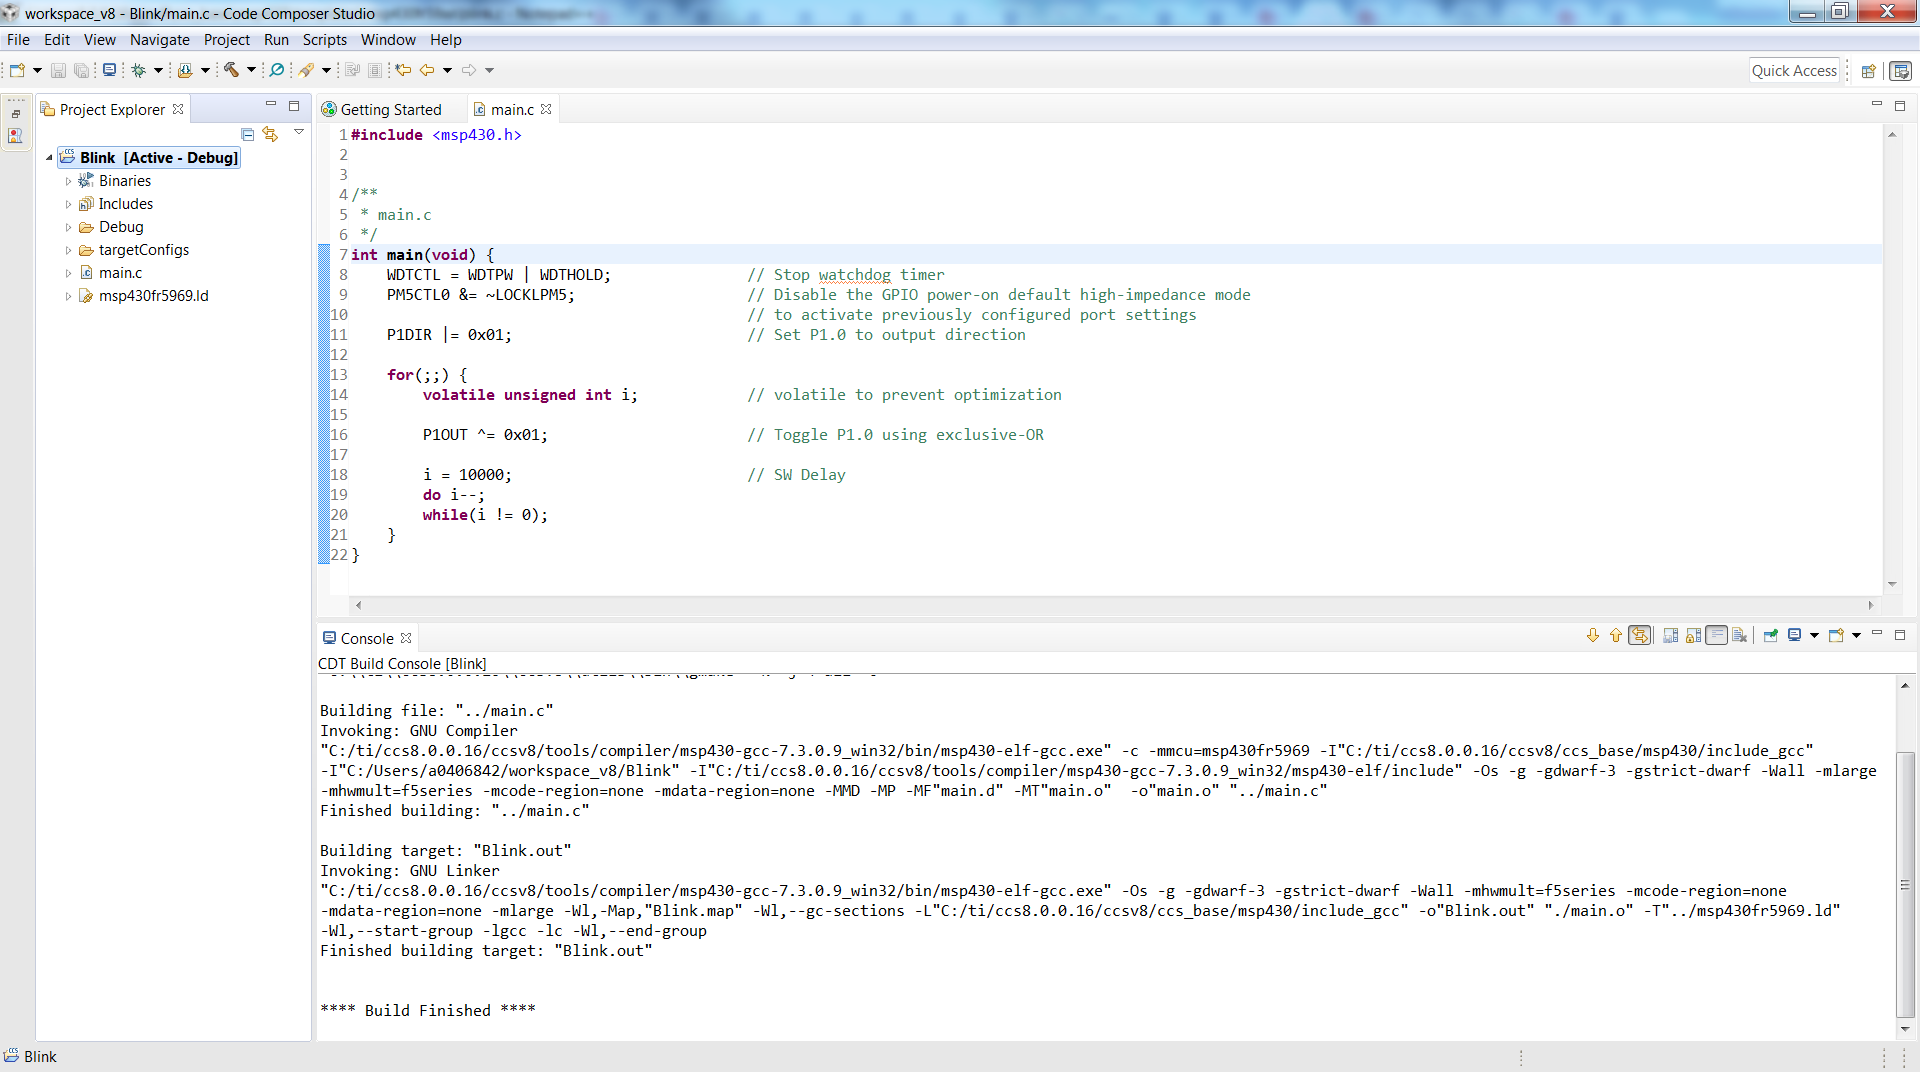
Notice that the project contains a .ld file (appropriate for the target selected). This is the linker script that contains the memory layout and section allocation. This file is the equivalent of the TI linker command file (.cmd) used by TI MSP430 Compiler and Linker.
- Enter the program code into the main.c file.
To use an existing source file for the project, click Project → Add Files... and browse to the file of interest. Single click on the file and click Open or double-click on the file name to complete the addition of it into the project folder.
Now add the necessary source files to the project and build. Similar to TI tools, additional compiler and linker options can be set from Project Properties.
- Build the project (Project
→ Build Project).
 Figure 3-2 CCS Project
Using MSP430 GCC
 - Debug the application (Run → Debug (F11)). This starts the debugger, which gains control of the target, erases the target memory, programs the target memory with the application, and resets the target.
- Click Run → Resume (F8) to start the application.
- Click Run → Terminate to stop the application and to exit the debugger. CCS automatically returns to the C/C++ view (code editor).