ZHCSAR9I January 2011 – December 2014 LMP91000
PRODUCTION DATA.
- 1 特性
- 2 应用
- 3 说明
- 4 修订历史记录
- 5 Pin Configuration and Functions
- 6 Specifications
-
7 Detailed Description
- 7.1 Overview
- 7.2 Functional Block Diagram
- 7.3 Feature Description
- 7.4 Device Functional Modes
- 7.5 Programming
- 7.6 Registers Maps
- 8 Application and Implementation
- 9 Power Supply Recommendations
- 10Layout
- 11器件和文档支持
- 12机械封装和可订购信息
8 Application and Implementation
NOTE
Information in the following applications sections is not part of the TI component specification, and TI does not warrant its accuracy or completeness. TI’s customers are responsible for determining suitability of components for their purposes. Customers should validate and test their design implementation to confirm system functionality.
8.1 Application Information
8.1.1 Connection of More Than One LMP91000 to the I2C BUS
The LMP91000 comes out with a unique and fixed I2C slave address. It is still possible to connect more than one LMP91000 to an I2C bus and select each device using the MENB pin. The MENB simply enables/disables the I2C communication of the LMP91000. When the MENB is at logic level low all the I2C communication is enabled, it is disabled when MENB is at high logic level.
In a system based on a μcontroller and more than one LMP91000 connected to the I2C bus, the I2C lines (SDA and SCL) are shared, while the MENB of each LMP91000 is connected to a dedicate GPIO port of the μcontroller.
The μcontroller starts communication asserting one out of N MENB signals where N is the total number of LMP91000s connected to the I2C bus. Only the enabled device will acknowledge the I2C commands. After finishing communicating with this particular LMP91000, the microcontroller de-asserts the corresponding MENB and repeats the procedure for other LMP91000s. Figure 30 shows the typical connection when more than one LMP91000 is connected to the I2C bus.
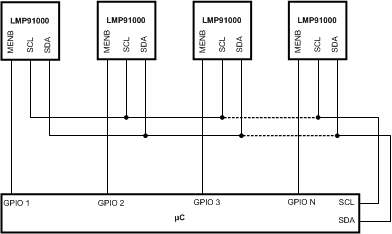 Figure 30. More Than One LMP91000 on I2C Bus
8.1.2 Smart Gas Sensor Analog Front-End
The LMP91000 together with an external EEPROM represents the core of a SMART GAS SENSOR AFE. In the EEPROM it is possible to store the information related to the GAS sensor type, calibration and LMP91000's configuration (content of registers 10h, 11h, 12h). At startup the microcontroller reads the EEPROM's content and configures the LMP91000. A typical smart gas sensor AFE is shown in Figure 31. The connection of MENB to the hardware address pin A0 of the EEPROM allows the microcontroller to select the LMP91000 and its corresponding EEPROM when more than one smart gas sensor AFE is present on the I2C bus. Note: only EEPROM I2C addresses with A0=0 should be used in this configuration.
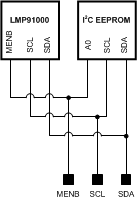 Figure 31. Smart Gas Sensor AFE
8.1.3 Smart Gas Sensor AFES on I2C BUS
The connection of Smart gas sensor AFEs on the I2C bus is the natural extension of the previous concepts. Also in this case the microcontroller starts communication asserting 1 out of N MENB signals where N is the total number of smart gas sensor AFE connected to the I2C bus. Only one of the devices (either LMP91000 or its corresponding EEPROM) in the smart gas sensor AFE enabled will acknowledge the I2C commands. When the communication with this particular module ends, the microcontroller de-asserts the corresponding MENB and repeats the procedure for other modules. Figure 32 shows the typical connection when several smart gas sensor AFEs are connected to the I2C bus.
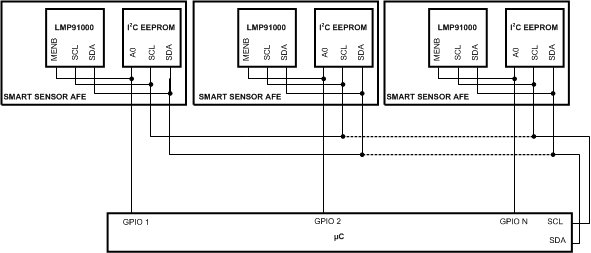 Figure 32. I2C Bus
8.2 Typical Application
The LMP91000 can be used in conjunction with environment sensors to build a battery power environment monitors such as an air quality data-loggers, or wirless sensors. In this application due to the monitored phenomena the micro-controller and the LMP9100 spend most of the time in idle state. In order to save power and enlarge the battery life, the LMP91000 can be put in deep sleep mode with Internal FET feature enabled. To optimize the current consumption of the entire system, the acquisitions and in general the activities of the micro can operate at set intervals with the TPL5000. The TPL5000 is a programmable timer with watch-dog feature.
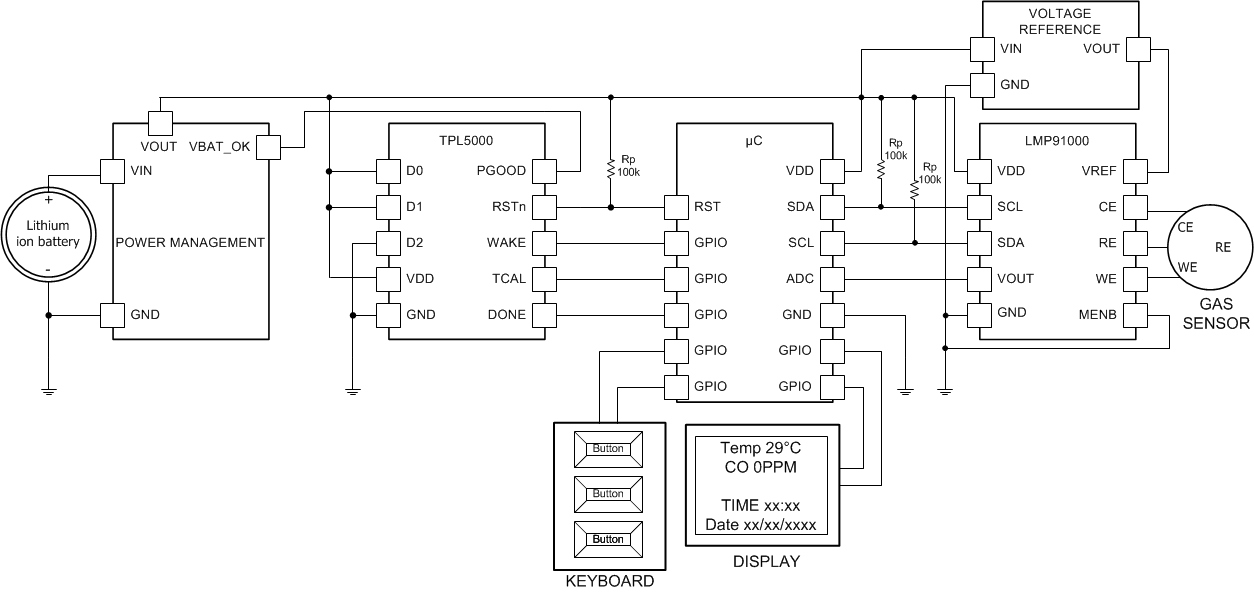 Figure 33. Data-Logger
8.2.1 Design Requirements
The Design is driven by the low-current consumption constraint. The data are usually acquired on a rate that ranges between 1s to 10s. The highest necessity it the maximization of the battery life. The TPL5000 helps achieving that goal because it allows putting the micro-controller in its lowest power mode. Moreover the deep slep mode of the LMP91000 allows burning only some hundreds of nA.
8.2.2 Detailed Design Procedure
When the focal constraint is the battery, the selection of a low power voltage reference, a micro-controller and display is mandatory. The first step in the design is the calculation of the power consumption of each device in the different mode of operations. An example is the LMP91000; the device has gas measurement mode, sleep mode and micro-controller in low power mode which is normal operation. The different modes offer the possibility to select the appropriate timer interval which respect the application constraint and maximize the life of the battery.
8.2.2.1 Sensor Test Procedure
The LMP91000 has all the hardware and programmability features to implement some test procedures. The purpose of the test procedure is to:
- test proper function of the sensor (status of health)
- test proper connection of the sensor to the LMP91000
The test procedure is very easy. The variable bias block is user programmable through the digital interface. A step voltage can be applied by the end user to the positive input of A1. As a consequence a transient current will start flowing into the sensor (to charge its internal capacitance) and it will be detected by the TIA. If the current transient is not detected, either a sensor fault or a connection problem is present. The slope and the aspect of the transient response can also be used to detect sensor aging (for example, a cell that is drying and no longer efficiently conducts the current). After it is verified that the sensor is working properly, the LMP91000 needs to be reset to its original configuration. It is not required to observe the full transient in order to contain the testing time. All the needed information are included in the transient slopes (both edges). Figure 34 shows an example of the test procedure, a Carbon Monoxide sensor is connected to the LMP91000, two pulses are then sequentially applied to the bias voltage:
- from 0 mV to 40 mV
- from 40 mV to –40 mV
and finally the bias is set again at 0mV since this is the normal operation condition for this sensor.
8.2.3 Application Curve
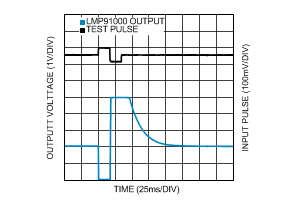 Figure 34. Test Procedure Example