SPMA041G January 2012 – October 2015 TM4C1230C3PM , TM4C1230C3PM , TM4C1230D5PM , TM4C1230D5PM , TM4C1230E6PM , TM4C1230E6PM , TM4C1230H6PM , TM4C1230H6PM , TM4C1231C3PM , TM4C1231C3PM , TM4C1231D5PM , TM4C1231D5PM , TM4C1231D5PZ , TM4C1231D5PZ , TM4C1231E6PM , TM4C1231E6PM , TM4C1231E6PZ , TM4C1231E6PZ , TM4C1231H6PGE , TM4C1231H6PGE , TM4C1231H6PM , TM4C1231H6PM , TM4C1231H6PZ , TM4C1231H6PZ , TM4C1232C3PM , TM4C1232C3PM , TM4C1232D5PM , TM4C1232D5PM , TM4C1232E6PM , TM4C1232E6PM , TM4C1232H6PM , TM4C1232H6PM , TM4C1233C3PM , TM4C1233C3PM , TM4C1233D5PM , TM4C1233D5PM , TM4C1233D5PZ , TM4C1233D5PZ , TM4C1233E6PM , TM4C1233E6PM , TM4C1233E6PZ , TM4C1233E6PZ , TM4C1233H6PGE , TM4C1233H6PGE , TM4C1233H6PM , TM4C1233H6PM , TM4C1233H6PZ , TM4C1233H6PZ , TM4C1236D5PM , TM4C1236D5PM , TM4C1236E6PM , TM4C1236E6PM , TM4C1236H6PM , TM4C1236H6PM , TM4C1237D5PM , TM4C1237D5PM , TM4C1237D5PZ , TM4C1237D5PZ , TM4C1237E6PM , TM4C1237E6PM , TM4C1237E6PZ , TM4C1237E6PZ , TM4C1237H6PGE , TM4C1237H6PGE , TM4C1237H6PM , TM4C1237H6PM , TM4C1237H6PZ , TM4C1237H6PZ , TM4C123AE6PM , TM4C123AE6PM , TM4C123AH6PM , TM4C123AH6PM , TM4C123BE6PM , TM4C123BE6PM , TM4C123BE6PZ , TM4C123BE6PZ , TM4C123BH6PGE , TM4C123BH6PGE , TM4C123BH6PM , TM4C123BH6PM , TM4C123BH6PZ , TM4C123BH6PZ , TM4C123BH6ZRB , TM4C123BH6ZRB , TM4C123FE6PM , TM4C123FE6PM , TM4C123FH6PM , TM4C123FH6PM , TM4C123GE6PM , TM4C123GE6PM , TM4C123GE6PZ , TM4C123GE6PZ , TM4C123GH6PGE , TM4C123GH6PGE , TM4C123GH6PM , TM4C123GH6PM , TM4C123GH6PZ , TM4C123GH6PZ , TM4C123GH6ZRB , TM4C123GH6ZRB , TM4C123GH6ZXR , TM4C123GH6ZXR , TM4C1290NCPDT , TM4C1290NCPDT , TM4C1290NCZAD , TM4C1290NCZAD , TM4C1292NCPDT , TM4C1292NCPDT , TM4C1292NCZAD , TM4C1292NCZAD , TM4C1294KCPDT , TM4C1294KCPDT , TM4C1294NCPDT , TM4C1294NCPDT , TM4C1294NCZAD , TM4C1294NCZAD , TM4C1297NCZAD , TM4C1297NCZAD , TM4C1299KCZAD , TM4C1299KCZAD , TM4C1299NCZAD , TM4C1299NCZAD , TM4C129CNCPDT , TM4C129CNCPDT , TM4C129CNCZAD , TM4C129CNCZAD , TM4C129DNCPDT , TM4C129DNCPDT , TM4C129DNCZAD , TM4C129DNCZAD , TM4C129EKCPDT , TM4C129EKCPDT , TM4C129ENCPDT , TM4C129ENCPDT , TM4C129ENCZAD , TM4C129ENCZAD , TM4C129LNCZAD , TM4C129LNCZAD , TM4C129XKCZAD , TM4C129XKCZAD , TM4C129XNCZAD , TM4C129XNCZAD
4.5 Source Code Modifications
For almost all of the ARM example projects, the above steps can be followed in a similar manner to build and run the ARM-provided source code. There is one project, though, that require modifications to the source code to properly build and run on the TM4C123G Launchpad.
The linear interpolation example contains a table of values meant to represent a waveform of sin(x) as x goes from negative pi to 2*pi by increments of 0.00005. This granularity causes the resulting compiled binary to be too large in size for the TM4C series launchpad. An alternate data file, ti_linear_interp_data_37968.c, has been provided along with this application report that represents the same array given increments of 0.00025 instead. This causes the compiled binary to be small enough to fit into a part with a flash size of 256 kB and an SRAM size of 32 kB for the TM4C123 Platform devices. This necessitates a change in the linear interpolation example code as well (as the size and name of the statically allocated array has been changed), so when adding the source code for this example, it is necessary to use the ti_linear_interp_example_f32.c file included with this application report
The linear interpolation example also contains a bug that might cause it to give the appearance of failing when executing. The purpose of the example is to show the difference in accuracy that can be achieved by using the CMSIS DSP library’s linear interpolation sin function, which uses both cubic interpolation and linear interpolation to derive its return values, and the library’s standard sin function, which uses only cubic interpolation. The method that is used to compare the accuracy of these two functions is to calculate the signal-to-noise ratio of both signals with respect to a pre-calculated signal that is known to be correct. Unfortunately, the method of using linear interpolation gives a result that almost exactly matches the pre-calculated signal, which causes the SNR function to attempt to take the log of a value divided by 0. As such, the function’s self-test method cannot be assumed trustworthy. The user should instead use the debugger to verify that the 10-element-long arrays representing the sin values are indeed more accurate when using the linear interpolation functions than when using the standard functions. This can be done using the following steps:
- Select the Expression view in the Code Composer Studio debugger context
- Click Add new expression, and type in testRefSinOutput32_f32. This will add the array containing the pre-calculated reference sin output to the expressions list.
- Click the arrow to the left of testRefSinOutput32_f32 to display all elements of the array.
- Click Add new expressions, and type testOutput. This will add the array containing the sin values as calculated by the CMSIS DSP_Lib sin function that uses cubic interpolation to the expression list.
- Click the arrow to the left of testOutput to display all elements of the array.
- Click Add new expressions, and type testLinIntOutput. This will add the array containing the sin values as calculated by the CMSIS DSPlib that uses both cubic and linear interpolation sin function to the expression list.
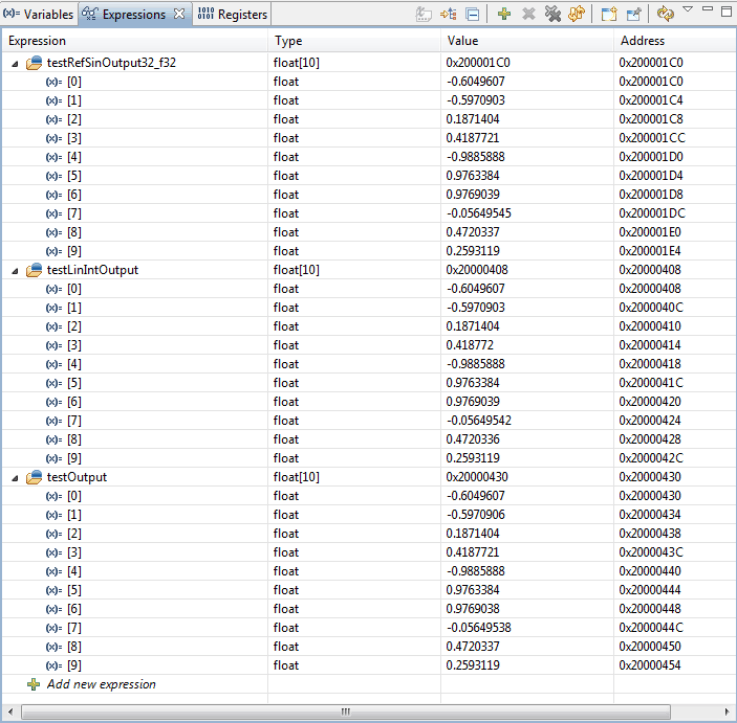
- Click the arrow to the left of testLinIntOutput to display all elements of the array (see Figure 28).
- If you manually examine the values stored at each element, you will see that for the most part, the sin values calculated using both cubic and linear interpolation are closer to the reference values than those calculated using only cubic interpolation. In the example above, this is especially noticeable on element 7 of the output arrays.
 Figure 28. Using the Debugger to Examine the Results of the linear_interp_example Project