SSZTB45 July 2016 LMX8410L , TRF370315 , TRF370317 , TRF370333 , TRF370417 , TRF3705 , TRF3710 , TRF371109 , TRF371125 , TRF371135 , TRF372017 , TRF3722 , TRF37T05
Have you ever been frustrated just trying to get your phase-locked loop (PLL) to lock? Premature assumptions can make the debugging process much longer and more tedious than necessary. By following the processes outlined here for verifying communication and establishing lock, the debugging process can be simplified.
Step 1: Verify Communication
The first step is to verify the PLL’s ability to respond to programming. If the PLL is not locking and you cannot read back from it, try sending software commands that require a minimum amount of hardware commands to work. One possibility is to power the PLL up and down via software (not pin) and look for a predictable current change or bias-voltage-level change on a pin. Many PLLs have a bias level on their input (OSCin) pin that is Vcc/2 when powered up and 0V when powered down.
If the PLL has integrated voltage controlled oscillators (VCOs), look at the low-dropout (LDO) output pin voltages and see if they react to power-down and power-up commands. It might be possible to toggle input/output (I/O) pins such as the MUXout pin on many LMX PLLs. If you can verify communications with these methods, then go ahead and try to achieve lock.
If you cannot verify communication, then look for common culprits such as the following:
- Crossed programming lines
- Latch enable (also called chip select bar (CSB)) held too high
- Too much low-pass filtering on the software inputs
- Timing issues with the Serial Peripheral Interface bus (SPI)
- Incorrectly soldered power pins.
Step 2: Establish Lock
Once you have verified communication, the next step is to try to achieve lock with the PLL. These are some of the more common reasons for an unlocked PLL:
- Misinterpretation of the lock detect pin. If configured incorrectly, the lock detect pin can give an indication that the PLL is unlocked when in fact it is locked. It is good practice to verify this condition by looking at the output on a spectrum analyzer, or by looking at the VCO tuning voltage.
- Programming issues. Incorrect information sent to the PLL can easily cause it not to lock. Some of the more common programming errors include a VCO programmed to a frequency out of range, incorrect settings for VCO calibration or incorrect timing of the registers.
- VCO calibration issues. For PLLs with integrated VCOs, the frequency range is typically divided into several different bands. Incorrect programming can cause the VCO to lock to the wrong band. The programming of a particular register typically initiates VCO calibration; therefore, you should confirm that the other software and hardware conditions (especially the input reference) are proper when programming this register so that the calibration works correctly.
- Issues with the input or feedback path. If the input from the VCO or input reference has an issue due to low power level, low slew rate, poor matching or high harmonics, this can cause the PLL to unlock. Most PLLs have a way to output the actual frequency output of the internal counters and send this to a pin.
- Open or short to ground in the loop filter. You can typically determine open and short by looking at the tuning voltage, or toggling the phase-detector polarity and looking for a frequency change.
- PLL loop filter instability. It is typically a symptom of instability if lowering the charge-pump current causes the PLL lock, but just because this technique does not work does not rule out instability. Common causes for loop-filter instability include neglecting to account for VCO input capacitance; using an integrated filter that over-restricts the loop bandwidth; or using the PLL with different settings (charge-pump gain, VCO gain, VCO frequency or phase-detector frequency) than the PLL was originally designed for. Various TI tools can simulate loop-filter instability such as the PLLatinum™ simulator tool.
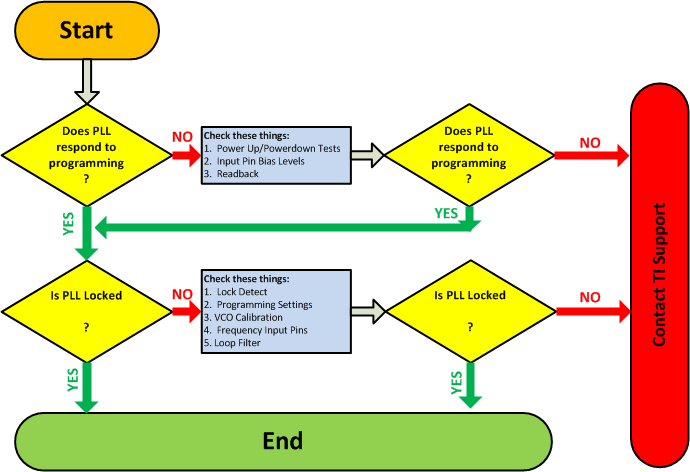
The debugging process for getting a PLL to lock can be much simpler by following a systematic approach and not making premature assumptions. Figure 1 shows a flowchart that can be used to guide one through this process.
 Figure 1 PLL Debugging Flowchart
If you would like to learn more about the challenges of unlocked PLLs, check out the Texas Instruments portfolio of phase lock loops.
Additional Resources
- Get started designing with these tools: