SSZT146 july 2021 DLP300S , DLP301S
Used for decades in large, industrial and high-end specialty applications, 3D printers with DLP® technology are becoming a reality in homes, offices or labs, with compact and affordable versions able to fit on a desk or a table. Despite such a small form factor, desktop 3D printers that utilize DLP chipsets still deliver fast print speeds, excellent resolution performance and reliability.
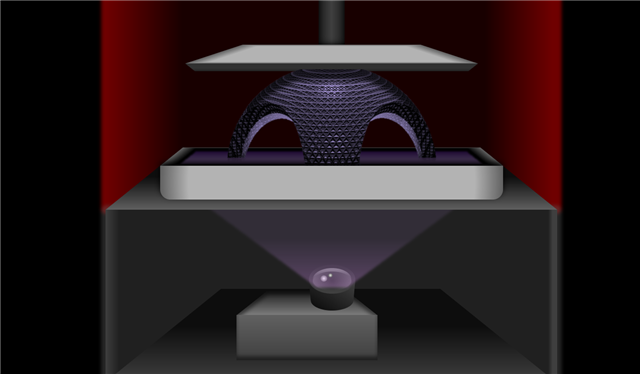
If you are designing a desktop 3D printer with DLP technology as seen in Figure 1, here are three important design considerations that can take your printing performance to the next level.
 Figure 1 Cross Section of a 3D Printer with DLP Technology
Decision No. 1: Choose Which Type of Chipset Is Best for Designing Your DLP 3D Printer
The earliest 3D printers with DLP technology used commercial display projectors purchased at big box stores and modified by 3D print companies to project into resin. The 3D printing market has since matured, but some designers still choose to use chips designed for display applications rather than light control in their 3D printers. There is a significant difference between standard display chips and light control chips that are designed for 3D printing. Display chips are not designed for and do not have specifications for 3D printing, and there are additional factors to consider.
Eyes and resin interpret images differently. For display chipsets, there has been decades of research and development on how the human eye best interprets images and colors, involving advanced algorithms, dithering and image processing that produce video optimized for your eyes. But light control chipsets are designed without algorithms, dithering, and image processing to ensure that a 3D print matches the input data provided.
When projected in resin, display chips can potentially create artifacts and inaccuracies in a 3D print. Light control chips designed for 3D printing, such as TI’s DLP300S and DLP301S, project images differently to deliver precise and accurate 3D prints – just don't try to watch a movie from the bottom of the resin vat.
Decision No. 2: Determine How to Process Your Layer Slices to Achieve the Best Surface Finish
Because the pixels in a 3D printer leveraging DLP technology are focused on the resin, you get excellent resolution performance with pixels that won’t blur like other technologies. LCD-based 3D printers, for example, emit a wide angle of light from each pixel, causing pixels to bloom or blur together in the resin. DLP chips project optically focused light.
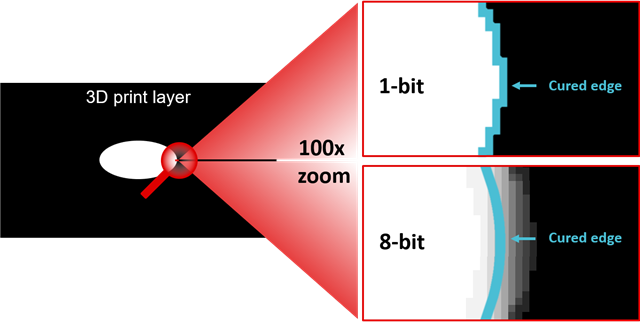
3D printers with DLP technology print what they project, so the software used to prepare and slice 3D models for printing needs to be able to take this into account when creating cross-sectional sliced images. Just as pixelation and stair steps are visible in a 1-bit black-and-white image, resin absorbs light energy in the same way – with boxy pixels. Using grayscale images can completely eliminate this effect, as shown in Figure 2. The projected layers should show exactly the object that the consumer is printing, with the exact surface finish required.
 Figure 2 Effects of Grayscale Layer Images on 3D Prints
In advanced industrial or medical applications, which require the highest precision, these gray shades can be taken a step further in the layer slicing software design to more precisely control the formation of cured resin. Controlling gray shades enables the position of cured structures at a subpixel level by changing the shade of gray, and thus the amount and position of light energy on the resin.
Decision No. 3: Determine the Highest Resolution You Can Achieve
In many display applications, projectors take advantage of the high switching speed and efficiency of DLP technology to achieve higher resolution. With optimization for 3D print applications, it is possible to apply this same concept to expand the resolution from 0.9 megapixels to 3.6 megapixels.
In order to use DLP technology to its fullest, it’s best not to limit the resolution. The DLP300S and DLP301S enable the use of low-cost four-way optical actuators to project quadruple the number of pixels on the resin compared to a traditional design, facilitating dramatic increases in build size, increased resolution density, or both. Higher resolution also enables a smoother surface finish and finer detail.
Conclusion
Starting your new desktop 3D printer design with DLP technology can be challenging given the different design decisions you must make. Being careful to assess the options available to you and their implications on your end product will ensure that your printer can push the bounds of what the industry is capable of today. As demand continues to grow in the consumer and professional desktop 3D printer market, designing a printer that prints quickly and reliably, and with accuracy and precision will be the key to amazing your customers.
Additional Resources
- Discover 3D printing applications.
- Learn more about the DLP300S and DLP301S.