SNVAA20 July 2021 DRV8833 , DRV8833 , LMR33630 , LMR33630
2 Motorized Resistive Load Architecture
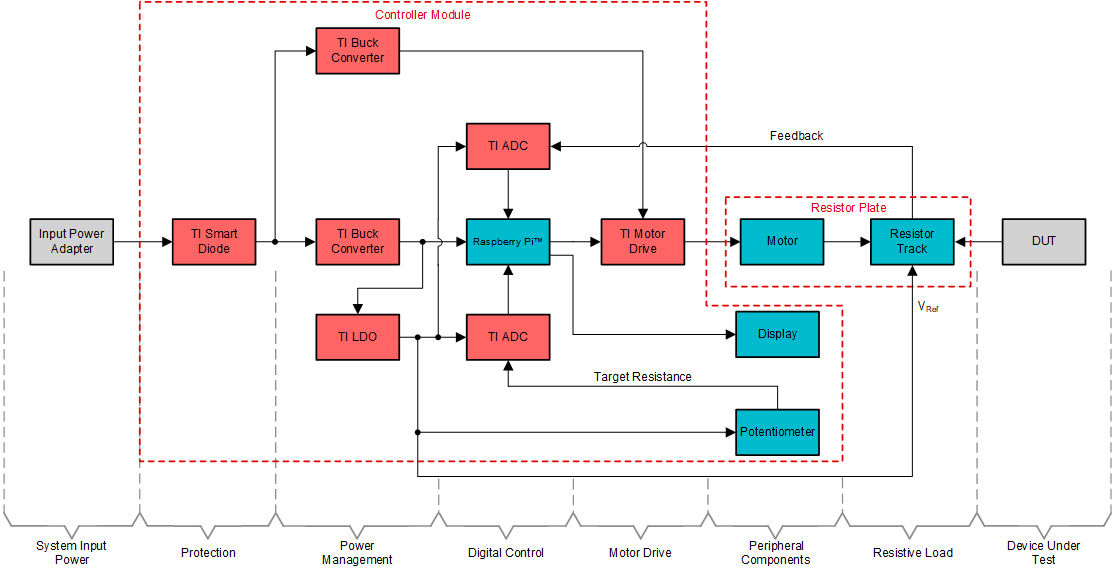
This motorized resistive load design is comprised of two PCBs and a Raspberry Pi™. The Raspberry Pi serves as the system controller, which facilitates communication between the components. The Raspberry Pi connects directly to the first PCB, the controller board, which contains the majority of the system blocks including: the protection, power management, motor drive, and analog-to-digital components. The Raspberry Pi and the controller board together form the controller module, which allows users to interface with the apparatus. The second PCB contains the actual load in the form of a resistor track. This circular PCB includes a stepper motor that is installed at its center along with a simple mechanical arm assembly that forms the variable resistance value between the input terminals of the apparatus. The user powers up the controller module and turns a knob (potentiometer) which changes the target resistance which is displayed on an LCD screen located on the controller board. The user then presses a button which triggers motor movement until the measured resistance value, which is also displayed on the LCD screen, matches the target resistance value within a predefined threshold. The number of steps and direction taken by the stepper motor is determined via feedback that is described in Section 3.4.
This programmable resistor is comprised of a number of interdependent blocks that contribute to the functionality of the overall design. Protection against reverse polarity is applied to the input adapter which is then split into multiple power rails that interact with system control elements and peripheral components. These blocks all perform critical functions that enable selecting a target resistance, displaying the selection, and rotating the motor appropriately to form the target resistance between the apparatus terminals. Figure 2-1 shows the system block diagram.
- LM74610-Q1: Smart-Diode Controller for Reverse Polarity Protection
- LMR33630: Synchronous Buck Converter with Ultra-Low EMI
- DRV8833: Dual H-Bridge Motor Driver
- LP2980-ADJ: Micropower Ultra Low-Dropout Adjustable Voltage Regulator
- ADC121C021: I2C-Compatible, 12-Bit Analog-to-Digital Converter with Alert Pin
 Figure 2-1 System Block Diagram