SWRU529C May 2017 – April 2020
-
mmWave Demo Visualizer
- Trademarks
- 1 Setup Instructions
- 2
CONFIGURE Tab
- 2.1 Platform
- 2.2 SDK Version
- 2.3 Antenna Config (Azimuth Resolution - Degrees)
- 2.4 Desirable Configuration
- 2.5 Frequency Band (GHz)
- 2.6 Scene Selection – Best Range Resolution
- 2.7 Scene Selection – Best Velocity Resolution
- 2.8 Scene Selection – Best Range
- 2.9 Plot Selection
- 2.10 User Selected Configuration
- 3 PLOTS Tab
- 4 Advanced Options
- 5 Troubleshooting
- 6 Customizing the mmWave Demo Visualizer
- 7 Offline Version of the Visualizer
- Revision History
1.3 Serial Port Setup
Follow the first-time setup instructions previously described before following the steps here.
- If the mmWave device is connected by the USB cable to the PC running this app, then you can locate the following COM ports using the Device Manager on a Windows PC (see Figure 2).
- XDS110 Class Application/User UART → This is the port where the CLI (command line interface) runs for all the various demos. This port is called the CFG_port.
- XDS110 Class Auxiliary Data port → This is the port on which binary data generated by the processing chain in the mmWave demo will be received by the PC. This binary data contains the detected object list and its properties (range, Doppler, angle, and so on). This port is called the visualization port or Data_port.
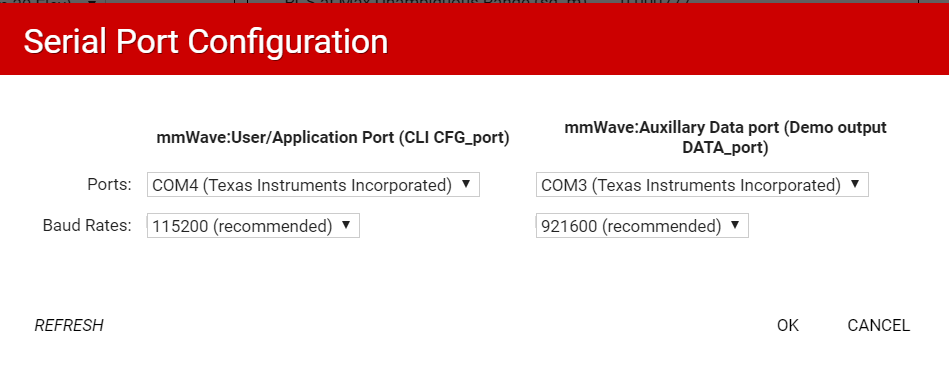
- In the browser app, navigate to Menu → Options → Serial Port and set up the COM ports in the pop-up window as follows (see Figure 3).
- CFG_port: Use the COM port number for XDS110 Class Application/User UART and set Baud: 115200
- Data_port: Use the COM port XDS110 Class Auxiliary Data Port and set Baud: 921600. User can leverage higher baud rates than 921600 by selecting "custom" in the Baud Rates drop down and setting the desired value (max: 3125000). Recommended values are: 1834000 or 3125000. Note that the sensor should be in stopped or rebooted state for the changes to take effect. Visualizer communicates with the sensor over CLI port to configure it to the user provided baud rate in this dialog box.
- Click the CONFIGURE button and the control should go back to the main browser window.
- At this point, the app automatically tries to connect to the target (mmWave Sensor), see Figure 4.
- If the app does not connect to the CFG_port or the connection fails, try to connect to the target by clicking in the bottom-left corner of the app (see Figure 5). For mmWave SDK 3.3 and earlier, DATA_port will show connected only after the sensor is configured and sending detected objects. For mmWave SDK 3.4 and later, both CFG_port and DATA_port will show connected if the ports are valid .
 Figure 2. Device Manager Ports
  Figure 3. Serial Port Configuration in App
  Figure 4. COM Port Status When Correct Ports Are Configured
  Figure 5. COM Port Status When Ports Are Not Connected