SSZTCP1 may 2015 DRV8711
In part 1 of this series, I provided a few key ideas:
- TI hearts stepper motors.
- Stepper motors can be power-hungry.
- Back electromotive force (EMF) will indicate the stepper-motor load.
- You can control the output current based on back EMF.
- This can help save some power.
- No talking about current regulation!
So now that all of the conceptual work is done (read: no real work at all), it’s time to see if this concept has any basis in reality. Can I prototype a system that can automatically adjust a stepper output current based on the back EMF in order to save power? Let’s see.
Step 1: Stepper Selection
I happen to have a stepper motor here at my desk (see image below). I don’t know where it came from, but I think I will use it. Someone lovingly wrote “2.8A 1.4mH.”
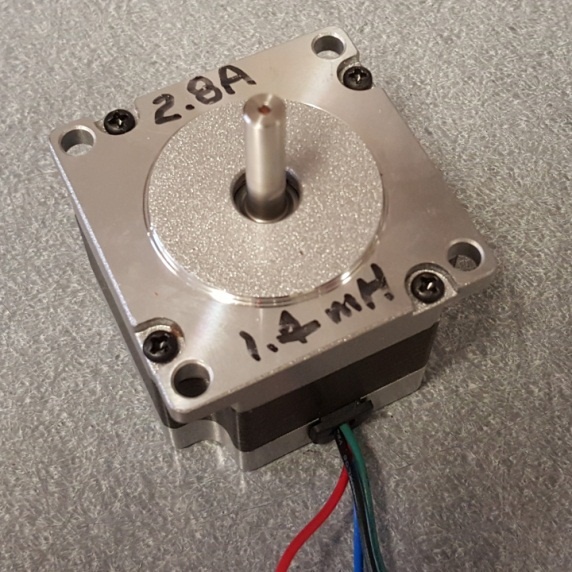 Figure 1 My New Stepper Motor: Thank
You Random Stranger!
Figure 1 My New Stepper Motor: Thank
You Random Stranger!Step 2: Stepper Driver Selection
As I revealed in part 1, the DRV8711 can sample the stepper motor’s back EMF. This will be much, much easier than designing an entire system from scratch.
Step 3: Hardware Prototype
I have to personally thank my colleague Nick for designing a DRV8711 BoosterPack. I’m going to use this device for prototyping.
Looking at his schematic online, I ran into one problem: the BEMF pin is not routed to the MSP430™ LaunchPad. This critical pin, according to the DRV8711 data sheet, is where the analog voltage representative of the back EMF will be present. I will need to read this voltage into the MSP430 device so that I can control when to increase or decrease the stepper-motor current.
Time to do some board modifications! As you can see below, I removed the potentiometer (R6) from the board and very inelegantly place a wire from the C7 pad to the POT net. At least I know that the POT net routes to an MSP430 analog-to-digital (ADC) input.
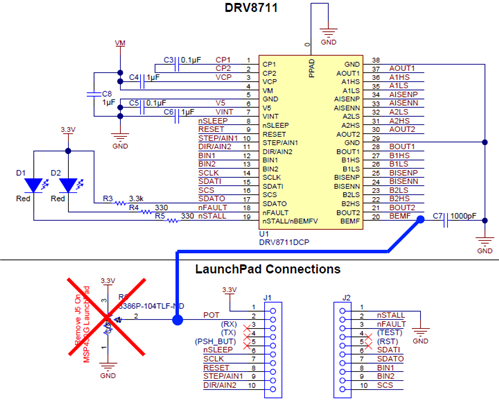 Figure 2 BOOST-DRV8711 Board
Modifications: Sorry for Breaking Your Board, Nick.
Figure 2 BOOST-DRV8711 Board
Modifications: Sorry for Breaking Your Board, Nick.Step 4: Stepper Characterization
Now that I might have a functional piece of hardware that can let me sample the stepper motor’s back EMF, I start by characterizing the motor before jumping into closed-loop control programming. I want to make sure this plan has a chance of succeeding before moving on to C programming.
When I say “characterizing the motor,” I simply mean determining the back EMF voltage that I can expect to measure from the DRV8711 when the motor is spinning. I can achieve this by using the firmware and graphical user interface (GUI) that ship with the BOOST-DRV8711 (it looks something like Figure 3 below). I want to average together a few different back EMF measurements for a couple of different speeds.
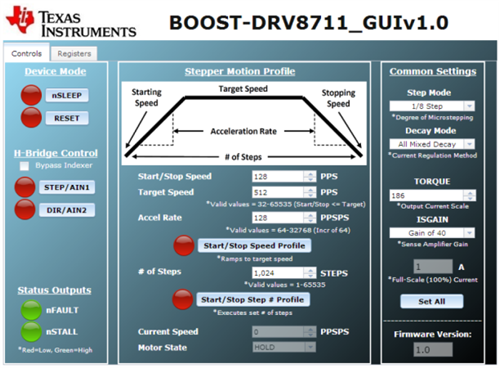 Figure 3 BOOST-DRV8711 GUI: So
Many Settings, So Little Time
Figure 3 BOOST-DRV8711 GUI: So
Many Settings, So Little TimeThis GUI lets me control the motor speed, and I’ll use an oscilloscope to see what the BEMF pin is doing. Another pin on the DRV8711 called STALLn/BEMFVn pulls low whenever a new back EMF sample is ready to be viewed on the BEMF pin. Of course, this only works in “external stall detect mode,” which requires writing the EXSTALL bit in the CTRL register to a 1. Figure 4 below shows what this looks like in real time.
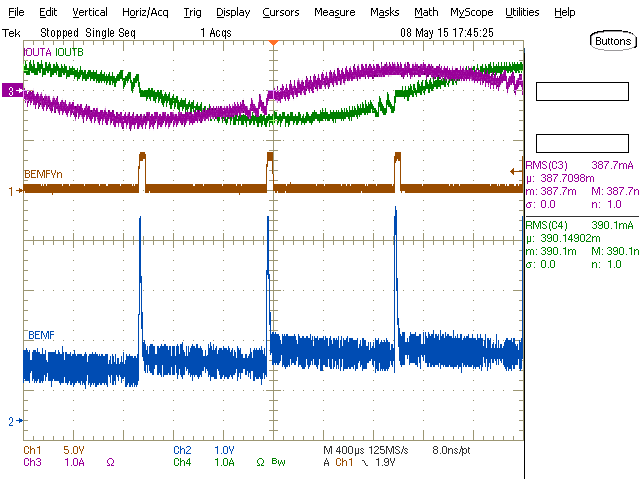 Figure 4 Motor Back EMF: It Certainly
Isn’t Pretty
Figure 4 Motor Back EMF: It Certainly
Isn’t PrettyThe DRV8711 is capable of scaling the back EMF by 1/4, 1/8, 1/16 or 1/32 using the VDIV bits of the STALL register. My motor seems to output 3V at 318rpm using the 1/4 setting, which will work well. The torque register also has bits called SMPLTH, which tells the DRV8711 how long to wait before sampling the back EMF from the stepper motor. For my motor, the lowest setting of 50µs seemed to work fine. I set my DRV8711 register settings and took some data at different speeds. You can see the raw data in Figure 5 below.
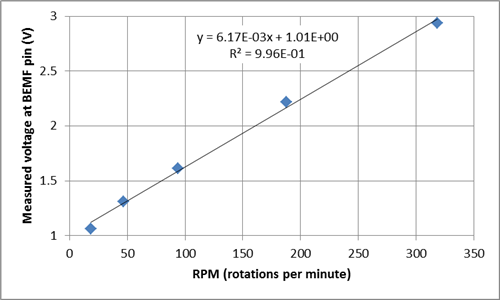 Figure 5 A Few Points of Back EMF Data: It’s Pretty Linear with Motor Speed
This data is very encouraging to me. If the motor load increases and the stepper motor begins to stall, the back EMF will reflect this and decrease. I need to close the control loop based on the back EMF and ensure that the motor current (torque) increases if the back EMF decreases. Conversely, if the motor is running fine and the back EMF is stable, then I can potentially decrease the motor current (torque) because it is not necessary to keep the motor spinning at this speed.
In my next and final post in this series, you’ll see some of my working hardware, some back EMF data on my motor and learn more about my determination to try something out.