SLUU521A August 2011 – November 2021 TPS53353
- Trademarks
- 1 Description
- 2 Electrical Performance Specifications
- 3 Schematic
- 4 Test Setup
- 5 Configurations
- 6 Test Procedure
-
7 Performance Data and Typical Characteristic Curves
- 7.1 Efficiency
- 7.2 Load Regulation
- 7.3 Load Regulation
- 7.4 Enable Turn-On/ Turn-Off
- 7.5 Output Ripple
- 7.6 Switching Node
- 7.7 Output Transient With Auto-Skip Mode
- 7.8 Output Transient With FCCM Mode
- 7.9 Output 0.75-V Prebias Turn-On
- 7.10 Output Overcurrent and Short-Circuit Protection
- 7.11 Bode Plot
- 7.12 Thermal Image
- 8 EVM Assembly Drawing and PCB Layout
- 9 Bill of Materials
- 10Revision History
4.1 Test Equipment
Voltage Source: The input voltage source VIN must be a 0-V to 14-V variable DC source capable of supplying 10 ADC. Connect VIN to J1 as shown in Figure 4-2.
Multimeters:
- V1: VIN at TP1 (VIN) and TP2 (GND)
- V2: VOUT at TP5 (VOUT) and TP7 (GND)
- A1: VIN input current
Output Load: The output load should be an electronic constant resistance mode load capable of 0 ADC–30 ADC at 1.5 V.
Oscilloscope: A digital or analog oscilloscope can be used to measure the output ripple. The oscilloscope must be set for the following:
- 1-MΩ impedance
- 20-MHz bandwidth
- AC coupling
- 2-µs/division horizontal resolution
- 50-mV/division vertical resolution
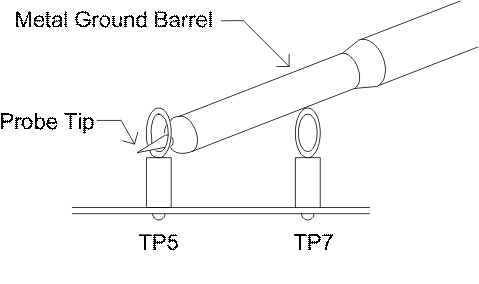
Test points TP5 and TP7 can be used to measure the output ripple voltage by placing the oscilloscope probe tip through TP5 and holding the ground barrel on TP7 as shown in Figure 4-1. Using a leaded ground connection may induce additional noise due to the large ground loop.
 Figure 4-1 Tip and Barrel
Measurement for VOUT Ripple
Figure 4-1 Tip and Barrel
Measurement for VOUT RippleFan: Some of the components in this EVM can approach temperatures of 60°C during operation. A small fan capable of 200–400 LFM is recommended to reduce component temperatures while the EVM is operating. The EVM must not be probed while the fan is not running.
Recommended Wire Gauge:
- VIN to J1 (12-V input):
The recommended wire size is 1× AWG 14 per input connection, with the total length of wire less than four feet (2-foot input, 2-foot return).
- J3 to LOAD:
The minimum recommended wire size is 2× AWG 14, with the total length of wire less than four feet (2-foot input, 2-foot return).