• Menu
  • Product
  • Email
  • PDF
  • Order now
  • TPS9264x 用于精密调光 LED 驱动器的同步降压控制器

    • ZHCSEC7A October   2012  – October 2015 TPS92640 , TPS92641

      PRODUCTION DATA.  

  • CONTENTS
  • SEARCH
  • TPS9264x 用于精密调光 LED 驱动器的同步降压控制器
  1. 1 特性
  2. 2 应用
  3. 3 说明
  4. 4 修订历史记录
  5. 5 Pin Configuration and Functions
  6. 6 Specifications
    1. 6.1 Absolute Maximum Ratings
    2. 6.2 ESD Ratings
    3. 6.3 Recommended Operating Conditions
    4. 6.4 Thermal Information
    5. 6.5 Electrical Characteristics
    6. 6.6 Typical Characteristics
  7. 7 Detailed Description
    1. 7.1 Overview
    2. 7.2 Functional Block Diagram
    3. 7.3 Feature Description
      1. 7.3.1  Controlled On-Time Architecture
      2. 7.3.2  Switching Frequency
      3. 7.3.3  Average LED Current
      4. 7.3.4  Analog Dimming and True-Zero Operation
      5. 7.3.5  Undervoltage Lockout (UVLO)
      6. 7.3.6  PWM Dimming Using the UDIM Pin
      7. 7.3.7  External Shunt FET PWM Dimming
      8. 7.3.8  VCC Regulation and Start-up
      9. 7.3.9  Precision Reference
      10. 7.3.10 Control Loop Compensation
      11. 7.3.11 Overcurrent Protection
      12. 7.3.12 Overvoltage Protection (OVP)
      13. 7.3.13 Boot Undervoltage Lockout (UVLO)
    4. 7.4 Device Functional Modes
      1. 7.4.1 Low Power Shutdown Using the UDIM Pin
      2. 7.4.2 Thermal Shutdown
  8. 8 Application and Implementation
    1. 8.1 Application Information
      1. 8.1.1 Switching Frequency
      2. 8.1.2 LED Ripple Current
      3. 8.1.3 Buck Converters Without Output Capacitor
      4. 8.1.4 Input Capacitor
      5. 8.1.5 NFETs
    2. 8.2 Typical Applications
      1. 8.2.1 TPS92640: Design Procedure
        1. 8.2.1.1 Design Requirements
        2. 8.2.1.2 Detailed Design Procedure
          1. 8.2.1.2.1 Set Output Voltage Feedback Ratio
          2. 8.2.1.2.2 Set Switching Frequency
          3. 8.2.1.2.3 Set Average LED Current
          4. 8.2.1.2.4 Set Inductor Ripple Current
          5. 8.2.1.2.5 Set LED Ripple Current and Determine Output Capacitance, COUT
          6. 8.2.1.2.6 Choose N-Channel MOSFETs
          7. 8.2.1.2.7 Choose Input Capacitance
          8. 8.2.1.2.8 Set the Turnon Voltage and Undervoltage Lockout Hysteresis
      2. 8.2.2 TPS92640 - PWM Dimming Application
        1. 8.2.2.1 Design Requirements
        2. 8.2.2.2 Detailed Design Procedure
          1. 8.2.2.2.1 Calculate Operating Points
          2. 8.2.2.2.2 Output Voltage Feedback
          3. 8.2.2.2.3 Switching Frequency
          4. 8.2.2.2.4 Set the Feedback Reference and LED Current
          5. 8.2.2.2.5 Calculate the Inductor Value
          6. 8.2.2.2.6 Calculate the Output Capacitor Value
          7. 8.2.2.2.7 Calculate the MOSFET Parameters
          8. 8.2.2.2.8 Calculate the Minimum Input Capacitance
          9. 8.2.2.2.9 Undervoltage Lockout and Hysteresis
        3. 8.2.2.3 Application Curve
  9. 9 Power Supply Recommendations
  10. 10Layout
    1. 10.1 Layout Guidelines
    2. 10.2 Layout Example
    3. 10.3 EMI and Noise Considerations
  11. 11器件和文档支持
    1. 11.1 相关链接
    2. 11.2 社区资源
    3. 11.3 商标
    4. 11.4 静电放电警告
    5. 11.5 Glossary
  12. 12机械、封装和可订购信息
  13. 重要声明
search No matches found.
  • Full reading width
    • Full reading width
    • Comfortable reading width
    • Expanded reading width
  • Card for each section
  • Card with all content


DATA SHEET

TPS9264x 用于精密调光 LED 驱动器的同步降压控制器

本资源的原文使用英文撰写。 为方便起见,TI 提供了译文;由于翻译过程中可能使用了自动化工具,TI 不保证译文的准确性。 为确认准确性,请务必访问 ti.com 参考最新的英文版本(控制文档)。

1 特性

  • VIN 范围:7V 至 85V
  • 宽调光范围
    • 500:1 模拟调光
    • 2500:1 标准脉宽调制 (PWM) 调光
    • 20000:1 分流场效应晶体管 PWM 调光
  • 可调节发光二极管 (LED) 电流感测电压
  • 2Ω、1 Apeak 金属氧化物半导体场效应晶体管 (MOSFET) 栅极驱动器
  • 分流调光 MOSFET 栅极驱动器 (TPS92641)
  • 可编程开关频率
  • 精密电压基准 3V±2%
  • 输入欠压锁定 (UVLO) 和输出过压保护 (OVP)
  • 低功耗关断模式和热关断

2 应用

  • LED 驱动器/恒流稳压器
  • 建筑 LED 照明驱动器
  • 汽车类 LED 驱动器
  • 通用 LED 照明

3 说明

TPS92640 和 TPS92641 器件是用于降压电流稳压器的高电压、同步 N 沟道场效应晶体管 (NFET) 控制器。 输出电流调节基于采用导通时间受控架构的谷值电流模式操作方式。 这种控制方法可简化环路补偿设计,同时使开关频率维持在近似恒定的水平。 TPS92640 和 TPS92641 器件包含一个高电压启动稳压器,该稳压器在 7V 至 85V 的宽输入范围内工作。PWM 控制器专为高速性能而设计,振荡器频率范围高达 1MHz。 高侧和低侧栅极驱动器之间的死区时间进行了优化,以在宽输入工作电压和输出功率范围内高效运行。 TPS92640 和 TPS92641 能够接收模拟和 PWM 输入信号,因此可提供优异的调光控制范围。 输入命令和 LED 电流之间的线性响应特性可通过使用低偏移误差放大器和专用 PWM 调光逻辑实现真正的零 LED 电流的方式实现。 两种器件还具备为低功耗微控制器提供精密基准电流的能力。 保护特性包括:逐周期电流保护、过压保护和热关断。 TPS92641 器件包含一个用于高分辨率 PWM 调光的分流 FET 调光输入和 MOSFET 驱动器。

器件信息(1)

部件号 封装 封装尺寸(标称值)
TPS92640 HTSSOP (14) 4.40mm × 5.00mm
TPS92641 HTSSOP (16) 4.40mm × 5.00mm
  1. 要了解所有可用封装,请见数据表末尾的可订购产品附录。

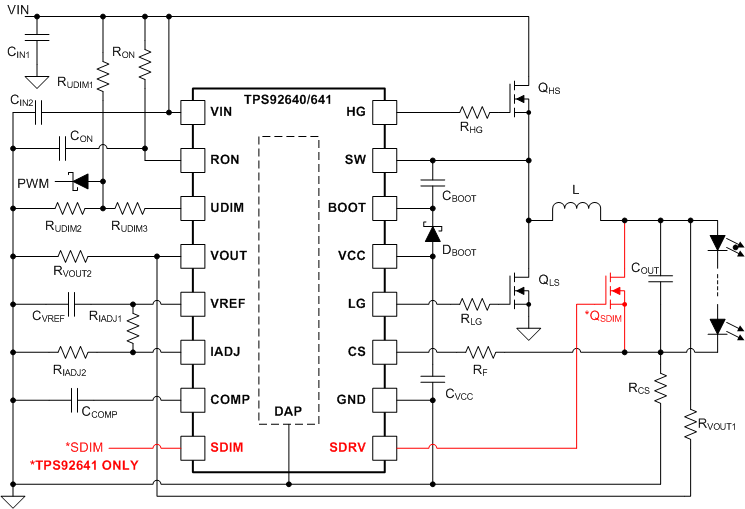
典型应用图

TPS92640 TPS92641 Typ_App_Schem_SNVS902.gif

4 修订历史记录

Changes from * Revision (October 2012) to A Revision

  • 已添加 ESD 额定值表,特性描述部分,器件功能模式,应用和实施部分,电源相关建议部分,布局部分,器件和文档支持部分以及机械、封装和可订购信息部分。 Go

5 Pin Configuration and Functions

TPS92640 PWP Package
14-Pin HTSSOP
Top View
TPS92640 TPS92641 PWP-14_SNVS902.gif
TPS92641 PWP Package
16-Pin HTSSOP
Top View
TPS92640 TPS92641 PWP-16_SNVS902.gif

Pin Functions

PIN I/O DESCRIPTION
NAME NO. (TPS92640) NO. (TPS92641)
BOOT 12 14 O Connect 100-nF ceramic capacitor to switch node and diode to VCC to provide boosted voltage for high-side gate drive.
COMP 7 7 O Connect ceramic capacitor to GND to set loop compensation.
CS 9 11 I Connect to positive terminal of sense resistor at the bottom of the LED stack.
GND 8 10 — System GND. Connect to DAP.
HG 14 16 O Connect to gate of high-side NFET of buck regulator. Use series resistor to limit current slew-rate and mitigate EMI noise.
IADJ 6 6 I Connect resistor divider from VREF to set analog dimming level. Use NTC resistor from pin to GND as resistor divider to implement thermal foldback operation.
LG 10 12 O Connect to gate of low-side NFET of buck regulator. Use series resistor to limit current slew-rate and mitigate EMI noise.
RON 2 2 I Connect a resistor to VIN and capacitor to GND to set switching frequency.
SDIM — 8 I PWM dimming input for shunt FET dimming.
SDRV — 9 O Connect to gate of external parallel NFET across LED load used for shunt dimming if desired.
SW 13 15 O Connect to switch node of buck regulator.
UDIM 3 3 I Connect resistor divider from VIN to set undervoltage lockout threshold.
VCC 11 13 O Bypass with 2.2-µF ceramic capacitor to provide bias supply for controller.
VIN 1 1 I Connect to input voltage. Connect 1-µF bypass capacitor
VOUT 4 4 I Connect resistor divider from VOUT, scaled down feedback of VOUT.
VREF 5 5 O System reference voltage. Bypass with 100-nF ceramic capacitor.
DAP — — — Place 6-9 vias from pad to GND plane for thermal relief.

6 Specifications

6.1 Absolute Maximum Ratings

over operating free-air temperature range (unless otherwise noted)(1)
MIN MAX UNIT
VIN, UDIM, SW –0.3 90 V
–1 mA
BOOT –0.3 98.5 V
HG –0.3 90 V
–2.5 (Pulse < 100 ns) V
LG, SDRV, CS –0.3 +VCC V
–2.5 (Pulse < 100 ns) V
VCC + 2.5 (Pulse < 100 ns) V
VCC –0.3 15 V
VREF, RON, COMP, VOUT, IADJ, SDIM –0.3 6 V
–200 200 µA
GND –0.3 0.3 V
–2.5 (Pulse < 100 ns) 2.5 (Pulse < 100 ns) V
Continuous power dissipation Internally Limited
Maximum lead temperature (soldering and reflow) (2) 260 °C
Maximum junction temperature –40 125 °C
Storage temperature –65 150 °C
(1) Stresses beyond those listed under Absolute Maximum Ratings may cause permanent damage to the device. These are stress ratings only, which do not imply functional operation of the device at these or any other conditions beyond those indicated under Recommended Operating Conditions. Exposure to absolute-maximum-rated conditions for extended periods may affect device reliability.
(2) Refer to TI’s packaging website for more detailed information and mounting techniques.

6.2 ESD Ratings

VALUE UNIT
TPS92640 PWP PACKAGE
V(ESD) Electrostatic discharge Human-body model (HBM), per ANSI/ESDA/JEDEC JS-001(1) ±2000 V
Charged-device model (CDM), per JEDEC specification JESD22-C101(2) ±1000
TPS92641 PWP PACKAGE
V(ESD) Electrostatic discharge Human-body model (HBM), per ANSI/ESDA/JEDEC JS-001(1) ±2000 V
Charged-device model (CDM), per JEDEC specification JESD22-C101(2) ±1000
(1) JEDEC document JEP155 states that 500-V HBM allows safe manufacturing with a standard ESD control process.
(2) JEDEC document JEP157 states that 250-V CDM allows safe manufacturing with a standard ESD control process.

6.3 Recommended Operating Conditions

over operating free-air temperature range (unless otherwise noted)
MIN NOM MAX UNIT
VIN Input voltage 7 85 V
TJ Junction temperature –40 125 °C

6.4 Thermal Information

THERMAL METRIC(1) TPS92640 TPS92641 UNIT
PWP (HTSSOP) PWP (HTSSOP)
14 PINS 16 PINS
RθJA Junction-to-ambient thermal resistance 40.1 38.7 °C/W
RθJC(top) Junction-to-case (top) thermal resistance 24.6 22.7 °C/W
RθJB Junction-to-board thermal resistance 20.9 16.5 °C/W
ψJT Junction-to-top characterization parameter 0.6 0.6 °C/W
ψJB Junction-to-board characterization parameter 20.7 16.3 °C/W
RθJC(bot) Junction-to-case (bottom) thermal resistance 2.5 1.7 °C/W
(1) For more information about traditional and new thermal metrics, see the Semiconductor and IC Package Thermal Metrics application report, SPRA953.

6.5 Electrical Characteristics

Unless otherwise specified VIN = 24 V. Typical specifications apply for TA = TJ = 25°C.
PARAMETER TEST CONDITIONS MIN(1) TYP(2) MAX(1) UNIT
START-UP REGULATOR (VCC, VIN)
VCCREG VCC Regulation ICC = 10 mA, VIN = 24 V, 85 V 7.86 8.5 9.14 V
ICCLIM VCC Current Limit VCC = 0 V 48 63 78 mA
IQ Quiescent Current VUDIM = 3 V,
Static VIN = 7 V, 24 V, 85 V
2 3 mA
ISD Shutdown Current VUDIM = 0 V 100 µA
VCC-UV VCC UVLO Threshold VCC increasing 5.04 5.9 V
VCC decreasing 4.5 4.9
VCC-HYS VCC UVLO Hysteresis 0.17 V
REFERENCE VOLTAGE (VREF)
VREF Reference Voltage No Load, VIN = 7 V, 24 V, 85 V 2.97 3.03 3.09 V
IVREFLIM Current Limit VREF = 0 V 1.3 2.1 2.9 mA
ERROR AMPLIFIER (CS, COMP)
VCSREF CS Reference Voltage With respect to GND VIADJ/10 V
VCSREF-OFF Error Amp Input Offset Voltage –600 0 600 µV
ICOMP COMP Sink Current 85 µA
COMP Source Current 110 µA
gM-CS Transconductance 500 µA/V
Linear Input Range See (3) ±125 mV
Transconductance Bandwidth –6-dB unloaded response(3) 400 kHz
TIMERS / OVERVOLTAGE PROTECTION (RON, VOUT)
tOFF-MIN Minimum Off-time CS = 0 V 230 ns
tON-MIN Minimum On-time 235 ns
tON Programmed On-time VVOUT = 2 V, RON = 25 kΩ, CON = 1 nF 2.08 µs
RRON RON Pulldown Resistance 35 120 Ω
tCL Current Limit Off-time 270 µs
tD-ON RON Thresh - HG Falling Delay 25 ns
VTH-OVP VOUT Overvoltage Threshold VOUT rising 2.85 3.05 3.25 V
VHYS-OVP VOUT Overvoltage Hysteresis 0.13 V
GATE DRIVER (HG, LG, BOOT, SW)
RSRC-LG LG Sourcing Resistance LG = High 1.5 6 Ω
RSNK-LG LG Sinking Resistance LG = Low 1 4.5 Ω
RSRC-HG HG Sourcing Resistance HG = High 3.9 6 Ω
RSNK-HG HG Sinking Resistance HG = Low 1.1 4.5 Ω
VTH-BOOT BOOT UVLO Threshold BOOT-SW rising 1.9 3.4 4.5 V
VHYS-BOOT BOOT UVLO Hysteresis BOOT-SW falling 1.8 V
TD-HL HG to LG deadtime HG fall to LG rise 60 ns
TD-LH LG to HG deadtime LG fall to HG rise 60 ns
PWM DIMMING (SDIM, SDRV) (TPS92641 only)
RSRC-DDRV SDRV Sourcing Resistance SDRV = High 5.6 30 Ω
tSDIM-RIS SDIM to SDRV Rising Delay SDIM rising 68 100 ns
tSDIM -FALL SDIM to SDRV Falling Delay SDIM falling 29 70 ns
VSDIM-RIS SDIM Rising Threshold SDIM rising 1.29 1.74 V
VSDIM -FALL SDIM Falling Threshold SDIM falling 0.5 V
RSDIM-PU SDIM Pullup Resistance 90 kΩ
ANALOG ADJUST (IADJ)
VADJ-MAX IADJ Clamp Voltage 2.46 2.54 2.62 V
RADJ IADJ Input Impedance 1 MΩ
UNDERVOLTAGE / PWM (UDIM)
VTH-UDIM UDIM Start-up Threshold UDIM rising 1.21 1.276 1.342 V
IHYS-UDIM UDIM Hysteresis Current 12 21 30 µA
tUDIM-RIS UDIM to HG/LG Rising Delay UDIM rising 168 260 ns
tUDIM-FALL UDIM to HG/LG Falling Delay UDIM falling 174 280 ns
VUDIM-LP UDIM Low Power Threshold 370 mV
TUDIM-DET UDIM Shutdown Detect Timer UDIM falling 8.5 13 ms
THERMAL SHUTDOWN
TSD Thermal Shutdown Threshold See (3) 165 °C
THYS Thermal Shutdown Hysteresis See (3) 20 °C
(1) All limits specified at room temperature (TYP values) and at temperature extremes (MIN/MAX values). All room temperature limits are 100% production tested. All limits at temperature extremes are specified via correlation using standard Statistical Quality Control (SQC) methods. All limits are used to calculate Average Outgoing Quality Level (AOQL).
(2) Typical numbers are at 25°C and represent the most likely norm.
(3) These electrical parameters are specified by design, and are not verified by test.

6.6 Typical Characteristics

Unless otherwise stated, –40°C ≤ TA = TJ ≤ 125°C, VIN = 24 V, VIADJ= 2 V, ILED = 1 A, CVCC = 2.2 μF, CCOMP = 0.47 μF
TPS92640 TPS92641 C001_SNVS902.png
Figure 1. Quescient Current, IQ vs Input Voltage, VIN
TPS92640 TPS92641 C003_SNVS902.png
Figure 3. Start-Up Regulator, VCC vs Input Voltage, VIN
TPS92640 TPS92641 C005_SNVS902.png
Figure 5. Minimum On-time, tON_MIN vs Input Voltage, VIN
TPS92640 TPS92641 C007_SNVS902.png
Figure 7. LED Current, ILED vs Input Voltage, VIN
TPS92640 TPS92641 C009_SNVS902.png
Figure 9. Converter Switching Frequency, fSW vs Input Voltage, VIN
TPS92640 TPS92641 SS_Waveform.gif
Figure 11. Waveforms of Steady-State Operation
TPS92640 TPS92641 C002_SNVS902.png
Figure 2. Shutdown Current, ISDvs Input Voltage , VIN
TPS92640 TPS92641 C004_SNVS902.png
Figure 4. Reference Voltage, VREF vs Input Voltage, VIN
TPS92640 TPS92641 C006_SNVS902.png
Figure 6. Minimum Off-time, tOFF_MIN vs Input Voltage, VIN
TPS92640 TPS92641 C008_SNVS902.png
Figure 8. Conversion Efficiency, η vs Input Voltage, VIN
TPS92640 TPS92641 PU_Waveform.gif
Figure 10. Waveforms of Power-Up Transient
TPS92640 TPS92641 UDIM_Waveform.gif
Figure 12. Waveforms of UDIM Operation (DDIM = 0.5)

7 Detailed Description

7.1 Overview

The TPS92640 and TPS92641 devices are synchronous N-channel MOSFET (NFET) controllers for step-down (buck) current regulators, which are ideal for driving LED loads. They can accept wide input voltage range allowing for greater flexibility in powering different series connected LED string combinations. The single current sense pin with low adjustable threshold voltage provides an excellent method for regulating LED current while maintaining high system efficiency. The TPS92640 and TPS92641 devices use valley current control with a controlled on-time architecture that allows the converter to be operated at nearly constant switching frequency without the need for slope compensation. The extremely accurate adjustable current sense threshold together with the synchronous operation provides the capability to amplitude (analog) dim the LED current with high contrast ratios. Excellent PWM dimming is attainable using the main NFETs or the external shunt FET driver (TPS92641 only). The TPS92640 and TPS92641 devices incorporate 2-Ω, 1-A internal gate drivers and supports constant current operation up to 5 A. This simple controller contains all the features necessary to implement a high-efficiency, versatile LED driver with precise dimming response.

7.2 Functional Block Diagram

TPS92640 TPS92641 FBD_SNVS902.gif

7.3 Feature Description

TPS92640 TPS92641 Typ_App_Schem_SNVS902.gif Figure 13. Synchronous Buck LED Driver

7.3.1 Controlled On-Time Architecture

The control architecture is a combination of valley current control and a one-shot on-timer that varies with input and output voltage. The TPS92640 and TPS92641 devices use a series resistor in the LED path to sense both average LED current and valley inductor current. During the time that the high side NFET is turned on (tON), the input voltage charges up the inductor. When it is turned off (tOFF) and the low side NFET is turned on, the inductor discharges. During both intervals, the current is supplied to the load keeping the LEDs forward biased. Figure 14 shows the inductor current (iL) waveform for a buck converter operating in continuous conduction mode (CCM). As the system changes input voltage or output voltage, duty cycle D is varied indirectly by changing both tON and tOFF to regulate IL and ultimately ILED. For any buck regulator, duty cycle, D, is calculated using Equation 1.

Equation 1. TPS92640 TPS92641 eq1_snvs902.gif

where

  • VCS is the voltage measured at the CS pin of the IC and η is the estimated or actual converter efficiency.
TPS92640 TPS92641 Ideal_CCM_Timing_SNVS902.gif Figure 14. Ideal CCM Buck Converter Inductor Current IL Waveform

7.3.2 Switching Frequency

The on-time is determined based on the external resistor (RON) connected between RON and VIN pins in combination with a capacitor (CON) between RON and GND pins. The input voltage and the RON resistor set the current sourced into the RON capacitor which governs the ramp speed. The ramp threshold is proportional to scaled down feedback of VOUT at VOUT pin. The proportionality of VOUT is set by an external resistor divider (RVOUT1, RVOUT2) from VOUT. The switching frequency, fSW can be calculated based on on-time and off-time using Equation 2.

Equation 2. TPS92640 TPS92641 eq2_snvs902.gif

Even though the on-time control is quasi-hysteretic, the input and output voltage proportionality creates a nearly constant switching frequency over the entire operating range. Quasi-hysteretic control minimizes the control loop compensation necessary in many switching regulators, simplifying the design process. It also mitigates current mode instability (also known as sub-harmonic oscillation) found in standard fixed frequency current mode control when operating near or above 50% duty cycle. The inductor current sensing and averaging mechanism in the valley detection control loop provides highly accurate LED current regulation over the entire operating range and temperature.

7.3.3 Average LED Current

Average LED current regulation is set using a sense resistor in series with the LEDs. The internal error-amplifer regulates the voltage across the sense resistor (VCS) to the IADJ voltage divided by 10. The error amplifier input offset voltage has been minimized using auto-zero calibration technique as shown in . In this chopping scheme, the noninverting and inverting inputs and outputs change polarity every switching cycle to cancel the offset, providing near zero input offset voltage.

TPS92640 TPS92641 Chopper_OTA_SNVS902.gif Figure 15. Working Principle of the Chopper OTA to Minimize Input Offset Voltage

IADJ can be set to any value up to 2.54 V by connecting it to VREF through a resistor divider for static output current settings. IADJ can also be used to change the regulation point if connected to a controlled voltage source or potentiometer to provide analog dimming. It is also possible to configure IADJ to be used for thermal foldback functions.

Equation 3. TPS92640 TPS92641 eq3a_snvs902.gif
Equation 4. TPS92640 TPS92641 eq4a_snvs902.gif

7.3.4 Analog Dimming and True-Zero Operation

In traditional Buck converters, discontinuous conduction mode (DCM) operation of inductor current results in loss of linearity at low dimming levels and limits the analog dimming range. When using TPS92640 and TPS92641 devices to implement synchronous buck converter, the inductor current is forced to maintain continuous conduction mode (CCM). As a result, it is possible to maintain linearity and achieve true-zero LED current operation with respect to analog dimming command. For true zero application, an external capacitor is required across the LED string to provide a negative current path for the inductor current loop. Figure 16 shows the inductor current (IL) and output voltage (VOUT) waveform for a buck converter operating at true zero average current level.

TPS92640 TPS92641 True_0_CCM_SNVS902.gif Figure 16. True Zero CCM Buck Converter Inductor Current IL and Output Voltage VOUT Waveform

In true zero application (VIADJ=0 V), there will be a certain amount of ILED passing the LEDs even though the average inductor current is well-regulated at 0-A set-point. The shaped area in Figure 17 shows the current that will pass through the LED string (iLED).

TPS92640 TPS92641 True_Zero_IOUT_SNVS902.gif Figure 17. Output Current Waveform in True Zero Application with VIADJ = 0 V

An external resistor, ROFF as shown in Figure 18 is recommended from VOUT to CS to shunt the positive current ripple while maintaining the operation of error amplifier to cancel input offset voltage. The shunt current (IOFF) should be at least half of the output current ripple to ensure proper operation.

Equation 5. TPS92640 TPS92641 eq3_snvs902.gif
TPS92640 TPS92641 Roff_TrueZero_SNVS902.gif Figure 18. ROFF for True Zero Application

The resistor ROFF also impacts the start-up behavior of the circuit as it creates an DC shift in the voltage sensed at CS pin. To ensure proper start-up sequence and monotonic LED current behavior, the voltage V'CS should exceed a threshold voltage based on the native offset of the error amplifier before VOUT exceeding the LED forward voltage, VLED. Assuming a worst case native off-set (non-chopping) of error amplifier to be less than ±10 mV, the voltage V'CS must be greater than this threshold to initiate switching and auto-zero operation. Therefore, ROFF should be sized to also meet following condition.

Equation 6. TPS92640 TPS92641 eq4_snvs902.gif

To conclude, an external resistor (ROFF) from VOUT to CS pin is required for true zero application, where ROFF should be:

Equation 7. TPS92640 TPS92641 eq5_snvs902.gif

7.3.5 Undervoltage Lockout (UVLO)

The UDIM pin of the TPS92640 and TPS92641 devices is a dual function input that features an accurate 1.276-V threshold with programmable hysteresis. This pin functions as both the PWM dimming input of the LEDs and as an input UVLO with built-in hysteresis. When the pin voltage rises and exceeds the 1.276-V threshold, 21 µA (typical) of current is driven out of the UDIM pin into the resistor divider (RUDIM1, RUDIM2) providing programmable hysteresis. The UVLO turnon threshold, VTURN-ON, is defined using Equation 8.

Equation 8. TPS92640 TPS92641 eq7_snvs902.gif

Once the input voltage is above VTURN_ON, the current source is active and the UVLO hysteresis is determined by Equation 9.

Equation 9. TPS92640 TPS92641 eq8_snvs902.gif

When using the UDIM pin for UVLO and PWM dimming concurrently, the UVLO circuit can have an extra resistor (RUDIM3) to set the hysteresis. This allows the standard resistor divider to have smaller values minimizing delays that can incur with additional external PWM dimming circuitry. In general, at least 3 V of hysteresis is preferable when PWM dimming if operating near the UVLO threshold. Under these conditions, the UVLO hysteresis is defined using Equation 10.

Equation 10. TPS92640 TPS92641 eq8a_snvs902.gif

7.3.6 PWM Dimming Using the UDIM Pin

The UDIM pin can be driven with a PWM signal, which controls the synchronous NFET operation. The brightness of the LEDs can be varied by modulating the duty cycle (DDIM) of this signal using a Schottky diode with anode connected to UDIM pin, as shown in Figure 13.

TPS92640 TPS92641 LED_During_EN_SNVS902.gif Figure 19. LED Current During UDIM Pin PWM Dimming

Figure 19 shows the LED current waveform during PWM dimming where duty cycle (DDIM) is the percentage of the dimming period (TDIM) that the synchronous NFETs are switching. For the remainder of TDIM, the NFETs are disabled. The resulting dimmed LED current (IDIM_LED) is:

Equation 11. TPS92640 TPS92641 eq9_snvs902.gif

7.3.7 External Shunt FET PWM Dimming

Extremely high dimming range and linearity can be achieved by using TPS92641 device for Shunt FET dimming operation with SDIM and SDRV pin. When higher frequency and time resolution PWM dimming signal is applied to the SDIM pin, the SDRV pin provides an inverted signal of the same frequency and duty cycle that can be used to drive the gate of a Shunt NFET directly across the LED load. Because the output voltage will go to near zero when the Shunt NFET is turned on, the internal on-timer at the RON pin will switch to a fixed minimum on-time during the off-time of the dimming cycle. This method keeps the inductor current slewed up and the converter regulating, without the presence of extremely high switching frequencies. During the on-time of the dimming cycle, the converter will switch in its regular fashion with the programmed on-time at the RON pin. An internal resistor pulls the SDIM pin to logic high if left open. In this case, the SDRV driver will be off.

TPS92640 TPS92641 Ideal_LED_During_FET_SNVS902.gif Figure 20. Ideal LED Current During Shunt FET PWM Dimming

Figure 20 shows the ideal LED current waveform during Shunt FET PWM dimming which is very similar to the internal PWM dimming described and shown previously except with much faster rise and fall of the LED current. With this method, only the speed of the parallel Shunt NFET limits the dimming frequency and dimming duty cycle.

7.3.8 VCC Regulation and Start-up

The TPS92640 and TPS92641 devices include a high voltage, low-dropout bias regulator. When power is applied, the regulator is enabled and sources current into an external capacitor (CVCC) connected to the VCC pin. The recommended bypass capacitance for the VCC regulator is 2.2 µF to 3.3 µF. This capacitor should be rated for 10 V or greater and an X7R dielectric ceramic is recommended. The output of the VCC regulator is monitored by an internal UVLO circuit that protects the device from attempting to operate with insufficient supply voltage, and the supply current is also internally current-limited. When VIN is close or lower than 8.5 V, the regulator will enter the by-pass mode and the VCC will closely follow VIN. This linear regulator is the primary heat source generator of the device. The amount of heat generated is a function of input voltage (VIN), switching frequency (FSW) and the characteristics of the power MOSFET used. The thermal handling capability of the device imposes a limit on the maximum switching frequency can be used, especially when VIN is higher than 48 V and high current power MOSFET is used.

7.3.9 Precision Reference

The device includes a precision 3-V reference. This can be used in conjunction with a resistor divider to set voltage levels for the IADJ pin and other external circuitry requiring a reference. It can also be used to supply current to low power micro-controllers. The source current capability from VREF pin is internally limited 2.1 mA. For the VREF regulator, TI recommends a bypass capacitance from 0.1 µF to 1 µF.

7.3.10 Control Loop Compensation

Compensating the TPS92640 and TPS92641 devices is relatively simple for most applications. The only compensation needed is a compensation capacitor, CCOMP across the COMP pin and ground to place a low-frequency dominant pole in the system. The pole must be placed low enough to ensure adequate phase margin at the crossover frequency. For most of the applications, CCOMP of 100 nF to 470 nF is good enough. Additionally, TI recommends a high quality ceramic capacitor with X7R dielectric rated for 25 V.

7.3.11 Overcurrent Protection

The TPS92640 and TPS92641 devices has overcurrent protection to protect the high side NFET (HS-NFET) along with the rest of the system from overcurrent conditions. This peak current limit of 1.28 V (with VIN = 85 V at room temperature) is sensed across the high side FET RDS-ON (from SW to VIN). If the threshold is reached or exceeded, HS-NFET will turn off and the low side NFET (LS-NFET) will turn on for approximately 800 ns. Then HS-NFET will turn on again, if the threshold is still reached or exceeded, both FETs are shutoff for 270-µs typical. Figure 21 shows the waveforms of HG and LG under overcurrent protection.

TPS92640 TPS92641 HG_LG_SNVS902.gif Figure 21. HG and LG Waveforms Under Overcurrent Protection

7.3.12 Overvoltage Protection (OVP)

The TPS92640 and TPS92641 devices have programmable overvoltage protection by using the resistor divider at the VOUT pin. The OVP limit, VOVP_ON, is defined using Equation 12.

Equation 12. TPS92640 TPS92641 eq6_snvs902.gif

If the output voltage reaches VOVP_ON, the HG, LG and SDRV pins are pulled low to prevent damage to the LEDs or the rest of the circuit. The OVP circuit has a fixed hysteresis of 100 mV before the driver attempts to switch again.

7.3.13 Boot Undervoltage Lockout (UVLO)

The BOOT UVLO circuit is implemented to ensure proper operation of the high-side gate driver under all operating conditions. The switching operation is commenced once the BOOT voltage exceeds 3.4 V above the SW pin. Comparator hysteresis of 1.8 V is included to prevent false tripping due to high-frequency switching noise. When the BOOT falls below the low voltage threshold (1.6 V typical), the high side NFET is disabled by pulling HG pin to SW pin. The next turnon transition of low-side NFET pulls SW pin down and charges the BOOT capacitor (CBOOT) through VCC. Normal operation is commenced once BOOT capacitor (CBOOT) is charged above BOOT UVLO turnon threshold of 3.4 V.

The boostrap circuit behavior impacts the circuit behavior near dropout (VIN= VOUT) conditions. A minimum off-time is implemented to restrict the maximum duty cycle and maintain charge on the external BOOT capacitor, CBOOT. As the input voltage, VIN, approachs close to the output voltage, VOUT, the output current will fall with the switching frequency, as in conventional Buck regulator. This behavior ensures smooth operation in and out of dropout region while ensuring proper operation of high side gate driver and bootstrap circuit.

7.4 Device Functional Modes

7.4.1 Low Power Shutdown Using the UDIM Pin

The TPS92640 and TPS92641 devices can be placed into a low power shutdown mode by grounding the UDIM pin directly (any voltage below 370 mV) for more than 13 ms (typical).

7.4.2 Thermal Shutdown

Internal thermal shutdown circuitry is provided to protect the device in the event that the maximum junction temperature is exceeded. The threshold for thermal shutdown is 165°C with a 20°C hysteresis (both values typical). During thermal shutdown the NFETs and drivers are disabled.

8 Application and Implementation

NOTE

Information in the following applications sections is not part of the TI component specification, and TI does not warrant its accuracy or completeness. TI’s customers are responsible for determining suitability of components for their purposes. Customers should validate and test their design implementation to confirm system functionality.

8.1 Application Information

8.1.1 Switching Frequency

Switching frequency is selected based on the trade-offs between efficiency, solution size/cost and the range of output voltage that can be regulated. Many applications place limits on switching frequency due to EMI sensitiviy. The on-time of the TPS92640 and TPS92641 devices can be programmed for switching frequencies ranging from the tens of kHz to over 1 MHz. This on-time varies in proportion to both VIN and VOUT, as described in Switching Frequency. However, in practice the switching frequency will shift in response to large swings in input or output voltage. The maximum switching frequency is limited only by the minimum on-time and minimum off-time requirements.

8.1.2 LED Ripple Current

The LED manufacturers generally recommend values of current ripple, ΔILED, to achieve optimal optical efficiency. The peak-to-peak current ripple values typically range from ±10% to ±40% of DC current, ILED. Higher LED ripple current allows the use of smaller inductors, smaller output capacitors, or no output capacitors at all. Lower ripple current requires more inductance, higher switching frequency, or additional output capacitance. Based on the LED current ripple specification and desired switching frequency, the inductor value can be calculated using Equation 13.

Equation 13. TPS92640 TPS92641 eq9a_snvs902.gif

It is important to ensure that the rated inductor saturation current is greater than the worst case operating current (ILED+ΔILED/2) under the wide operating temperature range.

8.1.3 Buck Converters Without Output Capacitor

A Buck regulator is ideal for regulating current because of the direct connection between the inductor and the LED load. Because the current is being regulated, not voltage, a buck current regulator is free of load current transients, and has no need of output capacitance to supply the load and maintain output voltage. This is of great benefit when driving LEDs as large electrolytic capacitors impact the lifetimes and PWM dimming performance. The output capacitor can be eliminated by using a large inductor or higher switching frequency as discussed in LED Ripple Current

A capacitor placed in parallel with the LED or array of LEDs can be used to reduce ΔiLED while keeping the same average current through both the inductor and the LED array. With this topology the inductance can be lowered, making the magnetics smaller and less expensive. Alternatively, the circuit can be run at lower frequency with the same inductor value, improving the efficiency and expanding the range of output voltage that can be regulated.

Figure 22 shows the equivalent impedances presented to the ΔiL-PP when an output capacitor, COUT, and its equivalent series resistance (RESR) are placed in parallel with the LED array.

TPS92640 TPS92641 LED_Ripple_SNVS902.gif Figure 22. LED Ripple Current With COUT

To calculate the respective ripple currents, the LED array is represented as the dynamic resistance, (rD). LED's dynamic resistance is not always specified on the manufacturer’s data sheet, but it can be calculated as the inverse slope of the LED’s VLED vs ILED curve at the operating point. However, this method only gives an rough estimate of rD. Total dynamic resistance for a string of n LEDs connected in series can be calculated as the rD of one device multiplied by n. Inductor ripple current, ΔiL-PP is still calculated as before. The following equations can then be used to estimate peak-to-peak LED current ripple, ΔiLED-PP, when using a parallel capacitor:

Equation 14. TPS92640 TPS92641 eq10_snvs902.gif

The calculation for ZCOUT assumes that the shape of the inductor ripple current is approximately sinusoidal. Small values of COUT that do not significantly reduce ΔiLED-PP can also be used to control EMI generated by the switching action of the TPS92640 and TPS92641 devices. EMI reduction becomes more important as the length of the connections between the LED and the rest of the circuit increase.

8.1.4 Input Capacitor

Input capacitor is selected using requirements for minimum capacitance and rms ripple current. The input capacitor supply pulses of current approximately equal to ILED while the high-side NFET is on, and is charged up by the input voltage while the high-side NFET is off. Switching converters such as the TPS92640 and TPS92641 devices have a negative input impedance due to the decrease in input current as input voltage increases. This inverse proportionality of input current to input voltage can cause oscillations (sometimes called power supply interaction) if the magnitude of the negative input impedance is greater than the input filter impedance. Minimum capacitance can be selected by comparing the input impedance to the converter’s negative resistance; however, this requires accurate calculation of the input voltage source inductance and resistance, quantities which can be difficult to determine. An alternative method to select the minimum input capacitance (CIN-MIN) is to select the maximum voltage ripple (ΔvIN-MAX), which can be tolerated. ΔvIN-MAX is equal to the change in voltage across CIN during tON when it supplies the load current. A good starting point for selection of CIN is to use an input voltage ripple of 2% to 10% of VIN. CIN-MIN can be selected using Equation 15.

Equation 15. TPS92640 TPS92641 eq11_snvs902.gif

TI recommends a minimum input capacitance at least 75% greater than the CIN-MIN value. To determine the RMS input current rating (IIN-RMS), use Equation 16.

Equation 16. TPS92640 TPS92641 eq12_snvs902.gif

Because this approximation assumes there is no inductor ripple current, the value should be increased by 10-30% depending on the amount of ripple that is expected. Ceramic capacitors are the best choice for the input to the TPS92640 and TPS92641 devices due to their high ripple current rating, low ESR, low cost, and small size compared to other types. When selecting a ceramic capacitor, special attention must be paid to the operating conditions of the application. Ceramic capacitors can lose one-half or more of their capacitance at their rated DC voltage bias and also lose capacitance with extremes in temperature. Make sure to check any recommended deratings and also verify if there is any significant change in capacitance at the operating input voltage and the operating temperature.

8.1.5 NFETs

The TPS92640 and TPS92641 devices require two external NFETs for the switching regulator. The FETs should have a voltage rating at least 20% higher than the maximum input voltage to ensure safe operation during the ringing of the switch node. In practice, all switching converters have some ringing at the switch node due to the diode parasitic capacitance and the lead inductance. The NFETs should also have a current rating at least 50% higher than the average transistor current. Once NFETs are chosen, the power rating is verified by calculating the power loss.

8.2 Typical Applications

8.2.1 TPS92640: Design Procedure

TPS92640 TPS92641 Typ_App_Schem_desex_SNVS902.gif Figure 23. TPS92640 Design Procedure Schematic

8.2.1.1 Design Requirements

  • VIN
  • VLED
  • Number of LEDs in Series
  • ILED
  • fSW
  • VCS
  • ΔiLED-PP
  • ΔVIN-PP
  • VTURN-ON
  • VHYS

8.2.1.2 Detailed Design Procedure

8.2.1.2.1 Set Output Voltage Feedback Ratio

For the desired output (VOUT), RVOUT1 and RVOUT2 is calculated first with the desired feedback voltage, VVOUT at approximately 2.5 V:

Equation 17. TPS92640 TPS92641 eq13_snvs902.gif

8.2.1.2.2 Set Switching Frequency

The switching frequency is set as follows:

Equation 18. TPS92640 TPS92641 eq14_snvs902.gif

8.2.1.2.3 Set Average LED Current

The average LED current (ILED) is set by:

Equation 19. TPS92640 TPS92641 eq15_snvs902.gif

8.2.1.2.4 Set Inductor Ripple Current

First, the expected duty cycle, D must be determined:

Equation 20. TPS92640 TPS92641 eq16_snvs902.gif

With the inductor ripple current, ΔiL-PP specified and the expected duty cycle, the inductance (L) can be chosen:

Equation 21. TPS92640 TPS92641 eq17_snvs902.gif

8.2.1.2.5 Set LED Ripple Current and Determine Output Capacitance, COUT

The LED ripple current (ΔiLED-PP ) is specified. With the target ripple current determined, the output capacitance (COUT) can be chosen using Equation 22.

Equation 22. TPS92640 TPS92641 eq18_snvs902.gif

8.2.1.2.6 Choose N-Channel MOSFETs

The suggested minimum voltage rating, VT-MAX and current rating, IT-MAX are:

Equation 23. TPS92640 TPS92641 eq19_snvs902.gif

Selecting a proper power MOSFET is critical in a power application, other than the SOA limits, the gate characteristic and the RDSON can affect the system performance seriousely.

Also, the peak current limit (ILIMIT) is governed by:

Equation 24. TPS92640 TPS92641 eq20_snvs902.gif

Both the current limit threshold and MOSFET RDSON are loosely specified and can vary a lot with temperature, input voltage and other operating conditions.

8.2.1.2.7 Choose Input Capacitance

Input capacitance is necessary to provide instantaneous current to the discontinuous portions of the circuit during the high side NFET on-time. The allowable input voltage ripple (ΔvIN-PP) is specified at approximately 3% Pk-Pk of VIN. The minimum required capacitance (CIN_MIN) to achieve this specification is:

Equation 25. TPS92640 TPS92641 eq21_snvs902.gif

The necessary RMS input current rating (IIN-RMS) can be approximated as follows:

Equation 26. TPS92640 TPS92641 eq22_snvs902.gif

8.2.1.2.8 Set the Turnon Voltage and Undervoltage Lockout Hysteresis

With the desired turnon threshold voltage (VTURN_ON) stated, the resistor divider network composing with RUDIM1 and RUDIM2 can be calculated with the equation in below.

Equation 27. TPS92640 TPS92641 eq23_snvs902.gif

Then RUDIM3 is optional and recommended for PWM. The RUDIM3 can be calculated based on Equation 10 to provide the desired undervoltage lockout hysteresis (VHYS).

8.2.2 TPS92640 – PWM Dimming Application

TPS92640 TPS92641 Typ_App_Schem_desex_SNVS902.gif Figure 24. PWM Dimming Using UDIM Pin Schematic

8.2.2.1 Design Requirements

  • VIN = 48 V ± 10%
  • VLED = 3.25 V, 325-mΩ dynamic resistance
  • 10 LEDs in Series, rD = 3.25 Ω
  • ILED = 1 A
  • fSW = 500 kHz
  • VCS = 200 mV
  • ΔiLED-PP ≤ 300 mA
  • ΔVIN-PP ≤ 1.5 V
  • VTURN-ON = 40 V
  • VHYS = 15 V

8.2.2.2 Detailed Design Procedure

8.2.2.2.1 Calculate Operating Points

Calculate the operating points using Equation 28 to Equation 30, and assume approximately 90% conversion efficiency (η = 0.9).

Equation 28. TPS92640 TPS92641 desex_Vout_eq_snvs902.gif
Equation 29. TPS92640 TPS92641 desex_D_eq_snvs902.gif
Equation 30. TPS92640 TPS92641 desex_Dmax_eq_snvs902.gif

8.2.2.2.2 Output Voltage Feedback

Calculate the VOUT pin resistors by setting RVOUT2 = 10 kΩ and calculating RVOUT1.

Equation 31. TPS92640 TPS92641 desex_Rout1_eq_snvs902.gif

Choose RVOUT1 = 120 kΩ.

8.2.2.2.3 Switching Frequency

Using the values calculated above choose a value of CON = 1 nF and calculate the value of RON:

Equation 32. TPS92640 TPS92641 desex_Ron_eq_snvs902.gif

Choose the closest standard resistor value of RON = 26.1 kΩ.

8.2.2.2.4 Set the Feedback Reference and LED Current

To get a value of VCS = 200 mV VIADJ must be set to 2 V. Choose a value of RIADJ1 = 10 kΩ and solve for RIADJ2:

Equation 33. TPS92640 TPS92641 desex_Radj2_eq_snvs902.gif

Choose the standard resistor value of RIADJ2 = 19.6 kΩ and solve for RCS using Equation 34.

Equation 34. TPS92640 TPS92641 desex_Rcs_eq_snvs902.gif

RCS = 0.2 Ω is a standard resistor value.

8.2.2.2.5 Calculate the Inductor Value

Because this is a PWM dimming application, TI does not recommend much output capacitance for faster current rise and fall times, so the inductor ripple current should be close to the 300-mA peak-to-peak LED ripple current. Calculate and inductor value that will give you 350-mA peak-to-peak inductor ripple current or less:

Equation 35. TPS92640 TPS92641 desex_L_eq_snvs902.gif

Choose the standard value of L = 68 µH which results in an actual ΔiL-PP of 342 mA.

8.2.2.2.6 Calculate the Output Capacitor Value

Given the actual inductor ripple current of 342-mA peak-to-peak, use Equation 36 to calculate the required output capacitor value.

Equation 36. TPS92640 TPS92641 desex_Cout_eq_snvs902.gif

Choose COUT = 0.1 µF.

8.2.2.2.7 Calculate the MOSFET Parameters

The MOSFETs must have a minimum voltage and current rating for the application. The minimum ratings are calculated using Equation 37 and Equation 38.

Equation 37. TPS92640 TPS92641 desex_VTmax_eq_snvs902.gif
Equation 38. TPS92640 TPS92641 desex_ITmax_eq_snvs902.gif

Choose MOSFETs that have a drain-to-source voltage rating of greater than 63 V and a current rating greater than 1.26 A.

8.2.2.2.8 Calculate the Minimum Input Capacitance

The minimum input capacitance to achieve 1.5-V peak-to-peak input voltage ripple is calculated using Equation 39.

Equation 39. TPS92640 TPS92641 desex_Cin_eq_snvs902.gif

For PWM dimming applications more input voltage ripple will be present at the PWM dimming frequency. For these applications, TI recommends using 10 times the amount of minimum input capacitance or more. Choose CIN = 10 µF.

8.2.2.2.9 Undervoltage Lockout and Hysteresis

Choose a value of RUDIM1 = 100 kΩ and calculate the values of RUDIM2 and RUDIM3 using Equation 40 and Equation 41.

Equation 40. TPS92640 TPS92641 desex_Rudim2_eq_snvs902.gif
Equation 41. TPS92640 TPS92641 desex_Rudim3_eq_snvs902.gif

Choose the nearest standard resistor values of RUDIM2 = 3.32 kΩ and RUDIM3 = 19.1 kΩ.

8.2.2.3 Application Curve

TPS92640 TPS92641 UDIM_Waveform.gif Figure 25. UDIM Dimming Waveform

9 Power Supply Recommendations

Any DC output power supply may be used provided it has a high enough voltage and current range for the particular application required.

10 Layout

10.1 Layout Guidelines

The performance of any switching converter depends as much upon the layout of the PCB as the component selection. Following a few simple guidelines will maximize noise rejection and minimize the generation of EMI within the circuit.

Discontinuous currents are the most likely to generate EMI, therefore take care when routing these paths. The main path for discontinuous current in the TPS92640 and TPS92641 buck converters contain the input capacitor (CIN), the low side MOSFET (QLS), and the high side MOSFET (QHS). This loop should be kept as small as possible and the connections between all three components should be short and thick to minimize parasitic inductance. In particular, the switch node (where L, QLS and QHS connect) should be just large enough to connect the components without excessive heating from the current it carries. The current sense trace (CS pin) should be run along with a ground plane or have differential traces run for CS and ground.

In some applications, the LED or LED array can be far away (several inches or more) from the circuit, or on a separate PCB connected by a wiring harness. When an output capacitor is used and the LED array is large or separated from the rest of the converter, the output capacitor should be placed close to the LEDs to reduce the effects of parasitic inductance on the AC impedance of the capacitor.

10.2 Layout Example

TPS92640 TPS92641 Layout_snvs902.gif Figure 26. Layout Recommendation

10.3 EMI and Noise Considerations

In synchronous rectifier, the high speed gate drive signals can generate significant conducted and radiated EMI. This noise can couple with high impedance nodes of the IC and result in undesirable operation. A small (4 Ω to 10 Ω) resistors, RHG and RLG, in series with the gate drive signals are recommended to slow the slew-rate of the SW node and reduce the noise signature. They also improve the robustness of the circuit by reducing the noise coupling in to sensitive nodes such as UDIM, CS, RON and IADJ.

In other to further reduce EMI signature, good PCB layout techniques must be implemented. The loop area between the synchronous NFET, inductor and output capacitor should be minimized to reduce radiated EMI due to switching action. The trace lengths of high impedance nodes (UDIM, CS, RON and IADJ) should be minimized and shielded from switching noise. The parasitic capacitance between switching node and ground node should be minimized to reduce common mode noise. Other common layout techniques such as star ground and noise suppression using local bypass capacitors should be followed to maximize noise rejection and minimize EMI within the circuit.


Texas Instruments

© Copyright 1995-2025 Texas Instruments Incorporated. All rights reserved.
Submit documentation feedback | IMPORTANT NOTICE | Trademarks | Privacy policy | Cookie policy | Terms of use | Terms of sale